PowerPod In-Depth Review

Back this past fall the PowerPod power meter was introduced on Kickstarter and funded within a few days. It started shipping a few months later, within a week or two of their planned date (a rarity these days) in late November, and I’ve been testing it out on numerous bikes since then.
The PowerPod comes from the folks behind the iBike, though, they see the PowerPod as a new brand/product identity. With the Velocomp iBike, it was a full head unit, versus this is just the power portion that can connect to other ANT+ head units (and soon Bluetooth Smart too). This makes it far more appealing to the legions of Garmin, Polar, and Suunto fans (among many other brands) that want to use their own head units.
Of course, anytime a new power meter comes onto the market at a low price – it’ll attract all sorts of attention, mostly around accuracy (deservedly so). The PowerPod gets a bit more attention due to the nature of the device measuring power differently. Unlike a Quarq, SRM, or PowerTap (and many more brands), the PowerPod doesn’t measure power with strain gauges. Instead, it uses wind measurement and accelerometers to determine power. As such, some have argued it shouldn’t be called a ‘power meter’, but I think that’s basically just trying to be elitist. At the end of the day, the term is ‘power meter’, not ‘strain gauge power meter’. I don’t particularly care how it gets the job done, as long as it’s accurate. It can use tiny gerbils with magic wands and helmets on their heads for all I care.
Of course, accuracy is the most important thing. And if it’s not accurate 100% of the time, then it needs to be predictable as to what situations it’s not accurate in. Just like other power meters have known conditions that are challenging (be it rider, environmental, or otherwise).
So that’s what I set out to do – figure out if this sub-$300 device works, and if so – how well does it work. Let’s begin.
(Oh, and for those curious, I did indeed pay for my own PowerPod, as a backer of the original Kickstarter campaign.)
Components:
In my case, I didn’t quite get a full branded box. Rather I got a non-branded box. No worries, it’s all the same minus the outside paper shell.

Inside you’ll see what are essentially five components: PowerPod itself, micro-USB charging cable, hex-wrench, mount, and thumb screw for mount. It says ‘Limited Edition’ simply because it was one of the Kickstarter units. Aside from the red printing on the front, there’s no difference to units bought outside of Kickstarter. It just makes Kickstarter people feel warm and fuzzy inside.

The mount is a standard GoPro mounting adapter. This is awesome because it allows you to use any GoPro compatible mount that you find. Just be aware that you want sturdiness in your mount. So don’t go all willy-nilly with a plastic mount since it’ll flex.

You’ve got two screw options when you tighten the PowerPod to the mount. One is to use the standard GoPro thumb screw, or, you can use the hex wrench with a non-thumb screw. Both when properly used will get it more than tight enough, but the thumb screw is better if you plan to move the unit around a bit (or take it off quickly).

Note though that you really want the unit to stay in the same position for each bike, and part of that is the flat edge seen on the two GoPro prongs. This helps ensure it’s flat on flat, versus the more standard rounded edges of the GoPro prongs.

The PowerPod charges with a standard micro-USB charging cable – just like every cell phone on earth except the iPhone. You can plug it into any USB port on earth as well. It’s all about earthliness here.

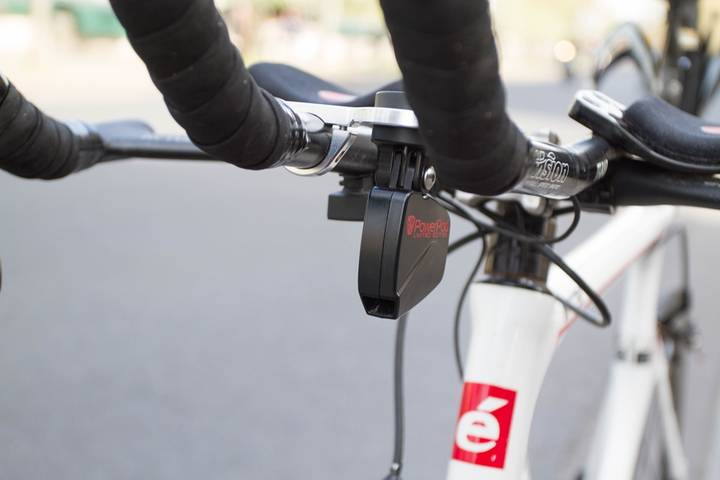
As for the PowerPod itself, you’ve got a single button and a single light. The bigger of the two white dots is the button, whereas the smaller dot is the LED light. This allows you to change modes to pairing, calibration and power it on/off.

But the most important thing here is the front wind port. This is where the magic happens. Or rather, where wind goes in to make magic happen.

This port takes in the incoming airstream and measures it, it then compares it against your speed from the ANT+ speed sensor and is able to determine power output. It also contains an incline sensor, accelerometer, and barometer. This allows it to determine pressure changes as well as elevation changes. Further, with the PowerStroke enabled it can use the sensor information to measure the barely visible shifting/tilting of each pedal stroke as you ride.
Note that while some have had issues with past Velocomp products and rain getting into the wind port, I haven’t seen that be an issue here (and I’ve definitely had rain rides). The PowerPod folks say this is because they changed the inlet port on the PowerPod to be a bit ‘uphill’, so that rain doesn’t collect there versus the perfectly flat port in the past.
Installation and Configuration:
First thing up is getting the unit mounted to your bike. It includes the mounting hardware for this, which is basically just a standard GoPro mount. Simply use the two hex screws and a wrench to secure it on. Be sure though that you place it somewhere that cabling won’t get in the way. You don’t want wind being blocked by cables that move around.

Next, you’ll need to ensure you’ve got a speed sensor (or a combo speed/cadence sensor). For now, that sensor must transmit over ANT+.

With the hardware physically installed, you’ll begin by pairing the PowerPod to the speed (or combo speed/cadence) sensor. Note that you’ll want to avoid other riders with a sensor during this pairing process, so you don’t get your wires mixed up. To start pairing, simply hold down the button (bigger white thing) for about 4-5 seconds. It’ll then blink as it finds the sensor.

Once it’s found the sensor it’ll illuminate and be ready for a brief calibration ride. For the calibration ride you just need to go out and ride 5 minutes. Ideally this would be without numerous stops or wonky terrain (i.e. cobbles). Though they say that a stoplight/sign here and there won’t kill you (and it’s true, it seems mostly fine). But I’ve had the best calibration results when it’s just clean open road.
Before you begin riding though, you’ll want to pair the unit to your head unit of choice (via ANT+). In my case, I’m using a Garmin Edge, but you can use anything that can show an ANT+ power meter. Simply go into the pairing menu and search for a new power meter.

It’ll find the unit, and you can name it as you see fit. Ignore the calibration button – it won’t do anything here for you (and PowerPod simply throws away the request from the Edge).

Instead, to calibrate we’ll head out for that ride. Now what’s cool here is that as you ride the percentage complete of the calibration ride shows on your head unit. So for that 5 minutes you won’t get your actual power value, but rather you’ll get the % complete (0 to 100). So a few seconds in it might show a value of ‘3’, meaning, 3% complete. It’s kinda brilliant.

Once it hits 100%, it’ll immediately switch over to showing your actual power output. And with that, you’re done.

It used to be with the older iBike products that you had to do an out and back course, but that’s all gone. Just ride and be done.
Note that for data recording purposes I’d recommend doing the calibration ride before starting (recording) on your Garmin, so you don’t have a weird incline mountain graph thing at the start of your ride.
With calibration complete – we’re ready to start using it day in and day out.
Basic Usage:

When it comes to using the PowerPod, most people will use it with a head unit to display power (since the unit has no display). However, you can technically use it without a head unit, as it records all rides internally for later download (see software section later).
We already paired up the unit in the previous section via ANT+ to my Edge bike computer. But it’ll work with any ANT+ head unit (Garmin, CycleOps, Mio, Wahoo, Recon Jet, older Suunto watches, and numerous others). Soon, they’ll also be releasing (likely April) the dual ANT+/Bluetooth Smart version, which will then work with Bluetooth Smart watches and head units (i.e. those from Polar, Wahoo, and newer watches from Suunto). Note though that the Bluetooth Smart version will require an ANT+ speed sensor. However, many Bluetooth Smart speed sensors these days are dual ANT+/Bluetooth Smart anyway, so that’s likely not a blocker for most.
You can name the sensor anything you’d like. In this case, I’ve just named mine to keep it simple.

After the calibration sequence, power will display on the unit in wattage, based on the data fields you’ve selected.
However, one notable thing is that by default PowerPod has what’s called ‘Dynamic Power Smoothing’ enabled, which means that they automatically smooth power numbers when in steady state riding – but then dynamically increase when you get to a sprint. While this works well, I’m not a fan of it because I like my power data ‘untouched’ when it hits my head unit.
After all, all major head units have smoothing options on them already (i.e. 3-second, 10-second, 30-second). And these options don’t ‘impact’ the recorded data. I get why PowerPod has this feature (a holdover from the iBike days when they were their own head unit too). But for me personally, I just want a clean data stream. If you want, you can easily disable it using the Isaac software:

Note that the PowerPod does not transmit or display cadence or speed values. Those will come from either your GPS (speed) or existing sensors (cadence). It just sends total power. Also, it will not send left/right power either. I wouldn’t expect it to, but just clarifying that to minimize questions on it.
From a basics standpoint, it’s pretty straightforward – it displays power as you go along like any other power meter over ANT+. Here’s a video I shot during a ride demonstrating the basics of this. In this case, Dynamic Power Smoothing was enabled:
Note that you do need to be aware of the wind port up front. It’s important that doesn’t get blocked by cabling (brakes/shifting), or anything else (a basket, handlebar streamers, action cam, etc…). I’ll show you in the accuracy section what happens if it does.
When it comes to power & charging, the unit will automatically power off after 20 minutes of inactivity, so it’ll save power. To turn it back on you’ll just tap the little button on it. The light will illuminate and you’re good to go.

Remember that because it depends on your speed sensor – if that’s missing, misaligned, or otherwise dorked up/dead, then the PowerPod won’t work. This is notable if your magnet gets slightly out of alignment and misses every few revolutions, as the numbers will impact power readings (significantly). If you were to have a mental troubleshooting step, the first one would almost always be to validate the speed sensor is happy.
The easiest way to do so is lift your rear wheel off the ground and spin it. Validate on your head unit (paired to the speed sensor) that the speed value is present, and is ‘clean’. By ‘clean’, I mean that it increases and decreases in speed smoothly, and doesn’t show any drops/jumps (indicating a missed magnet pickup).
For most people though, that sort of thing really only happens when you do maintenance on your bike, or travel with it. Or, if your bike falls over/crashes, gets extensive mud on it, etc… So it’s not something you really need to worry about day to day.
If you want to switch the unit between bikes you can do so. It supports four bike profiles, which allow you to pair to four different bike speed sensors. So you’ll want to have one speed sensor per bike, as this is how it knows which bike it’s on. You can validate/check these settings in the Isaac app, for example if you setup a new bike profile you can validate the default weight assumptions – and even retroactively fix a ride.

Note that you’ll want to be consistent in how and where you move the unit to between bikes, since positioning can affect accuracy.
Lastly – charging. To charge it you’ll just plug in a micro-USB cable into the charging port, and it’ll illuminate a red blinking light indicating it’s charging.

Note that I’d recommend picking up an ultra-long cable, or cable extender. This way you can just wheel your bike near an outlet and bring the cable to it. You can find this 3 meter (9ft) extender USB long cable on Amazon for about $6.
Plus, I find having a USB extender around the house is always useful.
Power Accuracy:

Of course – what folks really want to know is how accurate the thing is. After all, there’s been years of ‘complicated’ tensions with its predecessor. Some of those complications have been mixed with the previous head unit, versus the accuracy of unit itself. Or, they were influenced by setup and configuration aspects (which, in my opinion is still a valid complaint).
If you were to sum things up – I’d put it in the camp of: It can indeed be very accurate, but, it just takes a little more care and focus to get those results. Not excessive focus, but focus nonetheless.
We talked earlier about calibration – so for the results below I’m focused on things after calibration. I’ve picked four rides out below, all on road bikes (though, actually all on different road bikes).
All of my bikes have at least 2, if not 3-4 power meters on them (direct force power meters), such as Quarq, PowerTap pedals, PowerTap hubs, and various other units. Using only a single additional power meter makes it difficult to know who is right, and who is wrong. Yes, even the most expensive power meters out there can be wrong. Figuring out which one and when they are wrong is the hard part.

I’ll note that I did try it out on my triathlon/TT bike, but saw somewhat mixed results*. The reason there is that I didn’t/don’t have a great solid/steady mount for the PowerPod. I could place it on my aerobars, but the challenge there is that you get a bit of residual ‘bounce’/’sway’ on the aero-bars, which hoses up readings. Additionally, hand movements in that area can easily block the wind sensor. The company is aware of this limitation, and is working on getting a mount option for triathlon bikes. So until that happens, I’d stick with road bikes.
*Update Apr 23rd, 2016: PowerPod now has a dedicated TT/triathlon bike mount. See my full post on it here.
Ride 1: City & Forest Loops Ride
We’ll start out with a fairly straight forward ride. This goes through the city out to a major park nearby, where there’s roads that are closed to traffic and only available for cyclists. This route is useful because the city portion allows me to validate stop/go type activities, whereas the loops allows more steady-state riding.
Note for these graphs, like always, I’ve added a 30-second smoothing factor, otherwise you get this:

So instead, it makes it more readable, like below. Also note that the numbers you see in the upper right corner are the instant numbers at wherever my mouse is. They are not averages.

As you can see above, things in general seem to align quite well among the four power meters. Actually, there were five power meters on the bike, but my graphing tool was duplicating the color for the PowerTap G3 as well, so I removed it for now. But it mirrored the others as you’d expect from the G3.
Zooming in for a second, we’ll look at one of the sprint portions. In this case, I’ve smoothed it to a rolling 5-second average. As is pretty common on brief sprints, you’ll see power meters give fairly different results. However the PowerPod tends to overestimate them in some cases I’ve seen, like you see below (the PowerPod is the top track).

Now for this particular ride Power Smoothing was enabled, so you see a bit more ‘stability’ in the plot lines (like), especially in steady-state riding (but notice how above, it reacted instantly for the sprint). In Ride 3 sample data, I’ll show it disabled. Nonetheless, for below, while delayed due to the smoothing, it actually gets the plot line correct. Note the scale, all of these units are within a fairly tight range – very normal for power meters in multiple locations on the bike.

Here’s another random snippet from later in the ride, as I accelerate from a light, then ease up a bit, and then accelerate again. You do see that at that mid-point it doesn’t quite nail that section, going a bit low there.

In looking at the map for that ride, that section has some slightly rougher roads. Nothing I’d consider massive, but notable. This sorta speaks to some oddities I see when the road conditions change a bit.
Ride 2: Palma Majorca Mountain Ride
For this ride I did a two hour out and back section along a rather mountainous road. This route is interesting because of both the numerous climbs, but also the steep descents. Further, the winds (upwards of 20-30KPH) that changed direction depending on the rock faces I was up against. As such it helped to validate how well the unit performed in wind. For this ride I only had two power meters on, the PowerTap P1 pedals and the PowerPod – however, as you can see, they had beautiful alignment for the entire ride.

Notice that little tidbit of mis-alignment at 1:03ish? That’s a very brief rougher road section, where I saw the PowerPod spike a bit.
On this ride I had the Dynamic Power Smoothing enabled, so you see a bit of perceived ‘lag’ present for more steady-state increases/decreases. But not for sprints where it follows beautifully until I start to taper off. At which point the Dynamic Power Smoothing kicks in and shows it a bit smoother than it really was, as seen below:

Now throughout this ride the wind position was changing, as was my position (sitting up on climbs, lower down on descents). As you can see, there was no tangible impact to accuracy in doing so.
As a side note for this windy ride, it’s actually cool in that in the Isaac software you can crack open the wind analysis panel and dive into aspects such as the wind speed it measured (versus your ground speed):

While the menus and such within the app are kinda old-school, and desperately need a UI update – the underlying information is super cool, and there’s tons of items you can dig into beyond just wind speed.
Ride 3: Bois de Vincennes Loops
Next, another ride around through the city to Bois de Vincennes for loops. This time I was aiming to find some other cyclists to ride with. To begin, the overview.

If I dive down and increase the chart sampling to 5s, you’ll see the over-estimation of power as I noted a few times. In this case, Dynamic Power Smoothing is disabled.

But as I noted earlier – it doesn’t always overestimate. For example here’s another sprint a short bit later, this one a little easier, and you see that it’s much closer.

As I did loops around Bois de Vincennes, I found a small group of cyclists to latch onto. Would this impact power accuracy if I stayed in their draft zone? Nope. You can see this below:

The first portion of the above graph is me catching up to a group ahead (you see it at about 350w-400w), and then I catch up and pull back into the group, at which point I’m riding wheel on wheel without any issues or oddities in power.
The above three rides are fairly indicative of what I’ve seen repeatedly – that as long as you’ve got things setup initially correctly – you’re good to go.
Ride 4: Adjustment Ride
One challenge I’ve seen a few times is what happens if you don’t seem to get a good calibration ride initially. I’ve found that if I get a ‘clean’ calibration ride without any wonky stops/rough roads/etc, it works great. But, if I get stuck at numerous stop-signs or have weird roads, then the calibration is off, and it takes a long time to fix itself. For example, try to make sense of the ride below.

If you look carefully you’ll see that the pattern is indeed there, but it’s sluggish and not super-accurate (sometimes overshooting). But you do notice over the course of the ride that it does get closer and closer. Not accurate, but closer.
I’ve moved the unit around a lot on different bikes – mostly because I was curious how this would impact things. What I find is that unless I get that clean calibration (5 minutes worth), then the above is very much the norm. However, if I get that 5 minutes done right – then life is grand.
Now I mentioned earlier that the unit seems to ‘heal’ itself when it knows its astray. Whether that is because you’ve changed some aerodynamic element significantly, or because you’ve changed surface areas (which impacts rolling resistance assumptions). One particular example of this that I think is fun to show is the accidental placement of an action camera partially blocking the sensor. I had gone out for a ride and plopped a Garmin VIRB XE on the front K-Edge combo mount I use (combo GoPro/Garmin). It’s there, but I don’t the GoPro portion every ride.
However, what I didn’t think about when I put the camera on is that it actually blocked the wind sensor port partially (perhaps 30% blockage). Obviously, enough to totally hose up the existing aerodynamic profile. So as I started riding I saw massive power numbers – like 1,500w. Yet, over the course of 15-20 minutes, those power numbers slowly got back down to reality, and then shortly thereafter they matched the other 3-4 power meters on the bike. It was incredibly fascinating, as I didn’t change anything physically on the bike – I just kept riding. Here’s the graph below:

(Note: You see massive gaps as I was stopping and going getting photos of other things, but it’s interesting how at about the 8 minute marker you see it start to re-align, and by 12 it’s fully aligned.)
Finally, one area that doesn’t work well is cobbles. I recognize this is largely a European problem, and not so much a North American one – but, it’s a valid problem for me since my streets are littered with them. In my testing, the unit simply doesn’t produce accurate power when riding cobblestones. Within seconds of hitting such a patch of roadway, the unit pretty much shrugs and gives up. It’s like this emoticon: ¯\_(ツ)_/¯

You’ll see the power ‘fall out’ of the bottom, meaning that it just drops to a non-valid number, in my case usually about 100w.
For their part, the folks behind PowerPod say that they are aware of the issue and do plan to address it via a firmware update. They essentially need to collect lots of cobblestone data to understand how to interpret it (they record data at 800 times a second, so sampling isn’t the issue). But they lack the cobbles of Roubaix in Florida (where they are based), making the task slightly more difficult.
As for rougher ground that’s not cobbles, I’ve seen somewhat mixed results. In most cases I have no issues, but in some semi-rare scenarios I see similar ‘dropping’ patterns. I know that others have had success here in often challenging chip roads seen through much of the southern US – so perhaps it’s something with my particular roads that causes this.
Finally – you can find all the files I’ve used in this section here in this Zip folder, for those that want to do their own analysis.
Advanced Software Features:
The PowerPod doesn’t need any software configuration by itself to work. However, you can actually do quite a bit of configuration with their Isaac application. That app is a holdover from the iBike side of the house. But since the PowerPod software-wise looks and acts like a Newton, the app works with it as well. There’s boatloads of options here – and while I can’t cover all of them, I’m going to pick out some of my favorites.
To use the software, you’ll simply connect the unit via micro-USB cable to your computer. You can then download all rides this way. Every ride you take/make is recorded. So it’s easy to download them later.

Next up is the ability to really dial down your specific settings on the unit. Things like your weight, bike weight, and even rolling resistance if known:

Next, if you have an existing power meter, you can take a given ride’s data and basically use that profile in conjunction with the PowerPod ride data to ‘correct’ the PowerPod data for future rides. Think of it like a full-ride calibration sequence. It’s really rather cool.

Of course, if you already have a power meter on your bike, then it’s unlikely you’re going to use a PowerPod too. And it’s not as though you can then move the PowerPod to another bike – since that would throw away the calibration profile for that bike. But perhaps if a friend loaned you a pair of power meter pedals, that might be good enough.
The software is chock full of analysis that you can do, from aerodynamics results to rolling resistance details. Over the years many have noted that you could start to do some pretty interesting analysis if you had a PowerPod combined with a traditional power meter. You’d use the PowerPod for the aerodynamic data stream, and the power meter as the ‘known truth in changing aerodynamic positions’. The software supports these types of comparisons:

Speaking of which, the PowerPod folks note that they’d love to be able to transmit the PowerPod aerodynamic data out over ANT+ (or Bluetooth Smart) in a standard way, if such a profile existed. Today, no such ANT+ profile exists for aerodynamic data, so they’d have to do it in a private way (less appealing). But with Garmin Connect IQ supporting private ANT data streams, it’d be straightforward for the PowerPod development team to start transmitting aerodynamic data to your watch (which Connect IQ will start recording on certain devices by the end of the month). And even without recording, they could display real-time aerodynamic feedback as you make position changes out on the bike. Pretty fascinating stuff – but at this point the PowerPod folks are awaiting whether there is demand for it.
Lastly, there’s PowerStroke. This allows you to do analysis of your cycling stroke. Essentially, analyzing which areas of the stroke your power comes from. To enable this, you’ll need to buy their upgraded software package ($99, or was $49 for Kickstarter backers). It’s basically a software unlock option (just as it was on Newton). Note that you will need a cadence sensor with it.
Once unlocked, you’ll head out and ride like normal. Afterwards, you’ll go ahead and be able to download the information using the Isaac software. You’ll start by specifying where the cadence sensor was, as it needs that information to accurately determine stroke information.

From there, you can slice and dice up your ride and look at the whole of it, or just portions. You can see the top portion is showing wasted motion (mostly side to side) within my riding. While the bottom is showing the actual pedal stroke.

Note that this is NOT Garmin Cycling Dynamics (however similar it may be in certain aspects). Nor can it transmit said data to Garmin Cycling Dynamics. That’s because Garmin makes that profile private (private ANT), versus a public profile. Said differently: It’s not because PowerPod doesn’t want it (or 4iiii or PowerTap or ROTOR or Brim Brothers or whomever), but because Garmin doesn’t want it (and because ANT+ hasn’t enabled an open profile for it).
Still, it’s interesting data to analyze. At this time I don’t have a Garmin Vector set with Cycling Dynamics (or Pioneer Power meter with their similar metrics) on any of my bikes to compare the differences though, so the closest I can get is simple left/right balance with something like the PowerTap P1’s – but that’s not really measuring the same thing.
For those curious – I am a fan of reducing the hardware cost of devices, and allowing users to ‘buy-up’ software options that appeal to them, when they want them. While I think $99 is a bit high for this functionality (I thought $49 was rather fair), I still like the idea of being able to purchase features I want on the fly. I’d love to see the major watch vendors adopt this strategy for more inexpensive watches, allowing users to unlock features at a premium.
A quick note on trainers and the PowerPod. The unit both does and doesn’t work on trainers. It works by using a known power curve for a given trainer, and then taking the wheel speed and re-transmitting out your power value. You’d specify the trainer within the Isaac software:

As you can see – there’s quite a nice list of them. However the majority of them do require some sort of fluid trainer, or if a mag trainer to have a known resistance setting. You can see this below in which profile you choose:

This is virtually identical to how apps like TrainerRoad, PerfPro, Zwift and others work: Known power curves. Any given speed gives you a specific power level. The challenge with this is that it’s not quite precise unless there is a calibration procedure that takes into account your tire pressure. If you use the same tire pressure and the same number of turns of the knob each time it’ll at least be consistent (but may be offset).
Triathlon/TT Bike Combo Garmin Mount:
Section added April 23rd, 2016
PowerPod has released a combination mount for triathlon/TT bikes that holds both the PowerPod and a Garmin device (quarter-turn mount). Alternatively, the PowerPod mount can also be used to hold a GoPro, or other GoPro mount compatible item (i.e. Cycliq Fly12, Garmin VIRB X/XE, etc…). Obviously, if it’s holding something else, then it can’t be holding the PowerPod. still, it gives you flexibility.
I’ve written an entire separate post on the product, which you can read here. It runs $59, so a bit on the higher end. But it is machined aluminum and made in the USA by a small boutique mount company that typically does stuff for pro cycling teams. On the flipside, it’s perhaps a touch bulkier than the newly released BarFly TT/triathlon combo mount. But since that’s plastic, it may have more flex than the PowerPod mount design, which could introduce accuracy issues with the PowerPod (I haven’t tested that mount yet though).
Summary:

Overall, I’ve found that the PowerPod can be solidly accurate in most situations, assuming you are aware of the limitations – or aware of changes to configuration that could impact it. Further, it’s ability to seemingly ‘heal’ itself does act as a bit of a safety net should the aerodynamic profile change significantly enough to otherwise impact power readers. I’d sum it up as: If you do a clean calibration ride – things are impressively accurate across a wide range of riding environments and positions.
At $299, it’s somewhat right on the border of the price scales. I think at $249 or even $199 – it’d be a runaway winner. But at $299, it gets awfully close to 4iiii selling their Precision (left-side only) for $399. Of course, left-only power meters have limitations too, but I’d say in general there are less limitations there than with the PowerPod. On the flip side, the PowerPod can generate some fascinating aerodynamic data that if used properly could really do some interesting position analysis. Also, the PowerPod is more movable than the 4iiii unit, which is glued to your crank arm.
And what about comparing to the $99 PowerTap PowerCal? I see better accuracy with the PowerPod than the PowerCal. The PowerCal is great for ride total averages and longer durations, but it’ll struggle a bit on very short intensity efforts. On the flip side, it does include heart rate data – so it’s not a bad option if you’re really just looking for generalizations.
Now some of you already have a power meter, and I think that’s where PowerPod could really be fascinating if they enable real-time broadcasting of aerodynamic metrics. The combining of a direct force power meter with the PowerPod really gets you the best of all worlds, but the only realistic way to evaluate changes to position is to see them real-time on the bike while riding. Such changes are often as minor as moving hands a few millimeters, so you need to see and feel what they look like, and not have to wonder if it’s different on the next ride.
Finally – I think the direction the company is taking overall with shifting away from head units is very compelling. Especially if their manufacturing costs allow them to reduce the price of the unit a bit more and appeal to more people (at both ends of the rider tech spectrum, advanced and entry). With that – thanks for reading!
Wanna save 10%? Or found this review useful? Read on!

Hopefully you found this review useful. At the end of the day, I’m an athlete just like you looking for the most detail possible on a new purchase – so my review is written from the standpoint of how I used the device. The reviews generally take a lot of hours to put together, so it’s a fair bit of work (and labor of love). As you probably noticed by looking below, I also take time to answer all the questions posted in the comments – and there’s quite a bit of detail in there as well.
I’ve partnered with Clever Training to offer all DC Rainmaker readers an exclusive 10% discount across the board on all products (except clearance items). You can pickup the PowerPod from Clever Training. Then receive 10% off of everything in your cart by adding code DCR10BTF at checkout. By doing so, you not only support the site (and all the work I do here) – but you also get a sweet discount. And, since this item is more than $75, you get free US shipping as well.
PowerPod (select drop-down for ANT+ or ANT+/BLE version)
PowerPod TT/Triathlon Combo Garmin Mount
Additionally, you can also use Amazon to purchase the unit (though, no discount on Amazon). Or, anything else you pickup on Amazon helps support the site as well (socks, laundry detergent, cowbells). If you’re outside the US, I’ve got links to all of the major individual country Amazon stores on the sidebar towards the top. Though, Clever Training also ships there too and you get the 10% discount.
Thanks for reading!