Polar RCX3 In-Depth Review

The Polar RCX3 was announced a little over a month ago, though, the unit won’t be available until this summer. The RCX3 is designed to be the RCX5’s younger sibling. A bit cheaper, though with fewer features. It’s a clean and slim watch that easily hooks up with the majority of the Polar accessories out on the market today. But how does it test out in day to day use? And perhaps more importantly – how does it rank against other watches in the marketplace?
Like all my reviews, they tend to be pretty in depth (perhaps overly so) – but that’s just my trademark DC Rainmaker way of doing things. Think of them more like reference guides than quick and easy summaries. I try and cover every conceivable thing you might do with the device and then poke at it a bit more. My goal is to leave no stone unturned – both the good and the bad.
Because I want to be transparent about my reviews, this unit was provided by Polar as a media trial. It’s technically a prototype unit – though I’ve ben told it should be the same as the final production units. Once I’m done with it, it heads back to Polar. Simple as that. Sorta like hiking in wilderness trails – leave only footprints. If you find my review useful, you can use any of the Amazon links from this page to help support future reviews.
Lastly, at the end of the day keep in mind I’m just like any other regular triathlete out there. I write these reviews because I’m inherently a curious person with a technology background (my day job), and thus I try and be as complete as I can. But, if I’ve missed something or if you spot something that doesn’t quite jive – just let me know and I’ll be happy to get it all sorted out. Also, because the technology world constantly changes, I try and go back and update these reviews as new features and functionality are added – or if bugs are fixed.
With that, let’s get onto the review!
Unboxing and Components:
Because the Polar RCX3 isn’t quite available at retailers yet, the outer box and packaging I received may differ slightly from the the final version that will arrive in stores in June and July. However, functionally, the products themselves won’t be any different. So, let’s dig into it!

No matter which package you picked up, you’ll have the RCX3 itself sitting in the box. If you bought the men’s version, it’ll be black – and if you bought the women’s version it’ll be white.

All of the packages include the Polar WearLink heart rate strap (the transmitter you see above). The actual strap comes bundled up, like below:

You’ll simply unfold it, and then snap in the transmitter pod.

Now, the next few features will again depend on which package you bought. If you picked up the G5 GPS pod, it’ll look like the below – which shows the micro-USB charging cable plugged in:

The G5 GPS pod is fairly small, smaller than a business card:

Though, once you apply the included armband, its bulk and size increase a fair bit:

We’ll dig into the G5 GPS pod a bit more later on.
Next up we have the S3+ footpod, for those that want to measure running speed/distance either without a GPS pod, or while indoors:


Then we have the cycling speed sensor, which is included in the RCX3 Bike package. This allows you to measure speed/distance on the bike without the GPS sensor.

And finally, the USB Datalink, which enables you to download completed workouts from the RCX3 to your computer.

With that, let’s see how things stack-up size wise:
Comparison Shots:
Without question, the RCX3 is the slimmest and smallest connected fitness watch that I’ve seen to date (that’s been produced, some other companies have claimed smaller units but not actually produced them yet). This is especially evident when you plop it on the rolling pin against other watches in its category:


The watch is physically slightly smaller (width and depth) than the RCX5 – the unit which the RCX3 is based on. And also just a touch bit smaller than the FR70 (the pink one to the right).

It’s interesting to note the differences in the watch band between the men’s and women’s RCX3 variants, with the women’s variant having a much slimmer though slightly chunkier band. Meanwhile, the men’s band is thinner, but a bit wider.

Note that both men’s and women’s units have the exact same dimensions of the watch unit itself, it’s merely that the bands are slightly different:

Finally, here’s a couple quick photos on my wrist:


Running:
Once you’re ready to start running with the RCX3, you’ll need to ensure that the RCX3 is either paired with the G5 GPS pod, or the footpod. Otherwise, distance and speed calculations will be absent.

While I’ve run with both sensor types during the testing of the RCX3, I prefer the GPS pod simply because I have to worry less about accuracy in most cases.
Given that, you’ll want to turn on the GPS pod and give it a moment to find satellite coverage. Once the light is green, you’re good to go from a GPS reception standpoint. Then, you’ll go ahead and press the big red lower red button on your watch to connect to tell it which sport to use (Running). At which point, it’ll go ahead and start looking for your connected accessories. In my case, that’s the GPS pod and heart rate strap. Once ready, you’ll see checkmarks over both:

With that – it’s time to begin running!

As you run, you’ll see you have upwards of five data pages (dependent on how many sensors you have connected). Each data page has a label on it that displays briefly before you see that page. The labels can be turned on/off, and you can change the data page your viewing by pressing the up/down button:

The metrics displayed on the data pages themselves cannot be changed, though there’s quite a few of them and I was able to pretty much cover all the major fields that I use, including lap time/distance, overall time/distance, heart rate (BPM or %MAX), HR zones, and pace.

In addition, the unit supports the ability to turn on auto-lap functionality, which will automatically trigger a lap marker at set intervals. For long runs, I typically set this as every 1-mile. But for interval runs, I tend to do this manually just by pressing the lap button.


You can press the lap button at any time to demark a lap. Normally I do this when I’m changing into a different portion of a structured workout – such as from the warm-up to the next piece.
If you come upon an intersection (or simply the ice cream truck) you can press the back button (lower left) to pause the unit. Once ready to begin, you’ll simply press the red button to continue. Oddly enough, I did actually see the ice cream truck last week (first week of April!) during one of my runs. Crazy!

If you were to press the back button again, it would end the run – marking it as complete and then moving into the summary section:

The summary section displays a handful of metrics about the run, though you can view more in the history piece instead. The history portion of the watch (officially just called ‘Data’), allows you to view breakdowns by week, day and activity:


Then, for each activity, you can view totals:

Of course, at the end of the day – if you bought the RCX3, it’s likely because you’re planning on downloading data to the computer, so that’s ultimately where you’ll want to do most of your analysis.
Indoors on a treadmill you’ll want to utilize the Polar S3+ footpod in order to gather distance and speed data. It’s the one to the left.

Be sure however to calibrate it first, otherwise the distance won’t be terribly accurate. While indoors you’ll get all the same data fields as outdoors, assuming you have the footpod. Otherwise the RCX3 will automatically adjust the data fields to be primarily time and heart rate driven.

Cycling:
The RCX3 contains a cycling mode, which enables you to display performance data in views and formats more applicable to cycling – such as MPH instead of minutes per mile. Additionally, in this mode you can connect to cycling-specific sensors such as the Polar Speed sensor and Polar Cadence sensor.

While in cycling mode you have the option to specify configurations on two bikes (Bike 1 and Bike 2), which can then be tied to settings such as sensors (i.e. whether or not the bike has a speed/cadence sensor).

To get into bike mode, you’ll simply press the red button to indicate you want to start an activity. At this point, you’ll scroll up/down to Cycling. Once that is selected, the watch will search for the sensors that you have previously paired. In cycling mode this includes heart rate, GPS, speed, and cadence sensors.

Once the unit has found all paired sensors you’ll be given the OK to start riding, which is represented by check boxes over each sensor on the display.

If you have the speed sensor paired, you can also enable auto-start, which will automatically start the unit when it detects the wheel rolling. This is not however available with solely the GPS pod.

Because the RCX3 doesn’t have any form of removable band, you’ll want to either wear it on your wrist, or mount it to a bike mount. Polar makes a zip-tie bike mount which you can strap onto your handlebars. However, I prefer some of the other rubber bike mounts that cost about $10, because they can be easily moved bike to bike without zipties. Plus, I find their location placement a bit more flexible.

Once on the bike you’ll have a variable number of data fields depending on both sensors enabled as well as heart rate zone settings configured. In a maximum configuration you’ll have seven data pages, each with up to three data fields of information.
In the below example, you can see I’ve got one of the first training fields with average speed, another with the current time, and the last with the current lap timer (30 minutes):

While cycling, you’ll want to select either the speed sensor or the GPS pod for distance measurement. In my case, if outdoors I’ll generally use the G5 GPS pod.
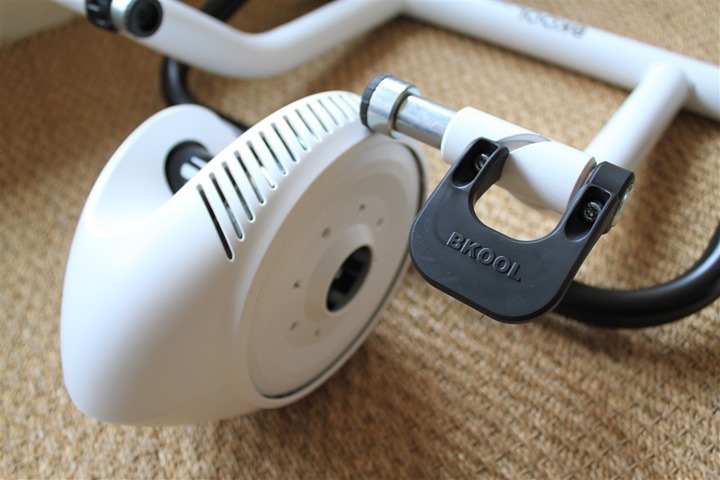
The RCX3 can also be used indoors with the Polar W.I.N.D. speed sensor. With this sensor, the unit will report speed & distance on a trainer. This is also useful outdoors in places where GPS coverage may be a challenge (i.e. mountain biking in dense tree coverage).

Note however that the speed sensor is not required to use the RCX3 indoors while cycling, but is required if you want speed/distance data to be displayed/recorded. From a purely technical training standpoint – speed and distance on a trainer is not terribly valuable/accurate since they can easily be modified by changing gears/cadence/resistance – which may not have any direct impact on your perceived effort. In other words, I can change my speed from 12MPH to 30MPH without changing how hard I’m working, merely by changing gearing and cadence.

Finally, cadence data is available through the Polar W.I.N.D. Cadence sensor. This sensor will measure cycling cadence, which is represented in revolutions per minute (RPM) and is based on how many times a given crank arm passes the cadence sensor (usually located on your frame next to the rear wheel). The crank arm is where your pedal attaches, and ultimately where your shoe attaches (and your leg).

Cadence data is available on the RCX3 display field if/when the RCX3 is paired to the cadence sensor. It’s also available within the activity summary/history information on the unit.
After uploading, cadence data is available online through Polar Personal Trainer:

I’ll talk about Polar Personal Trainer later on in a section dedicated to it, toward the end of the review.
Other Sports:
The RCX3 supports an ‘other sports’ mode, which can be utilized for tracking either heart rate data, or data dependent on GPS-provided speed. The ‘Other’ mode supports using either of those sensors. Or, alternatively, you can simply use it as a defacto timer mode.
You can configure settings within the other mode, similar to how you configure settings in either swim or bike. You cannot however pair to either the bike or running speed/cadence sensors.
The other mode is a good mode to use if you want to record sports such as swimming, which doesn’t have a specific sport mode for them in the RCX3. Note however (as I talk about below in the waterproofing section), that the default strap included within the RCX3 package while waterproof, will not transmit through water.
Data recorded in the other mode gets transmitted to PPT like any other activity, with the only difference being the default logo icon is a little person standing, as opposed to a cyclist or runner.

You can however change the sport type based on the sports you’ve defined in the settings of your account. The control panel offers a fair number of little icons that you can tie to a given sport of your naming. For example, I created the Kayaking sport:

I also created the Dodgeball sport:

Data-wise though, once the data is on PPT, it functions the same regardless of what you call the sport. And if you change it via the drop-down above, it’ll also change the icon within the activity.
GPS Accuracy:
The RCX3 itself does not actually contain any distance measuring technology. Rather, you must pair it to either a speed sensor (running or cycling), or a GPS sensor. All these sensors are external to the watch. In the case of the cycling speed sensor, the sensor magnet mounted on your bike to either your rear or front wheel (I recommend rear wheel so it works on your trainer). If you’re a runner, you’d need the running footpod (or GPS).
In the case of runners, be aware that footpod data always overwrites GPS data, and one cannot separate cadence-only from the footpod without also taking the speed/distance data.

Above is the G5 GPS pod. This allows you to measure distance and speed, regardless of activity type – as long as its outdoors.

The GPS pod is charged via micro-USB cable (similar to many cell phones these days). It takes about an hour to charge, and is designed to last about 20hrs on a single charge. This is interesting to note as most competitive watches with GPS integrated last between 8-10hrs for sub-$200 watches, and 15-20hrs for $300-$400 watches. However, the RCX3 itself (not the GPS pod) will last closer to a year on a single user replaceable battery. In fact, this is pretty much the primary draw of many of the Polar watches, where you don’t need to charge the watch battery itself for extended periods of time.

I’ve gone on a number of runs now, and the biggest item of note for me has been that if you have both the footpod and the GPS pod connected (paired), the footpod will take precedence over GPS for speed/distance. This can be somewhat troubling if you’d prefer that to come from GPS (and just want cadence from the footpod). Unfortunately, there is no method to choose which data source to use, and is similar to how the RCX5 works.
That said, when using just the GPS data source, I found the data consistently…well…consistent, with other GPS watches anyway. I’ll be doing my 2012 Accuracy Test roundup here in the coming months, but given I tested the G5 GPS pod last fall with the RCX5 (and it scored excellent), I don’t expect any changes here.
Nonetheless, here’s the result from a recent run – showing the two units are virtually identical:

On a recent bike ride, I got a bit more variation, but still within the 2-4% GPS limits.

Overall, I continue to recommend GPS over footpod data for the majority of users. Footpods when calibrated correctly can be incredibly accurate (even across a broad range of paces) – however ensuring that calibration remains accurate over time can be challenging for many folks. Further, the Polar footpod is unfortunately the size of a Twinkie (though, not as appealing). Thus, it’s a bit of a fashion killer
Waterproofing:
The RCX3 is waterproofed to 30 meters. Folks often get tangled up in the meanings of waterproof ratings and sport watches. And it’s understandable, they can be confusing. This comes from the fact that while there are some specific waterproof standards out there, very few companies follow the guidance formally, and even fewer publish exactly which (if any) specification they followed. But when it comes to athletic sport devices, I tend to take the opinion that if the unit shows a given depth on it deeper than 1 meter, it’s good enough to swim with. I wouldn’t necessarily dive with said units (though, I have), but for swimming, your safe. (Unless it specifies otherwise in the manual). Ultimately if a unit says it’s good for swimming and then dies, I’ll argue with the company/retailer until the cows come home about it being defective.
The RCX3 is safe for swimming, and waterproofed to 30 meters. It will not however record or display heart rate data in the water with the strap included with it in the box. You can see in the below two photos how at close range while underwater the unit displays the HR just fine:

But as I move more than a few inches away, the HR data drops out.

Polar does offer the T-31 coded straps though, which do transmit in the water to most Polar watches, including the RCX3. [Update] Unfortunately however, the production model of the RCX3 does not support the side of the protocol on these straps required to work underwater. You’ll need the RCX5 for these. You can see my display of this within the RCX5 review.
Night/BackLight:
The RCX3 includes a basic backlight that illuminates the display for 10 seconds, before automatically turning off.

The display backlight cannot be changed (either in time or brightness). It’s not quite as bright as many units on the market today, but that’s a bit of a trade-off with the use of a CR2025 coin cell battery that doesn’t need frequent charging.
Data Fields and Unit Types:
The RCX3 contains non-user customizable data pages which automatically modify themselves based on the sensors paired to them. For example, if you have the heart rate strap paired to the unit, you’ll have certain data fields displayed (namely, heart rate data), whereas if the strap isn’t paired those pages and data fields tied to heart rate won’t display.

In total there can be upwards of 7 data pages that are displayed on the RCX3, with up to 3 lines (data fields) per data page. These data fields are also variable based on the sport and unit type displayed. For example, during running, you’ll see speed displayed as “minutes per mile”, rather than MPH:

Meanwhile, in running, you’ll see the inverse. This can be controlled individually for each sport, as well as ‘other’.
If you’re of the metric persuasion, you can change the entire watch to show data in kilometers rather than miles. This is done via the general sport settings:

Once in metric mode, it will also take your weight in kilograms rather than pounds. And during running you’ll see speed as “minutes per kilometer”, and cycling will be KPH (Kilometers per hour).
Download Data to Computer:

The RCX3 includes the ability to download to your computer, and then to Polar’s online site. To do so, you’ll need the USB Datalink accessory, which comes with some of the RCX3 packages – though not all.
Once you’ve got it plugged in, you’ll want to download the latest version of the Polar WebSync software. As of this writing, it’s of the February 2012 vintage (well, actually, since it’s a page in Finland, it’s probably of the April 2012 vintage):

Once downloaded, you’ll go ahead and pair your computer to the watch. This requires having the watch handy, so you can confirm the pairing with the computer. From here on out, it can automatically synchronize data without further prompting.


The data upload process is fairly quick – generally about 10 seconds per activity, depending on the length and data sensor types:


Once the unit is done uploading to the computer (and thus to PolarPersonalTrainer.com), it can be configured to automatically open the website for you – ready to analyze your data.
PolarPersonalTrainer.com:
After the data is uploaded to PolarPersonalTrainer.com (which, I’ll just abbreviate here at PPT), you’ll see it displayed on the page page:

I’ll go ahead and dive into one of my activities to give you a better view of things. Let’s go with one of my runs first. Once you click on ‘Training Result’, I’m brought to this page:

The above was done on a treadmill, as part of an incline workout. Though, the footpod was not correctly calibrated for this particular run (showing about 2/min/mile slow), but I selected it for the screenshot above because of the broad range of heart rate zones. You can see how the time in zones is displayed on the right side.
If I then click on the ‘Benefit’ tab, you’ll see a new ‘Training Benefits’ feature in the RCX3 that shows you mapping of Polar zones to my given workout, as well as total time in zones. It also gives me qualitative feedback on how this workout was valuable (text block at the top).

If I was looking at a bike ride with GPS data, the overall page is pretty similar – except there is now a map leveraging Google Maps. In this case, I wasn’t wearing a HR strap (it was a bike commute to work), but the data is inclusive of speed/map data via the G5 GPS pod:

You’ll notice that on the main page there’s a settings button, which allows me to also add in cadence data as well to the graph – since I had the cadence pod on:

If I click the data page, I’m brought to an overall data summary of my workout. I can modify these values if I don’t feel like they reflect reality.

Below each activity the ‘splits’ are displayed. These can be either auto-generated splits based on settings in the watch, or manual splits by pressing the red button:

Finally, PPT include a number of summary, and overall training log features. For example, I can see all my entries into PPT and then drill down into a variety of charts and graphs based on total data and trending:

Additionally, the site also features running programs for popular distances, based on parameters that you provide around heart rate zones (it can help you here), previous experience, current running frequency and more:

Once it’s done, it’ll spit out workouts for you to follow and print out via a calendar:

Overall, PPT is a good resource for basic data needs. It doesn’t include deep data analysis, but for most customers of the RCX3, it covers the expected data display requirements and also provides some cool training plan options and recommendations.
Accessories:
Polar already boasts a pretty established line-up of accessories, almost all of which the RCX3 can use without issue. I’ve divided up the different accessory types below.
Heart Rate Straps
The RCX3 packages come with the Polar WearLink HR strap, which is compatible with not only the Polar RCX3 – but also numerous other Polar units.

After you’ve paired the HR strap with the unit, you’ll see the data not only on the watch itself in real-time, but also later on, on the Polar training log site:

It should be noted that the standard WearLink W.I.N.D. strap won’t work in the water measuring HR.
G5 GPS Pod:
One of the RCX3 packages being released includes the new G5 GPS pod. This smaller GPS pod is about the size of a few sticks of gum. The pod comes with an arm band that you can wear, giving it clear GPS reception and signal to the watch:

I’ve had good luck placing the GPS pod other places – such as in a pocket on my running shorts, as well as in a fuel belt I was running with. I also have cycled just throwing it in a backpack (commuter cycling), without any issues.
The G5 GPS pod is charged via a standard Micro-USB connector:

Speed Sensor (Cycling):
The RCX3 is compatible with the Polar W.I.N.D. cycling speed sensor, which enables you to gather speed data both inside and outside, when not using the GPS pod to gather that data.

The speed sensor utilizes a small pod that you attach to your bike frame near either your front or rear wheel. While the manual recommends the front wheel, that’s pretty much useless on an indoor trainer (since it stays still) – so I go with the rear wheel instead.
You then place a small spoke magnet on the wheel that triggers each time the spoke passes the magnetic sensor. This in turn wirelessly transmits to the RCX3. On the RCX3 you simply configure the wheel circumference, which allows it to in turn determine speed and distance:

This is the same speed sensor that’s used with existing Polar units, so if you already have it – no worries on picking up a new one. It should be noted that this is not compatible with Garmin ANT+ speed/cadence sensors, as it uses Polar’s W.I.N.D. technology.
Cadence Sensor (Cycling):
Polar’s W.I.N.D. based cadence sensor allows you to gather cadence data while cycling. This is measured in RPM’s (Revolutions Per Minute) and is based on the number of times the crank arm passes the sensor. The crank arm is where your pedal attaches to (and thus, where your shoe attaches to the pedal).

Typically cyclists aim for about 95RPM, however, recent research is showing that a self selected cadence tends to work out best for most athletes. Nonetheless, no matter how you train, the Polar cadence sensor allows you to capture that data and analyze it later on. This works well both inside and outside.
It should be noted that this is not compatible with Garmin ANT+ speed/cadence sensors, as it uses Polar’s W.I.N.D. technology.
s3+ Footpod Sensor (Running):
The RCX3 is compatible with the s3+ footpod, which allows you to track pace/distance while indoors (or outside), as well as providing foot turnover (cadence) data.


The footpod simply attaches to your shoe and once calibrated is pretty much good to go for life.

And like the other sensors, it should be noted that this is not compatible with Garmin ANT+ shoe footpod sensors, as the Polar s3+ uses Polar’s W.I.N.D. technology instead of ANT+. As a point of reference though, I have found that both sensor brands track equally as well on their respective devices however.
Bike Mount Kit (Cycling):
Finally, you can purchase the standard Polar bike mount kit, which enables you to wrap the watch around the mount – allowing easy viewing while cycling. Here’s the mount:

It simply attaches via zip ties to just about anywhere with a slightly curved surface:

From there you’ll wrap the watch band around it as if it were your wrist, at which point, you’re ready to roll!
Power Meter Support:
It should be noted that at this time the RCX3 is not compatible with either the legacy Polar W.I.N.D. chain stay driven power meter, nor the newer and upcoming Keo Polar/Look pedal based power meters. There are no plans to introduce compatibility with the RCX3.
Competitive Unit/Watch Comparisons:
The RCX3 is indeed a great little watch, with the strong backbone of the Polar brand. However, I can’t help but notice that the price point just doesn’t align to the realities of the market and competitors today. Let’s look at the different packages:
– RCX3 Base (RCX3, HR Strap): $220 (Available late July 2012)
– RCX3 Run (RCX3, HR Strap, Footpod, and Datalink): $310 (Available June 2012)
– RCX3 GPS (RCX3, HR Strap, G5 GPS, Datalink): $340 (Available June 2012)
– RCX3 Bike (RCX3, HR Strap, Bike Speed Sensor, bike mount): $250 (Available late July 2012)
(Note that all of the above MSRPs and may change between now and then)
The base offering at $220 includes the HR strap, but no method of recording speed/distance in any sport, nor any way to get data off the watch. There are half a dozen units at prices $30-$100 cheaper that perform everything above (speed/distance/GPS) and download to the computer. And at the high price range/end, with the RCX3 GPS at $340 also continues to lag behind the sub-$200 watches from a feature standpoint (i.e. intervals, data field customization, etc…). And in the case of some of the newer entrants (i.e. Motorola), the disparity is even further from a feature set (though, the Motoactv suffers some waterproofing issues).
However, the RCX3 does have one unique differentiator: Battery life.
The RCX3 is designed to operate on a single coin cell battery for a heck of a long time (close to a year). And, it does that well. For those that don’t want to re-charge their watch battery frequently, this is definitely the watch to go to.
But, it should be noted that many of the slimmer GPS watches out there today can operate in ‘watch’ mode for upwards of 4-6 weeks – quite a bit of time for most folks.
Here’s a comparison chart of the watches that I believe most compare functionality-wise to the RCX3. Note that this was a bit challenging because the RCX3 functionality-wise compares best with sub-$200 GPS watches, but price-wise compares with the high end $300-500US GPS watches. Thus, given I focus on features and functionality (and noted prices in a single line), I’m going to focus on functionality for this chart.
Copyright DC Rainmaker – Updated May 19th, 2017 @ 6:13 pmNew Window
Price$170.00$369$149-$299 (Features Vary)$219$249
Product Announcement DateMar 19, 2012Sept 7th, 2016Sept 1st, 2016May 16th, 2016Feb 19th, 2016
Actual Availability/Shipping DateJune 2012Sept 16th, 2016Sept 8th, 2016Expected June 2016Q2 2016
GPS Recording FunctionalitySeparate GPS PodYesYesYesYes
Data TransferWINDBluetooth SmartUSB/Bluetooth SmartBluetooth Smart, USBUSB, BLUETOOTH SMART
WaterproofingYes50m50m50m50 meters
Battery Life (GPS)1 year (GPS separate)5hrs GPS on time (24-48hrs standby)Up to 11 hours (varies)8 hours13 hours GPS on
Recording IntervalAdjustableVaries1sSmart RecordingSmart Recording
Satellite Pre-Loading via ComputerNoYes3 daysYesYes
Quick Satellite ReceptionGood via GPS PodGreatYesYesYes
AlertsSound/VisualVibration/Audio/VisualVIBRATE/SOUND/VISUALVibration/VisualVibrate/Visual
Backlight GreatnessGoodGreatGreatOKGood
Ability to download custom apps to unit/deviceNoYesNoNoYes
Acts as daily activity monitor (steps, etc…)NoYesYesYesYes
Can control phone musicYesNoYesYes
Has music storage and playbackYesYesNoNo
Bluetooth Legacy (pre-4.0) to PhoneNoNoNoNoNo
Bluetooth Smart (4.0+) to Phone UploadingNoYesYesYesYes
Phone Notifications to unit (i.e. texts/calls/etc…)NoYesYesYesYes
Live Tracking (streaming location to website)NoNoNoYes
Group trackingNoNoNo
Emergency/SOS Message Notification (from watch to contacts)NoNoNoNoNo
Built-in cellular chip (no phone required)NoNoNoNoNo
Designed for cyclingYesSortaYesNoYes
Power Meter CapableNoNoNoNoWith some Connect IQ apps (but cannot record data)
Power Meter Configuration/Calibration OptionsN/AN/AN/ANON/A
Power Meter TSS/NP/IFN/AN/AN/ANoN/A
Speed/Cadence Sensor CapableYesN/AYesNoYes
Strava segments live on deviceWith Strava appNoNoNo
Crash detectionNoNoNo
Designed for runningYesYesyesYesYes
Footpod Capable (For treadmills)YesNo (can use accellerometer though)No (Can use internal accelerometer)No (uses internal accelerometer)YES (Also has INTERNAL ACCELEROMETER)
Running Dynamics (vertical oscillation, ground contact time, etc…)NoNoNoNoNo
VO2Max EstimationYesNonONoNo
Race PredictorNononONoNo
Recovery AdvisorYesNononONo
Run/Walk ModeNoNonoYesYes
Designed for swimmingNoYesYesNoYes
Openwater swimming modeN/AYesNoNoNo
Lap/Indoor Distance TrackingN/AYesNoN/AYes
Record HR underwaterNoYesNO (NOT ENABLED IN SWIM MODE)N/ANo
Openwater Metrics (Stroke/etc.)N/ABasic stryoke type onlyNoN/ANo
Indoor Metrics (Stroke/etc.)N/ABasic stryoke type onlyYesN/AYes
Indoor Drill ModeN/ANoNoN/ANo
Indoor auto-pause featureN/ANoNoN/ANo
Change pool sizeN/AYes15m-50mN/AYes
Indoor Min/Max Pool LengthsN/A1y/m to 1,500y/m+YesN/A17M/18Y TO 150Y/M
Ability to customize data fieldsN/AVery limitedYesN/AYes
Can change yards to metersN/AYesYesN/AYes
Captures per length data – indoorsN/ANoYesN/AYes
Indoor AlertsN/AYes (goals)Goals OnlyN/AYes
Designed for triathlonYesNoSortaNoNo
Multisport modeNoNoNoNoNo
Create/Follow custom workoutsPartialNoNoNoNo
On-unit interval FeatureNoNoYesNoNo
Training Calendar FunctionalityNoNoNoNoNo
Auto Start/StopCycling OnlyYesNoYesYes
Virtual Partner FeatureNoNoYesHas Virtual PacerNo
Virtual Racer FeatureNoNoYesNoNo
Records PR’s – Personal Records (diff than history)NoYesNoNoYes
Day to day watch abilityYesYesYesYesYes
Hunting/Fishing/Ocean DataNoNoNoNoNo
Tidal Tables (Tide Information)NoNoNoNoNo
Jumpmaster mode (Parachuting)NoNoNoNoNo
GeocachingNoNoNoNoNo
Weather Display (live data)NoYesNoYesYes
Follow GPS Track (Courses/Waypoints)NoNoYesNoNo
Markers/Waypoint DirectionNoNoSortaNoYes (to pre-saved spots)
Routable/Visual Maps (like car GPS)NoNoNoNoNo
Back to startNoNoYesNoYes
Impromptu Round Trip Route CreationNoNoNoNoNo
Download courses/routes from phone to unitNoNoNoNoNo
Altimeter TypeNoneBarometric altimeterDepends on modelBarometricBarometric
Compass TypeNoneN/ADepends on modelN/AMagnetic
Optical Heart Rate Sensor internallyYesYesYesYes
Heart Rate Strap CompatibleYesYesYesNoYes – CONTAINS OPTICAL HR SENSOR
ANT+ Heart Rate Strap CapableNoNoNoNoYes
ANT+ Speed/Cadence CapableNoNoNoNoYes
ANT+ Footpod CapableNoNoNoNoYes
ANT+ Power Meter CapableNoNoNoNoNo
ANT+ Weight Scale CapableNoNoNoNoNo
ANT+ Fitness Equipment (Gym)NoNoNoNoNo
ANT+ Lighting ControlNoNoNoYes
ANT+ Bike Radar IntegrationNoNoNoYes
ANT+ Trainer Control (FE-C)NoNoNoNo
ANT+ Remote ControlNoNoNoNoYES FOR GARMIN VIRB
ANT+ eBike CompatibilityNoNoNoNoNo
ANT+ Muscle Oxygen (i.e. Moxy/BSX)NoNoNoNo
ANT+ Gear Shifting (i.e. SRAM ETAP)NoNoNoNo
Shimano Di2 ShiftingNoNoNoNo
Bluetooth Smart HR Strap CapableNoYesYesNoNo
Bluetooth Smart Speed/Cadence CapableNoNoYesNonO
Bluetooth Smart Footpod CapableNoNoNo, has internal accelerometerNoNo
Bluetooth Smart Power Meter CapableNoNoNoNoNo
Temp Recording (internal sensor)NoNoNo-Sorta (Available only in Skiing/SUP)
Temp Recording (external sensor)NoNoNoNoYes
Compatible with Firstbeat HR toolsNot FB, but other PolarNoNoNoNo
PC ApplicationPPT/WebsyncNoneMySports ConnectGarmin ExpressGarmin Express – Windows/Mac
Web ApplicationPPT.comNoneTomTom MySportsGarmin ConnectGarmin Connect
Phone AppPolar BeatsiOSiOS/AndroidiOS/Android/Windows PhoneiOS/Android/Windows Phone
Ability to Export SettingsNoNoNoNoNo
Amazon LinkLinkN/ALinkLinkLink
Clever Training – Save a bunch with Clever Training VIP programLinkN/ALinkLinkLink
Review LinkLinkLinkLinkLinkLink
Summary:
The RCX3 is a tricky little duck. As a watch, I really like it. It works well, is easy to use, and does exactly what it says it’s going to do. I’ve worn it as a day watch as well and it’s perfect (alarms, time of day, etc…). From a sports standpoint the UI is simple, refined and clean. And the upload process to Polar Personal Trainer online is straight forward, with the online workout viewer being functional (basic). Further, the Polar lineup does include a solid number of W.I.N.D. accessories that it works with, which can’t be discounted.
However, as the tricky little duck – the singular issue I have with the unit is I believe it’s mispriced – by approximately $100 at the base unit side, and about $150 on the GPS side. If Polar were to re-price the unit to be $120ish for the base unit + HR strap (and toss in the USB download plug like everyone else does), and were to re-price the RCX3 GPS unit package to be closer to $200 – it would be competitive with the market. The base RCX3 unit is no different than the Garmin FR60/FR70 ($90-$120). And the RCX3+GPS is no different functionality wise than the Garmin FR110 ($170).
Overall, I think the RCX3 is a great unit in a nice small package, but I believe it just lacks some pricing alignment with reality. Hopefully by time the unit releases this summer, the price point will adjust to better reflect market conditions.
Found this review useful? Here’s how you can help support future reviews with just a single click! Read on…
Hopefully you found this review useful. At the end of the day, I’m an athlete just like you looking for the most detail possible on a new purchase – so my review is written from the standpoint of how I used the device. The reviews generally take a lot of hours to put together, so it’s a fair bit of work (and labor of love). As you probably noticed by looking below, I also take time to answer all the questions posted in the comments – and there’s quite a bit of detail in there as well.

I’ve partnered with Clever Training to offer all DC Rainmaker readers an exclusive 10% discount across the board on all products (except clearance items). You can pickup the RCX3 below (with or without GPS pod). Then receive 10% off of everything in your cart by adding code DCR10BTF at checkout. By doing so, you not only support the site (and all the work I do here) – but you also get a sweet discount. And, since this item is more than $75, you get free US shipping as well.
Polar RCX3
Polar RCX3 GPS bundle
Additionally, you can also use Amazon to purchase the unit (all colors shown after clicking through to the left) or accessories (though, no discount). Or, anything else you pickup on Amazon helps support the site as well (socks, laundry detergent, cowbells). If you’re outside the US, I’ve got links to all of the major individual country Amazon stores on the sidebar towards the top. Though, Clever Training also ships there too and you get the 10% discount.
As you’ve seen throughout the review there are numerous compatible accessories for the unit. I’ve consolidated them all into the below chart, with additional information (full posts) available on some of the accessories to the far right. Also, everything here is verified by me – so if it’s on the list, you’ll know it’ll work. And as you can see, I mix and match accessories based on compatibility – so if a compatible accessory is available at a lower price below, you can grab that instead.
Copyright DC Rainmaker – Updated February 28th, 2014 @ 10:17 pm
G5 Standalone GPS PodPolar$113LinkLinkN/A
H2 Heart Rate Strap (Polar W.I.N.D. units, Analog + Gym Equipment)Polar$60.00LinkLinkLink
H3 Heart Rate Strap (Polar W.I.N.D. units only)PolarTBATBATBALink
Polar Bike Mount Kit (for mounting any watch onto handlebars)Polar$12.00LinkLinkN/A
S3+ Running Footpod (Polar units only)Polar$101.00LinkN/AN/A
W.I.N.D. Bike Cadence SensorPolar$46.00LinkLinkN/A
W.I.N.D. Bike Speed SensorPolar$33.00LinkLinkN/A
Thanks for reading! And as always, feel free to post comments or questions in the comments section below, I’ll be happy to try and answer them as quickly as possible. And lastly, if you felt this review was useful – I always appreciate feedback in the comments below. Thanks!
Finally, I’ve written up a ton of helpful guides around using most of the major fitness devices, which you may find useful in getting started with the devices. These guides are all listed on this page here.