Nike+ FuelBand In-Depth Review

Back in the spring I started to compare various activity monitors – in the hopes of making sense of this fast moving and exploding market segment. This review will be the first in a series of reviews (every couple of weeks or so) of each of the numerous units I’ve been using. It’s important to understand that step/activity monitors aren’t really a substitute for something like a GPS running watch, heart rate monitor or cycling computer. The primary goal of these devices is to get (or keep) people moving and active. It’s to potentially motivate someone who may be otherwise sedentary into doing something, anything, to improve their lifestyle. You’re starting to see health insurance program premiums (or rewards) tied to use of these devices.
First up is the Nike+ FuelBand, which first entered the market back in the March/April timeframe. At the time, it was the third major dedicated device after the Jawbone Up and Fitbit. There are of course many other activity monitors out there (big brand and smaller brands), but this made a significant splash (similar to the Jawbone Up) due to it’s relatively clean design and connectivity promises….and the fact that it’s Nike.
But does it hold up? And is it accurate? And how does it compare to other units? Well, I set to find out. I ordered a unit (well, actually a ton of different units from different companies) with my own cash and started testing them.
Lastly, at the end of the day keep in mind I’m just like any other regular triathlete out there. I write these reviews because I’m inherently a curious person with a technology background (my day job), and thus I try and be as complete as I can. But, if I’ve missed something or if you spot something that doesn’t quite jive – just let me know and I’ll be happy to get it all sorted out. Also, because the technology world constantly changes, I try and go back and update these reviews as new features and functionality are added – or if bugs are fixed.
With that, let’s get onto the review!
Unboxing:

The Nike+ FuelBand comes in a box roughly the size of four Snickers bars laid side by side. The only difference is that when you unwrap the Nike+ box, you can’t eat what’s inside:

Inside you’ll find a very high level overview of the steps on the left side, which essentially focuses on plugging the unit in, and charging it:

Under that instruction set though are all the accessories hidden away:

Meanwhile, on the right side is where the real good are:


If you go ahead and remove all the pieces from the box, here’s what you’re left with:

Let’s dive into them! First up is the FuelBand itself, along with the USB charging cable:

Now the USB charging cable can actually be turned into a USB charging stand, as you can see below:

The rest of the pieces you see in the unboxing photo above allow you to change the width of the band – from smaller to larger. Note that the Nike+ Fuelband comes in three different sizes – small, medium and large. Then, within a size you’ve got more customization to make it smaller or larger. I bought the medium size.

You use a small tool that’s included to pop in some pins and then remove or add little chunks to the watch band:

Here it is with two spacers added (to the the right of the silver section):

Here you can see the spacer as I separate it:

And finally, here’s how it looks while connected to the USB charging cable:

Overall, there’s not much to do other than size how big you want the band to be:
Size Model Comparison:
For those comparing to the FitBit or Jawbone Up, here’s the three together:

Of course, they’re different units doing different things and placed in different parts of your body. So the comparisons are somewhat unequal, but more on that later.
Initial Setup:
Initial setup of the Nike+ FuelBand is about as simple as it gets. After you’ve taken all the box parts out and decided which size you want it to be, you’ll go ahead and connect the USB cable to the FuelBand, and then the other end to your computer.

At this juncture you’ll need to install the default Nike+ Connect software. What’s cool is that they’ve now consolidated all Nike+ software apps into this single one. So if you’ve already got something like the Nike+ GPS unit, you don’t have to re-install another Nike app. Just ensure you’ve got the latest software (which it warns you about automatically).

Now that you’ve got the unit connected, you’ll go ahead and get it customized to you. The primary reason for doing this is to ensure at least semi-accurate calorie information (it still won’t be super-accurate, but let’s just play along).
You can see below that you’ll specify which wrist you wear it on, as well as your height and weight.

Next you’ll set a daily goal. In my case, I just left it the normal ‘2000 Nike Fuel points per day’. This is because normally when I’m in full training mode I’ll remove the Fuel unit (which would otherwise dramatically skew the numbers in my case). Now lately I’ve been leaving it on for testing purposes, but generally I just want to see non-workout numbers each day – and thus have a goal accordingly.

With that, you’re basically done. It’ll then bring you back to the main Nike+ configuration page where you can select your basic settings and default views.


Along the way though it will try and explain NikeFuel and what it is. In theory, it’s the great equalizer in between calories and how to align that with different folks having different calorie burn needs. Meaning, my 5’2” petite wife has very different calorie burn needs than me at 6’2”.
I’d speculate that by removing the word ‘calorie’ it makes it more game-like. It’s been proven time and time again that society is more accepting of fitness goals if tied to a game rather than straight calorie in/out metrics.
At the end of the day though, it’s just a number. Track it relative to your activity going up or down, and not as an absolute thing of any substantive value. In other words, your doctor won’t say to you “you need to earn 3,000 NikeFuel points each day”, they’ll instead tell you that you need to burn 2,500 calories each day (or whatever that value might be). In the same way that the back of food items don’t say how many NikeFuel points they are, but rather list calories (or kCal if outside the US).


Finally, depending on when you bought it and how long its been sitting on the shelf, you may need to update the firmware. When it prompts you, simply click ‘Update’ and go along with it. It only takes a minute. The screenshot below is from way-back-when this spring when I first got it, so it’s on a much more current version now.

At this point, it’s time to go about your business.
Day to day recording of activity:
When it comes to using the device to record your activity, it’s about as simple as it gets. Really. Super simple.

In short, it goes like this:
1) You charge it
2) It’s always on
3) You wear it
4) Repeat at step #1
In long form, it goes like this:
1) You charge it
2) It’s always on
3) You wear it
4) Repeat at step #1
The thing is, there’s not much to do with it. You’ll go ahead and clip it on your wrist using the little lock system (which stays put rather well), and then you’ll just got about your day like normal. You can display the following data fields by pushing the single button on the unit:
Calories (CALS)
Steps
Time
Fuel (Nike+ Fuel)
Along the edge of the unit, you’ll see a color coded light bar regarding how far along to your specified goal you are (default is 2000 Fuel points, steps is separate as seen below):

The display remains lit for a few seconds before automatically turning off.
But when it comes to on-device display and things to do with it, that’s it. The end of the road. Like I said, pretty simple.

Now, when it comes to data analysis – that’s where you start to involve other pieces, which I’ll dive into in one moment. First up though, accuracy!
Step and Calorie Accuracy:
Unlike typical long-distance accuracy tests I do with GPS devices, measuring step-count accuracy on the Nike+ FuelBand was beautifully simple. Lacking anything better to do while waiting 5 hours at the airport, I spent a bit of time walking giant circles around Heathrow Terminal 5 last night.

I counted off in chunks of 100 steps, and after each set I compared what I had counted versus what the unit counted. I did this probably a 15+ times, varying the circumstances each time.
For example, since I was wearing a backpack on one shoulder, I tried it with the backpack on one shoulder, then on the other. Then switching the watch to different wrists. Turning the watch upside-down or right-side up. All sorts of variations.
The closest I ever got was within 5 steps (95%). The furthest apart was 50 steps (50%). The vast majority of the time I found it within 10%, usually measuring short 10 steps (10%), but occasionally high 10%. There was no pattern as to why it would measure high or low one time versus another. My walking speed remained the same throughout.
In many ways, one of the major reasons you don’t see the Nike+ trying to estimate actual distance on the unit is because it’s tough enough just getting steps right (which is then used for distance). They likely realize that most consumers won’t ‘care’ too much whether they see 8,000 steps or 7,200 steps. But they will care if they get shorted a mile. Probably a strange double-standard – but I suspect it’s also accurate (my assumption, not the steps).
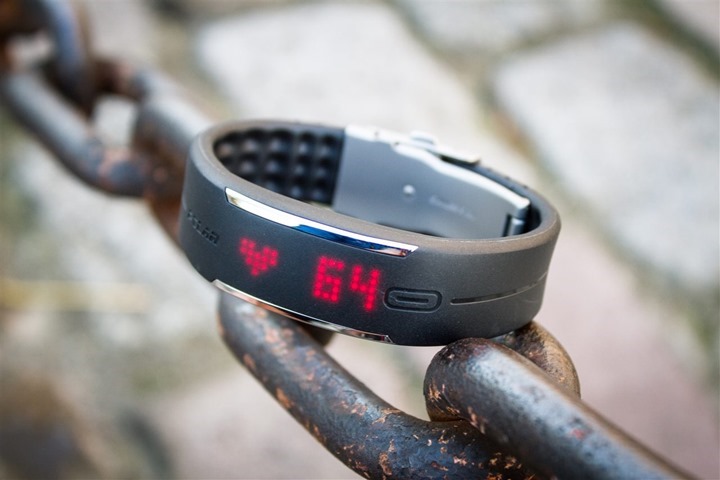
For fun – here’s what my two units looked like at the end of the day when I got home – I wore them together all day long:

Who’s right? Well, I’ll probably never know – but I’d guess the real answer is somewhere in between.
Now when it comes to calories, the unit is essentially just taking a swag based on distance and mass and age and weight. Since there’s no heart rate based aspect to this, the calorie counting is going to be suspect at best.
Because I don’t have any way to test calorie burn on the unit, I’m going to refer you instead to a fun test that Gizmodo did a few months back. Here’s a quick snippet of just some of the activities they recorded with the Nike+ FuelBand:

You can click the image to head on over and read the rest of their article on calories. Their opinion is pretty consistent with mine.
Syncing with phone with Bluetooth:
The Nike+ FuelBand offers two ways to get your data to the web. First, I’ll talk about the most common method via Bluetooth, and then the USB method. The FuelBand includes Bluetooth to allow wireless synchronization with your existing smartphone. This enables the band to upload your statistics (both historical and realtime) to a dedicated app on the phone, which in turn sync it with the web.


In order to sync with the phone you’ll first need to pair your phone to the band, which is done similar to any other Bluetooth device:


After that’s complete, you’ll crack open the Nike+ Fuel app. This app allows both sync but also historical access as well. First, we’ll cover sync.
After logging into the app (it’ll save your information from then on out), all you need to do to sync is to hold down the button on your Fuelband for about 3-4 seconds. This will enable Bluetooth on the band, which in turn causes the phone to then see it and automatically establish a connection:

You’ll notice the Bluetooth icon in the upper right corner of the phone then becomes illuminated, indicating an active connection.
At this point, the FuelBand will wirelessly sync with the app. On average it takes about 4-10 seconds to complete. Fairly quick.

At the completion of which it may give you a congratulatory message if you’ve hit some goal and/or newfound achievement:

Once you’re done basking in the glory of high quality animated achievement screens, you’ll close it out and head back to the historical and reports aspect. This is where you can view your days summary, as well as any other day in history.
Starting off with the day view, you have two basic options. The first is simply viewing total Fuel burn against your goal (which you can customize). And the second is viewing the day as a bit of a bar graph. This allows you to see when you’re most active (or lazy). Note that it does show you distance here once you sync to your phone.

After this you’ve got the ability to look at historical charts around day/week/month:


Next up is the ability to check our your various trophies and milestones – which you’ll accumulate along the way for various events such as most consecutive days, largest days, etc…:


And finally, is the ability to set the basic display settings such as time, steps and calories on the unit via Bluetooth. This is of particular importance while your travelling across time zones, as you’ll want to ensure that the FuelBand matches your cell phone’s time zone:

Interestingly, if you keep the app open while still connected to the FuelBand with Bluetooth, it’ll actually count steps and Fuel in real-time on the app on your phone. Kinda cool and fun to watch, albeit likely a massive battery drain (for all involved)!
Syncing with computer application:
In addition to synchronizing and setting configuration options via your phone, you can also do it via your computer as well with the Nike Connect application. It’s just a bit less exciting.
As soon as you plug-in your FuelBand, it’ll automatically upload the data to the Nike+ site. It does this behind the scenes and simply tells you when it’s done, which is displayed at the top:

Beyond that, it’s really a matter of changing only five basic settings. First is your profile – which includes weight/height/birthday and gender:

Then is the time & date, including whether or not to display the time in 12hr or 24hr format:

Following which is the customization of the LCD screen, which is really just whether or not you want to display steps and calories.

If you click advanced, you can go ahead and flip the orientation of the text as well:

And last but not least is the ability to customize your daily goal:

That in total, is all of the options within the desktop software. Clean and straight forward. Again, most of the reporting features you’d access either from the phone app, or the the web portal.
Nike+ online site:
The Nike+ online site allows you to review all of your data as well as connect with and share the data with friends. When you sign-in you’ll be brought to your dashboard. If you have multiple Nike+ products, you’ll see those in small text below your name.

If you dive in on a given day and click on the graph you can get a bit more detail about that day. For example note that it estimates my mileage. The 13.22 miles it estimated (below) wasn’t probably too bad to be honest. I had an 8-mile run in there (around 11AM), and then I know I walked at least 6.5 miles (GPS on), but then I probably had another 1-2 miles of walking to/from subway stations etc. So perhaps about 85% accurate.

Note that for those days where I did really well, the graphics carry across in both the dashboard view and detailed view:

As you scroll down in the page you can see some high-level community comparison stats. I’m honestly a bit surprised that I somehow had the highest day in the last 7 days for the Men 30-39 category at 16.3K. That does seem a bit low compared to what others might do.

Averages were kinda interesting as well:

Now you’ll likely see the ‘Places’ tab displayed up there on the dashboard, but in reality that’s not really used by the Nike+ Fuel device, it’s just part of the larger Nike+ platform. You can tie-in with the Nike+ App to track your runs, and then see where others have run (such as below) – but it has nothing to do with Fuel device itself.

Note that if you do enable various social sharing features, you can control how much you share, and with who:

Additionally, you can swap between the various time, date and measurement formats:

Overall, I find that the phone app is far cleaner and easier to use than the website – which seems a bit clunky and kinda rushed in some areas. I feel like they spent more time on the running side of the site (which is cleaner) than the Fuel portion.
Final thoughts and Comparisons:
When most folks initially look at the Nike+ FuelBand, they immediately start to also look at competitors in the market. As of today, there’s a lot of those – and it’s only getting more crowded. Yet interestingly, they all do slightly different things. Either through features, or through the way they are implemented, or their form factors.
Meaning that the Fitbit and Nike+ FuelBand are likely the two most head-to-head competitors in this space with similar feature sets (I leave the Jawbone Up out due to lack of display on the unit). Yet both companies have implemented their features very differently. At the most obvious layer is that the Nike FuelBand unit is wrist based, while the Fitbit is normally worn on your waistband. There’s pros and cons to both. Some women don’t like the size of the Nike+ unit on their wrists and find it uncomfortable, while more men tend to like it. On the flipside, the Fitbit is a bit more hidden, but is easier to have slip off (especially when visiting the bathroom…bad story there). For the most part though, from a form standpoint, it becomes personal preference.
When you compare on-unit features – the Fitbit does have more technical features. There’s no getting around that – it simply does more. Whether or not it does more accurately is potentially questionable, but it does do more (such as measuring distances on the device itself, flights of stairs, sleep, etc…).

If you move to their software platforms, the Fitbit is FAR more open. They co-mingle with anyone and everyone that wants to play. They offer an API for developers to access data, and tons of other devices and apps connect with them. Meanwhile, Nike is and always has been like North Korea when it comes to data and playing nice in the sandbox. They integrate with nobody and talk to nobody (as in other companies/developers). For some users though, they like that – the Nike+ platform in and of itself is fairly wide ranging with far more integrated community features and encouragement than Fitbit. Thus again, it becomes personal preference.
At some point, I will compare all these units in one final post. For now, I’m working through product reviews one at a time. I have a lot of units to try out, and a lot of testing to do. I’ve used the Nike, Jawbone and Fitbit units quite extensively over the past year – the others less so.

In general, I find the other dedicated units (outside Nike/Jawbone/Fitbit) cumbersome at best, and horribly implemented (software) at worst. Which in fact may be one of the reasons I’m dragging my feet on them – I just don’t like using them. But they do offer features that the big three don’t, especially around activity monitoring in a gym where calories may be of more interest. I just wish the software wasn’t so painful.
The Motoactv as a step-monitor is an exception here, it works fairly well and has a whole host of other fitness activity features (including GPS). But at this point I’d be hesitant to purchase one given that Motorola is giving very clear signals they’re looking at discontinuing the device (I’ve heard the product line is actually ‘under review’).
Of course, one item to keep in mind is that they really only do an accurate job for walking/running related tasks. All of my cycling I did went ‘unnoticed’, and the same goes for swimming. Those are essentially zero-calorie exercises according to the FuelBand. And that’s were some of the other ones pictured above do better, as they have other metrics they can measure in those scenarios.
Finally, here’s my thoughts on the pros and cons of the Nike+ FuelBand:
Pros:
– Super-easy to use
– Don’t fall off easily
– Very clear display
– Lasts about 4.5-5 days of battery in my tests
– Syncs with phone wirelessly
– Easily hidden under business clothingCons:
– The clasp sometimes snips skin/hair when closing
– Doesn’t show distance on device, must sync to view
– Tied into the super-gated Nike+ software platform
– More expensive than the Fitbit ($150 vs $99)
– Water resistant, not waterproof (I’ve had no problems in the shower though)
In total, I enjoy the unit – and enjoy trying to ensure I hit my 2,000 units of Fuel burned each day through walking/activity. Usually that’s incredibly easy if I’m doing a run, but on days where I may be travelling or otherwise not as active – it’s useful to make me walk the long way sometimes to get over the goal.
Remember that the units are best used for comparative measurements, rather than absolute measurements. If you set your expectations accordingly as a way to encourage activity, you’ll likely be happy with the unit.
Found this review useful? Here’s how you you can help support future reviews with just a single click! Read on…
Hopefully you found this review useful. At the end of the day, I’m an athlete just like you looking for the most detail possible on a new purchase – so my review is written from the standpoint of how I used the device.
The reviews generally take a lot of hours to put together, so it’s a fair bit of work (and labor of love). As you probably noticed by looking below, I also take time to answer all the questions posted in the comments – and there’s quite a bit of detail in there as well. If you found this review helpful in your purchasing decision, you can support future reviews like this by using any of the Amazon links.
Thanks for reading! And as always, feel free to post comments or questions in the comments section below, I’ll be happy to try and answer them as quickly as possible. And lastly, if you felt this review was useful – I always appreciate feedback in the comments below. Thanks!
Finally, I’ve written up a ton of helpful guides around using most of the major fitness devices, which you may find useful. These guides are all listed on this page here.