Garmin Varia UT800 Smart Bike Light In-Depth Review

Today, Garmin introduced their latest generation front bike light – the UT800. This light builds upon the connected concepts from their first generation lights, such as integration with their head units. With the UT800 though, the company has shifted the focus to the trail side of the cycling realm (though, it’s still perfectly fine for commuting). The unit now increases and decreases brightness with speed, as well as has other modes to save battery. Not to mention the nifty new mounting system.
I’ve been able to test out the UT800 both on trail and road rides, and thus have a pretty good handle on how it all works. Aside from the Varia Radar light I reviewed two years back, this is actually the first pure light focused in-depth review I’ve done (though I did do a first look of the See.Sense ICON lights). I have talked in a few posts about the Bontrager RT lights in the past, though never quite finished my review. The general concept there is similar though, and I like those lights quite a bit too.
In fact, it’s a point Garmin made pains to emphasize: While they technically compete with Bontrager in this space of ANT+ enabled bike lights, they don’t want to make it some sort of ugly marketing battle. They just want people to use lights on bikes, regardless of who it is. And it’s something that Bontrager has also echoed to me in the past as well.
In any event, this unit was loaned to me to try out and soon I’ll ship it back just like normal. If you find this review valuable, you can check out the links at the bottom to pick up your own illuminating goodness and help support the site via Amazon or Clever Training. With that – let’s dive into it!
(Oh, and like some other product reviews I do where the product is relatively straightforward, I’ve slimmed down the format here to pack as much detail as humanly possible into a more compact version. Hope you like it!)
Video Overview:
Oh, wait. Before we unbox this baby, if you’re the type that just likes videos – then the below is where it’s at. It’s about as close to a complete video review as you’ll get from me. But most importantly it includes legit and real light tests while outdoors trail and road riding to show how it all works.
Ok, with that out of the way, let’s talk boxes. Or rather, getting box naked.
Unboxing:

First up we’ve got the box itself. It more or less looks like most other Garmin boxes these days. And it packs quite a bit inside that small package. Do note on the back that compliance warning for StVZO, which governs light usage in Germany.

Also of note is the side of the box, which has a handy little chart showing lumens and how the light responds over time.

After opening it up, we’ve got a pile of plastic bags full of little parts:

Removing those bags you’ll find the core pieces sitting ready:

First up is the paper manuals, where the quick-start guide is actually kinda useful. It lists all the different modes and more nifty charts for figuring out speed and light intensity:

Next, we’ve got the light itself, but don’t worry, you’ll get plenty more looks at that by the time this post is over. It comes in at 130g in weight.
Moving along, there’s the micro-USB charging cable. It’s just like every other micro-USB charging cable out there. It plugs into the back of the unit:

Then there’s the mount. This is not like every other mount out there. Sure it’s got the standard Garmin quarter-turn mount up top for your Garmin Edge device, but down below it’s got what is basically an inverted quarter-turn mount.

More interesting though is the small adapter piece that’s included. This allows you to attach the light to it, and then easily lock it on/off the bike in a single twist. One side being GoPro compatible, the other being Garmin quarter-turn mount compatible.


Here’s how the whole pancake stack looks:

Oh, and in case you missed it up above, they also included two small hex wrenches to adjust both the GoPro-style mount as well as the mount onto your handlebars.
Finally, just to put size into perspective – here’s the older HL500 side by side with the newer (and brighter) UT800:


With that all set – onwards into the basics we go.
The Mounting System:

We’ll start first with the mount side of things, and then move into the technical components. Then I’ll compare light visibility in the next section.
First up we’ve got the Garmin out-front mount that I mentioned earlier. This is the same core Garmin out-front mount that came with the HL500 light a few years ago. However, it’s different than the standard Garmin out-front mount packaged within an Edge series bike computer box. This one has a quarter-turn mount on both upper and lower halves:


Up top is where you stick your Garmin Edge (or other bike computers that fit into that slot). Where things differ from the HL500 is that this now has the secondary adapter. This adapter has a GoPro/VIRB mount on the bottom, and a Garmin quarter-turn mount up top:

In fact, you can even use this to mount a Garmin or GoPro action camera as well, making them handy to perhaps buy a couple of them so you can quickly pop on and off action cameras or lights without any tools.

Speaking of the sans-tool part, the main goal of this design is that you can just twist the locking ring in a single motion (even with gloves) and it locks on tightly. And yes, it does do exactly that. Once locked it doesn’t budge.

Yet you can still adjust the up/down angle of the light using a hex wrench as you see fit.

All of this works pretty well and is probably one of my more favorite parts of the whole kit. I just wish Garmin would then offer an aluminum version of the same double-sided mount, and I’d be totally happy.
Illuminating Details:
Next, let’s talk the light itself. On the left side is a single button. This powers it on and off, and also changes modes. You can further hold it down to power it off entirely.

Once you power it on it’ll go into a pairing mode, which enables it to be added to a ‘light network’ from your Garmin Edge device. Technically this is open standard ANT+ (Lighting Profile), so any company (like Wahoo or Lezyne) could implement this in their head units. You can thus also add in multiple lights, even from different vendors. For example, you could use Bontrager’s rear tail lights, and combine them with Garmin’s front light. Whatever floats your boat.

Within the lighting options on your Edge you’ll see each individual light and the battery status of that light. You can also pull this up from the status menu by swiping down on the Edge 820/1000, or pressing into the status button on the Edge 520.

You can then configure options for the network. For example, you can set it to not turn on your lights until you actually press start on your Edge device. As soon as you do that, it’ll turn on the lights automatically. Thus saving battery while you’re standing around getting ready.

You can also configure whether or not the Edge will automatically control brightness on the lights, or if you want that to be manually controlled. You can always override this at any time either from the Edge itself (and a new lighting control panel data page to be released soon) or just by tapping the button on the light.


Which gets us to the variability aspect. The light has a number of modes within it, each with different battery levels:
800 lumens: 1.5 hours
400 lumens: 3 hours
200 lumens: 6 hours
100-300 lumens pulsing (night mode): 6 hours
700 lumens flashing (daylight mode): 25 hours
Each of these modes can be manually iterated through by simply pressing the button on the side. Also, the manual says it’ll hold a charge for an entire year if not in use, which his pretty darn impressive. Obviously, I can’t validate that at this point.
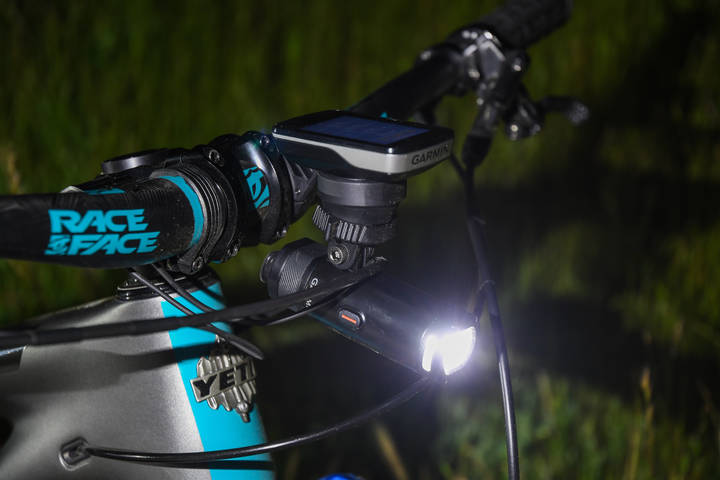
Next, and more importantly is that the light, when used in conjunction with a Garmin Edge device, will automatically change intensities based on speed. It does this in the three settings noted above (200/400/800 lumens). This is done to save battery and to give a non-overkill amount of light to your situation.
The idea here being that as you climb on a trail you’ll need less light because you’re moving slower. Whereas when you’re riding downhill at full speed, you’ll need more light to ensure you aren’t outrunning your lights. All of which in my testing actually worked out great while out on the trail.

Speaking of which, I’ve gotta give props to a crew of guys that helped me out in filming and photographing out in the (very dark) woods last week. Being a moonless night, all of us were at times standing in the pitch black next to a camera waiting for whoever was riding to ride by with the UT800. We didn’t want any other ambient light or other bike lights messing up the shots.

We’ve got Jonathan Lee on the right (from TrainerRoad), and Ian Meintjes in the middle (also of TrainerRoad, and Pro Enduro Racer for KTM). All of us spent hours out on the trail in clothing definitely not suitable for the task trying to get the night shots. As for ‘my bike’ for those days, it was loaned by Steven Lewis of MTBPodcast.com. It’s an incredibly sweet and totally brand new bike. I was actually the first to put it through its paces between that and the previous day of riding.
Funny aside…much of the shooting was about a 20-minute ride away from where the trailhead started, but I didn’t bring a secondary bike mount for the older HL500 light. No worries, Jonathan managed to MacGyver a solution together using a Wahoo TICKR strap on a K-Edge Garmin out-front mount for his bike. Astoundingly it actually held the entire night.

Once again – thanks all!
Back to the tech side, some might be wondering how the light shifting/changing piece is different from before. With the previous HL500 (which has 500 lumens), that light had two different bulbs in it, which in turn hit two different reflector points. So instead of changing the light intensity, it changed where the beam was pointed (closer or further). But that didn’t save any battery, it just shifted things around. Whereas with the UT800, it’s saving some considerable battery by reducing the brightness.
As for on-road visibility, it was just as good as in the trails. With on-road on brightly lit streets you can get away with the pulsing light (which isn’t total on/off, but just slowly increasing/decreasing lumens). Whereas when things get darker, you can go with the full 200/400/800 lumens.
One oddity I did stumble into just two nights ago in Los Angeles was that some well-lit intersections would ‘trick’ the Edge 820’s ambient light sensor. As such, it thought I was in daylight and would toggle over to the daylight flasher mode. I brought this up to Garmin and they’re looking at a possible fix in an upcoming firmware update. Though I could always just override it via either the Edge or unit itself. I never had this trigger in any darker road or trail situations, but only in a handful of very bright intersections. It didn’t really impact my visibility for the simple reason that it was already pretty darn bright. Either way, something I’ll look for in the future.
Comparing Light Visibility:

When it comes to comparing the different lights, the most important aspect to consider isn’t the light at all – but rather, the camera. In the same way that I stress that configuration of microphones is the most important aspect in trainer noise tests, the same is true for light tests: It’s all about the camera settings.
I can make any light look like any lumen value I wish. I can make two totally different lights look identical. I can make one brilliant light look horrible, and another horrible light look great. The quality of the lens/camera being a major factor, as with the exact settings I use.
The purpose of this isn’t to make you think I’m showing you #FakeLights, but rather to be aware that on any comparison site (including here) that the limitations of photos and video come down to the settings used. In my case, all of my on-road and on-trail comparisons were done with a GoPro Hero5 Black in 4K/30 mounted on a GoPro Karma Grip Gimbal attached to my chest using the GoPro Seeker backpack. This gives me a bit better light performance, but it’s nothing compared to my DSLR.
To demonstrate this, look at the below imagery. These were taken at the same time with one camera atop the other. One from the $399 GoPro, and the other from the $3,000+ DSLR setup:

With that in mind, let’s look at some comparisons out on the road. Here are the three light levels while riding in complete darkness:


Next, let’s look at the comparison between the older HL500 (500 lumens) and the new UT800 (800 lumens). Remember that the HL500 is designed to have a very narrow beam (primarily for road use), whereas the UT800 is designed as a wider beam. That’s easily seen below comparing these two lights against a wall:


(These last two photos were shot with a DSLR on a tripod, which goes to show you just how different cameras evaluate light compared to the moving shots on the bike with the GoPro.)
What I found was that the brightness of the UT800 was more than sufficient for trail riding, even downhill at speed. And equally, it was just fine at the lower lumens for going uphill on trails.
While out road riding on brightly lit streets I didn’t find the light made all that much of a difference, and I could have primarily used the slow-pulsing mode to save battery. However, once I went into darker areas, it was nice being able to pump up the brightness and light up my surroundings.
Summary:

I’ll be honest – when I first heard of another bike light from Garmin, I wasn’t super excited. It was roughly akin to being told I was being given broccoli with a side of cauliflower. Yet, once I had my hands on it, I’ve gotta say I’m kinda impressed.
I’m not sure whether to be more impressed with how well the light works itself, or with the nifty mount doohickey. I’m a sucker for cool mounts. It’s like my comfort food of technology. And this one delivers with a truly useful mount innovation that’s actually super functional. If only they’d make a darn metal/aluminum mount with that same lower attachment point and we’d be in golden-happy land (for better action cam footage).
Of course – this is all about the light – and in that area they really do actually nail it. I totally see myself using this thing as my primary bike light, for the simple reason it doesn’t look like a brick. I rarely need to ride more than a couple hours at night at a time, and most of the time it’s in the city. Yet when I do go outside, it’s nice to have the power behind the light to illuminate the darkest of trails.
While I did see the one quirk noticed on the Edge giving a false-positive for daylight (thus triggering the light into daylight mode), I’m optimistic Garmin can fix that. Or failing that, I can just use it in manual mode.
Either way – if you’re looking for a great trail light that doubles for commuting, this is definitely one to consider. It starts shipping today, and is priced at $149USD, which is in the ballpark for other connected lights.
Found this review useful? Wanna support the site? Here’s how:

Hopefully you found this review useful. At the end of the day, I’m an athlete just like you looking for the most detail possible on a new purchase – so my review is written from the standpoint of how I used the device. The reviews generally take a lot of hours to put together, so it’s a fair bit of work (and labor of love). As you probably noticed by looking below, I also take time to answer all the questions posted in the comments – and there’s quite a bit of detail in there as well.
I’ve partnered with Clever Training to offer all DC Rainmaker readers exclusive benefits on all products purchased. By joining the Clever Training VIP Program, you will earn 10% points on this item and 10% off (instantly) on thousands of other fitness products and accessories. Points can be used on your very next purchase at Clever Training for anything site-wide. You can read more about the details here. By joining, you not only support the site (and all the work I do here) – but you also get to enjoy the significant partnership benefits that are just for DC Rainmaker readers. And, since this item is more than $75, you get free 3-day (or less) US shipping as well.
Garmin Varia UT800 Smart Bike Light
Additionally, you can also use Amazon to purchase the unit (though, no discount). Or, anything else you pickup on Amazon helps support the site as well (socks, laundry detergent, cowbells). If you’re outside the US, I’ve got links to all of the major individual country Amazon stores on the sidebar towards the top.
Thanks for reading!