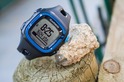
360Fly 360° Action Camera In-Depth Review

It’s the all-seeing action camera in-depth review. Or at least, the mostly seeing action camera in-depth review
While I’ve talked about 360° action cameras a bit over the last year or so, it hasn’t been until now that they’re actually worth spending the time on a review. Most of them have had relatively high levels of suck, generally in the quality/resolution department. But also in the usability, software, and form factor departments.
The 360Fly though is somewhat different (keyword: ‘somewhat’), but it gives us a glimpse into what’s coming down the pipeline from numerous players, including 360Fly themselves, on their newer and more capable 360° action cams. Based on all of the cams I’ve used to date, this package is the most ‘put together’ in terms of viability. But, does that mean I’m actually recommending it? Well, let’s get started on the review.
Oh, one little point: In order to simplify some terminology, if you’re not 100% clear on the difference between 3D, 360°, and VR, see my little primer section towards the bottom.
Unboxing:

I’ve gotta say – the 360Fly has a nice tidy little case & packaging job. Easy to see the whole thing from all sides, and not overly crazy in terms of wasted packaging (cough…eTAP…cough).

As with many action cam packages, don’t got all nutso when throwing away what you think is packaging, many times those pieces are actually important for later on. That’s the case here where the baseplate that the 360Fly connects to will be used as your mount. It’s kinda important. Like, really important. As in, most important thing other than the ball itself.


Once you’ve got all the parts out of the box, here’s the pile of goodness:


First up is the camera itself. It’s a simple little ball. It’s got numerous flat sides to stay put at various angles, but it will roll if you want it to.

There’s a tiny little string/cord hanging out of the unit, it keeps water from getting inside the microphone port. I’ll give you props if you manage to not lose it within the first two weeks. I was personally doing so well until literally just the last hour or two. Now I have no idea where it went to.

Next we’ve got the charging cradle. This serves both to download videos to your PC (you can also do it to your phone via WiFi), as well charge the unit. It’s also pretty important. Thankfully they used a simple micro-USB cable connector from the dock onwards.

Next we’ve got a few different mounts. There are two sticker mounts (slightly curved and flat), along with a GoPro adapter mount.


But, there’s also this middle-man mount, that’s used for connecting the camera to the sticker mounts.

The middle-man mount enables you to lock to the camera, while then in turn locking to a sticker mount.

While they were at it, they threw in a nifty little carrying/protective case for the 360Fly. Basically, it’s your ball’s sack. Ok, that probably sounds weird. But it’s true.

Finally, there’s some paper stuff and stickers.

With that – let’s get to sizing things up.
Size Comparisons:
From a size standpoint, the 360Fly is a surprisingly small package. And comparing it to a GoPro? Well, the full-frontal view shows that it’s actually not much different if comparing to a GoPro in a frame case. Well, actually, it’s smaller in width (and a smidge taller).

However, it is a fair bit thicker. Too many cookies give it a plump appearance. Less comparatively plump if you stick the GoPro in its waterproof case.


Which is an important point – the 360Fly is waterproof to IP67 standards even without the port plugged (30 minutes at 1-meter deep), once you plug that little port (with the included hole plugger), then it’s ATM5 waterproofed, so on par with the external cases GoPro ships today.
If I go back and compare to something like the V.360 action, that’s far larger and more bulky. On the flip side though, the V.360 has a swappable battery and Micro-SD card, whereas the 360Fly does not. The Kodak meanwhile is kinda the same size, but a bit more square and awkward.

And what about weight? Ask and you shall receive:
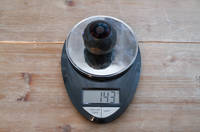
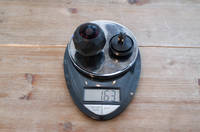
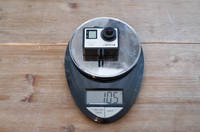
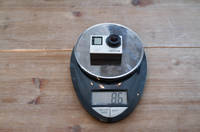

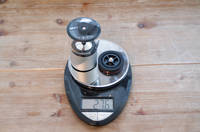
So basically, it’s not much different in terms of physical dimensions.
The Basics:

Of course, while it’s not much different in terms of physical dimensions – it doesn’t quite change the fact that you’ve got a ball on your head. When the GoPro first came out, people thought it looked clunky and boxy (especially on your head). These days, it seems totally normal. Perhaps one day sticking a ball on your head will look normal (though, based on my testing, that doesn’t seem to be the case yet).
But let’s not get too far ahead of ourselves. After all, we’ve still gotta turn the darn thing on.
The unit sits on a rounded yet multi-surface shell. This is actually interesting because it allows you to put the unit on almost any angle and have it sit by itself. Here, let this animated gif explain:

Of course, that’s really only valuable if you’re leaving it somewhere (like a night stand for filming your own Paris Hilton sex tape).
Most of us will use one of the mounts though for our action (ideally outdoors). The unit has a metallic locking mechanism on the bottom, which then connects to their base. Here’s the bottom of the cam:

You quarter-turn rotate the ball and it locks. So far I’m pretty impressed by it. It’s far better than the V.360 locking system, which I’ve broken rather easily.
The mounts actually have two parts, at least on the sticker variants. On the GoPro variant it’s all-in-one. With the stickers, you’ve got the sticker portion that…well…sticks onto something.
Whereas the GoPro mount adapter has the locking pole built right in.


The GoPro mount is great because it works with any GoPro accessory out there:

This is even more notable because getting extra 360Fly sticky mounts is both complex and expensive, whereas getting more GoPro sticky mounts is a two-cent affair (ok, maybe $1 affair). So I prefer to use generic GoPro sticky mounts, especially in places that may not be permanent (i.e. a rental car, skis, etc..):


Finally, there’s a separate dock for charging, which has no locking system. Rather, the ball just sits on it and charges/syncs.

Ok – so how about turning the thing on? Well, there’s a single button on the unit (I’m pointing at it below with a small tool). This turns it on/off, and then also starts/stops recording. That’s it.

When it’s on and in standby, the light is blue. Whereas if you hold it down a second time, it’ll switch to recording – a red light. Each time you press that button, the whole unit will vibrate. This is awesome if you have it on your head, because you can feel the vibration pattern and know if it’s on or off.
There are no configuration options on the camera itself – everything other than power/start/stop must be done via the mobile app (iOS/Android). For example, there is no option to take photos on the camera, that must be done via apps (and actually, must be done afterwards).
Next, looking at the lens, the unit has a single spherical camera lens that sits below a dome.

Now the one caveat to this design (versus having two or more cameras that are stitched together), is that you don’t quite have as much downwards viewing range. It’s about 6-8ft away from you before you hit the ground, or roughly the same distance above the ground that the 360Fly is placed at.
Note that I’m about 6ft tall, obviously if you’re shorter, you’ll get closer visible range.
As you’ll see in the videos later, you can rotate the scene anywhere you’d like within that range. The camera has a TOTAL resolution of 1504×1504 (For reference: 1080p is typically 1920×1080). Now this is where 360° cams get a wee bit tricky…or…more accurately: Deceiving.
See, companies will advertise that a cam is 1080p capable, or even 4K capable for some of the new cams. But in reality, that’s the total image surface. Not the portion of the image you’d actually see. Think of it this way: When you open up YouTube and look at a 360° video, you’re only seeing one portion of the view (for example, looking forward in a car). That one portion of the video isn’t 1080p, but rather a subset of that 1080p. That’s generally speaking why the video quality looks rather rough.
This means that instead of having an HD image, you have a circa-2004 quality image. Now companies are fixing that quickly – including 360Fly, with their upcoming/planned 4K variant. Same goes for Nikon and their 4K variant.
Once you get to 4K for the total image size, then each portion is more on the 1080p range, and far clearer. To understand this a bit, here’s a famous chart from Wikipedia, that shows video resolution and makes this really clear.
In the case of the 360Fly (non-4K variant), it sits roughly in the same range as the 1080p total resolution. Whereas when you talk a 4K variant, it’s the larger red 4K UHD variant – basically four times the image resolution.

Last but not least it’s important to note that the unit is fully waterproof to 5ATM. But, there’s a caveat there. See this tiny little hole on the bottom? That must be filled with that little plug to get 5ATM waterproofing. Else, it’s IPX67. That’s still good for 30-minutes at 1-meter deep. So rain/snow/snorkeling is fine. But if you go diving, then you definitely want the plug.

Said plug is super-easy to lose, so eventually, you’ll lose yours. It comes on a small tie-on, so ideally you’d attach it to the mount that you use in the water most often.
Of course, if you’re just talking rain and snow – then you don’t have to worry too much about plugging the hole. And, since that hole is the microphone, once it’s plugged you lose good quality audio. But if you’re going swimming, surfing, or aqua-biking – then you’d want to ensure you plug it up.
Mobile App:

First up is the mobile app. You’ll need to use either the mobile app or the desktop app if you want to change settings on the 360Fly, or publish it to 3rd party sites. Sure, you can technically plug in the unit to any USB-capable computer and download the footage, but it’s tougher to edit 360° footage without their tools making it easy.
In some ways, neither the desktop or mobile app is complete. There are sometimes features you can do on one, but not the other. For example, on the phone app you can add music – which you can’t do on the desktop app.
To begin, you’ll connect to your camera via WiFi connection – similar to how a GoPro works. Once you do that, you’ll get a streaming preview of what the camera sees:


At that point, you can tap the little button next to the bigger recording button to tweak various color/brightness settings (including ISO). And of course, you can press the big button to start recording. Once you do you’ll get the red banner up top, the red recording light on both the app and device, and then the button turns red too.


The entire time the battery icon is also displayed on the app. This is really the only way to see either battery or SD card status. Note that if/when the unit runs out of storage space (32GB), it will not record future clips until you deal with that situation.
Within settings there aren’t too many options. Basically you can view your current camera details, and then turn on/off power or WiFi. That’s kinda it. For example, you can’t change resolution – it’s just one setting. And to be fair, you really don’t want to change resolution anyway in this case.


After you’re done with recording something you can go ahead and download the clip to the phone for editing. There’s another tab for looking at what you’ve uploaded to your profile.


After you’ve downloaded the video to your phone you can edit it. The editing capabilities are pretty darn basic, but you can get the basic job done. I really wish I could add my own music here, rather than pull from their music library.


When it comes to editing, most will want to upload the full 360° video. but in some cases you may actually want to export out a normal ‘flat’ (non-360°) video. The clip capture option allows you to control the viewpoint that’s exported. It’s like being a director in real-time. Kinda neat option.

Finally, once you’re done here you can upload the video directly up to their platform for sharing 360° videos, or you can upload it to Facebook & YouTube. I find the uploader gives more options in the mobile app, but tends to burn through a boatload of battery and is usually a bit more flaky than the desktop app.
Desktop App:
Next we’ve got the desktop app (Mac & PC). Like the mobile app, you’ve kinda got two sections: Stuff that’s sitting on the camera (or a folder elsewhere), and stuff that’s been imported into your library.
The first tab is for importing in videos. I find that it’s good to copy the videos off your 360Fly and to a folder on your hard drive. That’s because the USB connection is super-slow on the 360Fly. I think they found it on the bargain aisle at K-Mart. In this first tab, you’re essentially just pointing the app at a folder of your choice.

From here you’ll click to ‘import’ files into your library, which brings them to the second tab:

It’s this second tab that you can start slicing and dicing videos, or getting them ready to publish. In the case of below, I’ve used the little scissors tool to take a snippet out of this clip and will then string it to other clips. In this mode, it retains all of the 360° aspects.

This means that I can move my mouse around and change the view:

Once you’ve got clips, you can either publish those individually to various platforms, or you can ‘Merge’ them together and then publish. Either way, you’ll get this ‘Share’ menu option:

As a ‘Pro Tip’, if you want to just export out the 360° video file to your computer, you can hold the ‘ALT’ button down while clicking the Share icon on the clip (PC), or on a Mac, hold down ‘ALT/Option’. This is useful if you want to upload them on your own terms rather than the default uploader.

As I noted earlier, there are some feature discrepancies here. Such as lack of ability to add music from the desktop uploader. Also, I see some quality degradation that occurs when I use either desktop or mobile app to create videos. It tends to make the clips darker, as well as slightly more yellowed than the original clips. It’s really too bad, because the quality looks far better before I upload the clips to YouTube than afterwards.
In talking with 360Fly about this, they believe this may be related to compression introduced by YouTube. It’s unfortunate, because it significantly impacts the end-quality of the clips. Said differently: They look a heck of a lot better before than after.
Video Samples:
Ok, time to look at some video samples that I’ve shot. In my case I’m largely using YouTube to demonstrate the videos – but I’ll also include some with the embedded player from 360Fly. Since there aren’t really too many video settings, I just kept it on the highest quality it offered. Be sure when you play back on YouTube that you also change it to the highest quality offered.
First up – a fun ski-tip video I shot on a sunny day while skiing. I fully expected the camera to fall off (using a sticker mount). It was just a matter of time. I’ve done this numerous times with cameras, and anything more than a few turns is an overwhelming success. But this isn’t about the sticky mount, rather, just about the video quality:
In general I’d say this video turned out well. Though, the 360Fly definitely makes the image look darker and grainier than it really is.
In fact, if you go to a near-identical clip of this that I shot the day prior in simple overcast conditions, it looks like it’s about to thunderstorm out. The quality is very bad:
Next, here’s a handful of clips strung together while skiing/snowboarding, where we placed it on our head, or a selfie-stick:
Then we’ve got a ride around Paris using the 360Fly. I placed it on my bike using a metal mount on the front handlebar:
Then we’ve got a less locked down ride using a Citi Bike in NYC, through Times Square:
Next there’s the Paris-Roubaix race video I shot this past weekend:
After that, I decided to attach it to a drone to see how things would look:
Note this was sorta a MacGyver style mounting job to my Phantom 4 based on what I found in my suitcase along the side of the road, so there’s going to be a little bit of flex in the video due to that. Going from the electrical tape to using the P4’s lens protector case helped a bit. If I thought about it more, I’d come up with something more creative. Some of the older Phantom units have a GoPro mount on them, but not the newer ones.


There ya have it!
Photo Samples:
Now the 360Fly is actually a bit odd in that there’s no way to just take a photo. Serious – #NotKidding. Instead, you have to shoot video and then load the video and take a photo snap from that. While the ability to grab a photo from a video is well executed within their software, there are many times I just want to take a stinkin’ photo without recording a video. Would it be that hard to just put a darn photo snapper button on the app like others do?
Apparently the answer to that is: Yes, it’s that hard. In fact, you can’t even do it from the desktop app – only the mobile app.
Still, ignoring all the messiness, you can get photos exported from existing videos. You’ve actually got a bunch of options for how those photos will look too. Here’s a handy-dandy little screen that shows the differences:

And as a result, here’s a small gallery of my finest work. And by finest, I mean, anything that looked interesting over the last few weeks:


Above is an example of the 16:9 view (a portion of the 360 video), compared to below being a panorama view:


Like the exporting of videos, I’ve found the software seems to degrade both quality and lighting on export.
Wait, what is VR, and 3D?

Now, at this point I want to briefly note something: 360° is not VR. And 360° isn’t 3D. But VR is typically 360°.
Confusing?
Well, it’s like the whole ‘a square is a rectangle, but a rectangle is not a square’ thing.
VR is Virtual Reality, which implies that you can interact with the environment. So not only can you rotate your view 360° like in a 360° cam video, but you can move forward and back. Typically, this is limited to video games or other computer generated environments (though, there are certainly exception cases).
In virtual reality, you often have a headset of some sort that makes your head movements control what you’re looking at. So as you look left, it shows the image to the left. And the same with the right/up/down/etc…
There are numerous headsets out there, with names you’re familiar with OCULUS, HTC’s, Samsung’s, and more. In fact, 360Fly actually makes one of their own for just $39. In their case, you just plug in your own cell phone and use it as a small headset. It has a handy play/pause button up top – and works just fine for getting the gist of things. Within the app you just tap a button to switch to VR headset mode.

But again – 360° videos is different than VR. That’s because in a pure 360° video it doesn’t require a headset, but more importantly – it means you’re not navigating an immersive world. You can’t go anywhere. You can just change the view from a static location.
Finally, 3D is also not 360. Totally different. 3D is where if you’re watching a movie objects pop out at you. Again, you’re not changing your viewpoint, nor can you rotate around to look somewhere else. Note that 3D, 360, and VR can all be combined together (typically in a computer generated world), but by itself, 3D is neither 360, nor is 360 3D.
Got all that? Phew!
Thoughts on the 360° Market:

First up, there’s really two sides to the 360° camera market. Actually, almost three sides:
Consumer 360° Cams: I’d put 360Fly, 360Fly 4K, Samsung gear 360, the upcoming Nikon KeyMission, Kodak’s two offerings (4K and not), and Giroptic.
Consumer 360° Not-So Action Cams: Stuff like Ricoh Theta, where they aren’t really designed for sport use.
Pro Level 360° Cams: Such as the GoPro multi-cam rigs, Nokia Ozo, Facebook’s Surround 360 reference rig, and many others
I’m mostly focusing on that first category. Within that category, there’s been 360° cam options for a while now. For example, Kodak’s entrant a year or two ago was viable (horribly sucky, but viable). Then we had the V.360. I used that a fair bit last summer actually. Far better than the Kodak, and quality on par with the 360Fly. The downside though was the form factor and easy of breakage/scratches.
But really, I think the best times are in our near-term future. That’s when we’ll get this rush of 4K capable (full image) 360° action cams. In that group we’ve got the Nikon 4K KeyMission, the Samsung Gear 360° 4K, and the 360Fly 4K. I’d focus more on the 360Fly and Nikon, due to their design aimed more for sport than the Samsung offering.
Plus, we get whatever mysterious consumer-level 360° cam that GoPro CEO noted back in January, that should appear shortly.
It’s those entrants that is where I’d suggest going into the 360° market. Well, at least assuming they don’t suck.
The good news is that all of these lesser options have helped to pave the road on the software front. And that’s super-critical. YouTube 360° videos now work without issue with most company’s cams. If that company doesn’t work with YouTube, they aren’t worth buying (it’s really that simple). But virtually everyone does.
Plus, consumers now know what 360° action cam footage is, and have a vague understanding of how to interact with it when they stumble on it. Further, increased attention to the adjacent VR world is drawing more and more interest to 360° action cams and platforms. All of which is good for consumers.
Wrap Up:

At present, I’d say the 360Fly action cam is the best available 360° cam suited to consumer action sports. After all, there’s no issues with water, it’s relatively small, and the mount options are stable and flexible.
But at the same time, it’s far from the best action cam in general. And frankly, far from a cam I’d actually use day to day after this review. To me it all comes down to quality, or rather, lack thereof. The sensor is simply too small for truly watchable 360° videos. Once you slice and dice that image down to what you’re actually looking at on the screen, it’s going to be of low-quality and fuzzy. And that ignores troubles in low light.
In many ways, the 360Fly (along with other non-4K options in the category today) are like cheap beer: It doesn’t taste great, but it’ll do the job and get you drunk. The 360Fly doesn’t taste great in terms of image quality, but if you really really really need 360° footage, it’ll do the job at a lower price than a professional 360° rig.
That said, I’m excited to see what 360Fly does with their upcoming 4K camera. It’s got more than just 4K, but also GPS and accelerometers, as well as double the storage (64GB) and more battery life. If they can take what they have today, add that and buy a few more app devs to fix some of their mobile/desktop app quirks – then they’ve got a huge winner on their hands. But of course, the 360° market will explode with announced but not yet released 4K entrants over the next few months. So the race is definitely on.
With that – thanks for reading!
Wanna save 10%? Or found this review useful? Read on!

Hopefully you found this review useful. At the end of the day, I’m an athlete just like you looking for the most detail possible on a new purchase – so my review is written from the standpoint of how I used the device. The reviews generally take a lot of hours to put together, so it’s a fair bit of work (and labor of love). As you probably noticed by looking below, I also take time to answer all the questions posted in the comments – and there’s quite a bit of detail in there as well.
I’ve partnered with Clever Training to offer all DC Rainmaker readers an exclusive 10% discount across the board on all products (except clearance items). You can pickup the 360Fly (or any other action camera) from Clever Training. Then receive 10% off of everything in your cart by adding code DCR10BTF at checkout. By doing so, you not only support the site (and all the work I do here) – but you also get a sweet discount. And, since this item is more than $75, you get free US shipping as well.
360Fly Action Cam
Additionally, you can also use Amazon to purchase the unit or accessories (though, no discount on Amazon). Or, anything else you pickup on Amazon helps support the site as well (socks, laundry detergent, cowbells). If you’re outside the US, I’ve got links to all of the major individual country Amazon stores on the sidebar towards the top. Though, Clever Training also ships there too and you get the 10% discount.
Thanks for reading!