The Feiyu Tech GoPro Action Cam Wearable Gimbal In-Depth Review
I know, approximately 97% of you are looking at the title right now and going “Who the fudge is Feiyu Tech?” And then about 65% of you are saying “What the heck is a gimbal?” (and is it related to a gumball?). Fear not, I’ll soon answer both of those. And for those uninitiated in the world of gimbals, you’ll soon be impressed. For those of you familiar with gimbals – you’ll soon be geeking out.
If you’ve watched any highly produced video on YouTube with lots of action – it’s likely that video had some post-processing done to stabilize the footage and make it appear smoother than it really is. That processing is done in software suites such as Adobe Premier or After Effects, among others. It’s a way to remove bumps and other distracting things in footage.
Over the last 1-2 years though we’ve seen the rise in cheap devices called gimbals, that can stabilize a camera in real-time, eliminating or minimizing the need for post production. Some of these gimbals merely use counter-weights to make something smoother. While others (such as what I show here) are electronically controlled to counteract your movements just as instantly as you make them. In doing so you get incredibly silky smooth footage.
Up until now – this crop of gimbals (for action cameras) has largely been hand-held. You’d take your GoPro and attach it to what was essentially a oversize selfie-stick. From there, it’d make video look beautiful. But what if you wanted to do some sort of sporting event where holding a camera out front wasn’t recommended (i.e. mountain biking)? There wasn’t a solution there.
But this past August a company (Feiyu Tech) released a wearable variant of their enormously popular handheld gimbal line-up. This new wearable mount simply would attach to any GoPro mount (helmet, chest strap, pole, etc…) – and get the same high quality stabilization, but on your body directly.
Which…brings us to the unboxing portion of the review. Note that I purchased the product with my own hard-earned cash (actually, I purchased two of them after I broke one in a suitcase).
Unboxing:

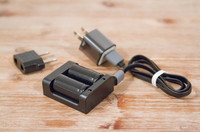
The gimbal comes in a fairly well protected box. Both on the exterior as well as the interior. On the outside you’ve got your standard cardboard box – but you’ve also got a separate carrying case inside too.

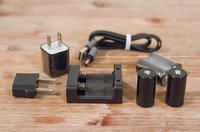
Once you crack that little package open, you’ll find all your parts. It’ll never look this pretty again.

I’ll un-pack them and explain them. Seriously, somehow all that stuff below fit into that little thing above. And again, like trying to put a champagne cork back in, it’ll never fit back in again.

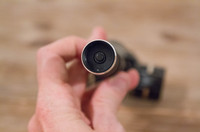
First up we’ve got standard GoPro mounts (except, without the GoPro branding), but really, they’re identical. One flat mount plus three stickers. Also, the piece that slides into the flat mount. We’ve also got those two little doohickey’s to the left. Those will actually affix to the gimbal itself, but more on that in a bit.

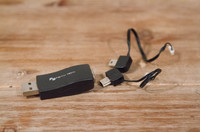
Next you’ve got a USB updater cable.

Then there’s the mount itself. Note at this point we haven’t added all of the important parts to it. Once you do that, it’ll take up more space and won’t fit back into the little gimbal carrying case very well.

Here it is with all its screws. The smallest screws are for putting on those little doohickey’s we talked about a moment ago. Whereas the longer screws are for the GoPro holder piece. Then the standard GoPro thumbscrew is for attaching the GoPro (though, you likely already have a crapton of those).

And finally, we’ve got that manual. You’ll definitely want to consult that a bit – at least until you memorize the options. If your memory is like a goldfish, then all you really need is just keep pressing buttons in patterns of: 1 tap, 2 taps, 3 taps, or 4 taps. That’s basically the summary of it.

Now that I’ve explained the manual in basically one line, I’ll actually dive a bit deeper into how it works.
Basic Operation:
The Feiyu Tech wearable gimbal is super easy to use, assuming you can memorize those precisely four button combinations. At its core it has two basic ways that you can mount it: Vertically, or Horizontally.
When you get it out of the box you’ll have noticed that the GoPro mounts aren’t attached to the unit, rather, you have to screw them on. This is my only real annoyance on the design of the unit. No, not that I had to screw them on – but rather that their protective case doesn’t fit the mount well with them attached. Given that’s the only way to use it, it’s a stupidly annoying omission (you can still fit it in the case though by re-purposing one of the extra protective pieces and layering it on top of the base foam layer, giving you extra height).

These two GoPro mounts attach to any GoPro mount in the world. That’s great, because it makes compatibility easy. The downside though is that the weight of the gimbal is significant, so you can’t quite get as much torque as you want on the screw to keep things super-snug on the mount. So it’ll move if you press on the gimbal, since it has far more leverage than a GoPro would normally. Still, it generally works.

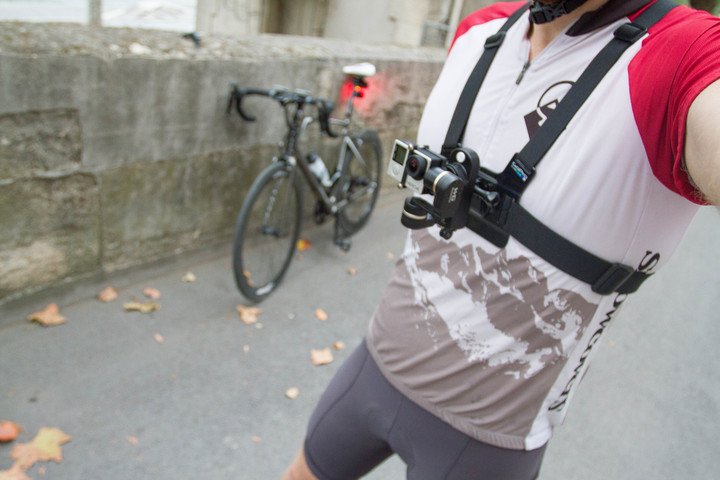
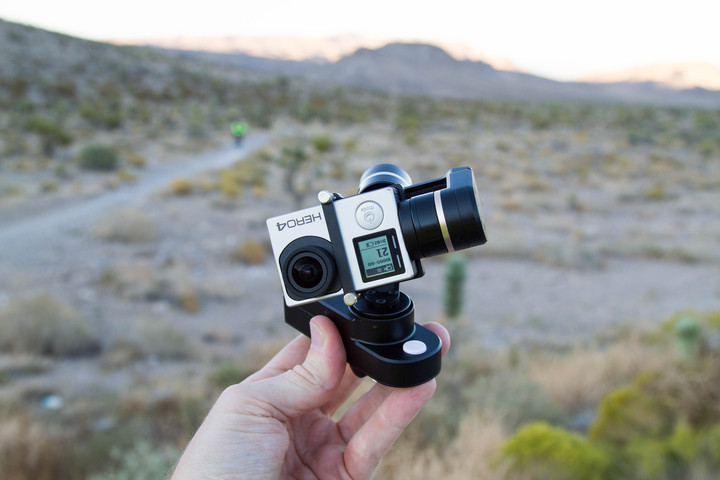
As noted, I attached both GoPro mounts, which gives me flexibility to mount it both horizontally as well as vertically. I use horizontal on my bike, and vertical on a chest harness. But before we go too far – what does a gimbal do anyway? Well, here’s a quick video I shot explaining all the basics. Specifically, it shows you how the camera stays pointed perfectly still despite what I’m doing with the gimbal (body/bike/etc…):
As you can see, a gimbal enables you get super-still footage, without having to do post-production.
Next, the unit has a single button on it. This button also has a light below it, to let you know when you’ve turned it on. The button acts as both a power button (by holding it down for a few seconds), as well as a mode-changing button (pressing it briefly):

The number of times you press it will change to different modes. For example, press it once and you’ll be in panning mode. Press it twice quickly and it’ll shift to panning and tilting mode (my favorite). And do it three times and you’ll invert the camera (for shifting between horizontal and vertical modes). And so on. There’s an entire manual with the modes, but basically that and one more are all you’ll need to memorize. And if all else fails, just press the button through three iterations till the camera is pointed the way you want.

The batteries are located in the small compartment with the tiny hand-screw. It takes both of the included batteries (but they give you two extras and a charger). The unit claims 3 hours of battery life, but I rarely got to the point of using it that much straight in a row. I suspect it’d be more of an issue skiing or such where I could be using it all day long. Plus, your GoPro is more likely to run out of batteries sooner anyway.

Finally, you’ll remember earlier on I noted that I broke one of the gimbals. That is indeed true. See, I’ve long had the handheld gimbal version (discussed later), and have found that gimbal to be super-easy to take with me on trips. I simply toss it on my suitcase and don’t think about it. I never took any case for it or anything special. Thus, while the wearable gimbal came with a case, I figured that took up valuable real estate in my over-stuffed suitcase – so I left it behind.
That was a poor decision. By time I got to my destination, the gimbal had somehow been crushed/bent horribly within my suitcase. It was the only thing broken, and I suspect somehow something else pressed enough to bend the metals. Thus, the gimbal part wasn’t very gimby-like. So – a word to the wise: Just use the little case that comes with it. Since using said case and still travelling every week, I haven’t had any issues.
Mountable Locations:

The gimbal can be mounted pretty much anywhere you can mount a GoPro, as it has a GoPro mounting clip. But, as the name of the product implies – it’s meant to be worn (hence the ‘wearable’ part). So that honestly narrows it down to about two core locations: The chest and the helmet/head. But there are also cases where it makes sense to mount it somewhere else – such as on a bike.
Sure, there are ancillary wearable locations – such as some wrist straps or even a shoulder harness, but those are more challenging. For example the wrist location would quickly fail due to orientation issues (going beyond rotational limits as you move your arms).
So instead, I focused most of my usage to:
A) Chest harness
B) Helmet strap
C) On-bike positions
First, it should be noted that the gimbal does NOT come with any harness or strap. So you’ll have to buy that extra. I tested both the GoPro and Garmin chest harnesses (Note: The VIRB X/XE uses a chest harness, whereas the v1 VIRB uses a shoulder harness – be careful you get the right one if you go that route).
In my testing, it made absolutely no difference which one you used. They were both equally good and sucky in the same ways. They were good in that they were easy to use and both have a quick-release option. That means you can leave the chest harness on while quickly removing the gimbal.

They were both sucky though in that the quick-release functionality meant the gimbal was pushed even further away from your body – adding additional bounce. I’m sure there’s a 3rd party chest harness out there that doesn’t have the quick-release and thus pulls the unit slightly closer to the body. Though it’s possible that may introduce some sort of other unanticipated clearance issue.

Next, we’ve got the head/helmet option. In this case I strapped it to a helmet using a GoPro helmet/head strap mount. In theory I could have put it on a sticky pad, but that type of sticky wouldn’t work terribly well on my bike helmet. For skiing though, it’d probably work better. In any case, I just strapped it on nice and snug and then attached the mount to it. I used the bottom attachment piece, which meant that it sat higher that I’d like. But I didn’t have much choice since otherwise the gimbal would hang down in front of my nose.

In the helmet scenario you’re capturing more of your point of view (POV) than a standard mounted location. This is both good and bad. On the positive side it means that if you turn to look at something the camera will follow, and generally do so smoothly. However, if you turn too fast, you might exceed the panning limits and the unit might shutter slightly in that pan. This would be especially true if you’re constantly looking left/right over your shoulder for cars or such.

The other challenge here is that the gimbal is really damn heavy on your head. I wouldn’t want to ride like this for very long. I did a few short loops around the city, but couldn’t imagine doing hours of riding like this comfortably. Perhaps on a heavier helmet (like a skiing helmet) it wouldn’t feel so hefty.
Lastly, we’ve got a bike mount location. Ultimately this could just as easily be the front of a car, motorcycle or any other moving thing. As long as you’ve got a GoPro compatible mount spot, you’re good. In my case, I used the K-Edge handlebar mounts, specifically because they’re machined aluminum versus being a plastic mount. The extra forces applied when something as heavy as the gimbal starts to bounce can be massive – and would likely easily tear off a plastic mount.


This configuration generally worked well, though there were a few caveats/notes:
A) On a mountain bike, it sucked. The gimbal would stay stabilized on typical mountain bike terrain for about 20 seconds, and then lose orientation. I tried it on three different mountain bikes on very different terrain.
B) On a road bike, it was great – I had very few issues there – it worked well most of the time.
C) On any bike, be sure your brake/shifting cables don’t touch any part of the mount at any time during any rotations. I found I had to zip-tie pull back some of my cables to ensure they don’t block the rotation of one axis. Not a big deal, but sucks when you realize it 15 minutes after leaving the house.
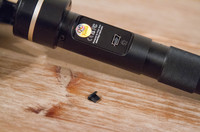
The biggest challenge you’ll find is that the unit simply doesn’t handle massive and sharp impacts well. So when mounted to a mountain bike going over rocks, it’s like taking a baseball bat to the side of the unit. The bike doesn’t absorb anything, and soon the unit will be all crooked, like this:

Whereas when mounted to your body – it rarely (almost never) did that. Your body absorbed that initial impact and the gimbal was able to do its job keeping things nice and level. I’d strongly recommend going the chest harness route as the best overall position for the wearable gimbal, unless riding on reasonably smooth roads.
Test Videos:

I’ve taken a slew of test videos over the past month or two with the gimbal, and have simply arranged them in a vast sequential list of videos below. Most of them are cycling focused, but I did include a running one. And on the cycling front, I’m showing different mount locations (i.e. chest vs helmet) as well as different terrain (mountain vs road).
A) Mountain Biking – Kananaskis (Chest Harness): In this case I was mountain biking up in Kananaskis, Canada. Myself and another traded using the GoPro on our chest for these clips:
B) Mountain Biking – Kananaskis (On-bike mount): This is a good example of why you don’t put it on the bike directly when mountain biking. You’ll notice the camera continually gets out of alignment and ‘falls over’:
C) Mountain Biking – Canmore (Chest Harness): Another Canadian Mountain Biking Option, this one using the chest harness on wooded terrain at dusk. You’ll notice that the increased stability means the camera image quality looks better than it would otherwise have, given it was sunset in dense tall trees.
D) Road Bike – Paris (Chest Harness): In this case I rode a simple loop around the block demonstrating a variety of road conditions from super-smooth relatively new pavement (first portion) to light cobblestones (turning onto bridge), to heavier/larger cobblestones (turn after 2nd bridge). This was all using a chest harness.
E) Road Bike – Paris (On-bike mount): Same exact route as previous, but with the gimbal mounted to a K-Edge combo GoPro/Garmin mount instead. You’ll see it did well on the smoother sections, but once any cobbles or even vibrations crept in – it started to fail and ’fall over’.
F) Road Bike – Paris (Helmet mount): This route through/around the streets of Paris using a helmet strap instead gives a good look at the pros and cons of going with the head mounted variation. Note when I turn my head to look and how it pans.
G) Use while running: While the unit is horribly over-sized for running, I know some will be curious how well this works (or doesn’t). So, I gave it a whirl. Plus, I did some fancy picture in picture stuff to show you just how crazy it looks while I’m running.
For all of the above videos, you can see the stabilization is still generally quite impressive when the mount is working correctly, and it’s really only the on-bike mounted scenario in rough off-road/road conditions that’s more challenging.
A Brief Note on the Handheld Gimbal:

Finally, before we get to the summary I do want to briefly note that the wearable gimbal isn’t the only option. There is also a handheld gimbal. And quite frankly – I use this even more than the wearable one. Though, my use case is somewhat unique – more on that in a second.

The handheld gimbal is the far more popular gimbal they make, simply because it’s been around longer. It allows you to hold the camera sorta like a selfie-stick, but without the need to point it at yourself (you can if you want though).

It has a similar button system as the wearable gimbal in that you can quickly change modes as you wish. It also uses the same batteries.

This is great for doing anything walking or running where you’re holding the unit, it also works well for cycling. But again, you’ll need to hold the camera while you do your thing. For me, I’ve been using it the last year or so for taking videos while on the bike or running, specifically of watches and bike computers. It ensures I get super-smooth footage that you can actually read the text on the screen (instead of my bouncing). Here’s an example of one such video here shot with the handheld gimbal while riding this past fall (talking to the new Specialized e-Bike):
And here’s one while running that I put together for the Fitbit Blaze:
Ultimately, if someone were to tell me to keep only one gimbal – it’d actually be the handheld gimbal rather than the wearable one. But again, my use case is fairly unique compared to most.
Also – note that there have been a few Kickstarter projects as of late with some pretty cool gimbal solutions. Some of them offering some interesting software options, as well as 3rd party non-GoPro compatibility. All of them look great – but none of them are available today. And with any Kickstarter or Indiegogo project, I wouldn’t trust them till they ship.
Summary:
The wearable gimbal is pretty cool, and we’ll no doubt continue to see the size shrink over time from new competitors. Right now, it’s one of the only mainstream options on the market that you can actually wear. Plus, it comes from one of the most well known companies in the field (even if it’s not exactly a household name).
My recommendations would be to use the product in precisely the way the product is named: Worn. Meaning, the name is the ‘wearable gimbal’, not the ‘mountable gimbal’. In my experience when worn on the body – it’s awesome. However, when mounted to something like (like my bike), the results are more mixed. Not always horrible or bad, but just heavily mixed. Sometimes it’s great, and sometimes it just ‘falls over’.
As for the hand-held gimbal, if you tend to do more general videos and want gimbal footage mixed in here and there, then I’d go that route. I’ve had iterations of it for a few years now and just love it. It’s always on my trips with me, and you’ve long seen footage from it in my videos – even if you didn’t realize it. Ideally, that’s the goal: Make the footage so smooth and clean that you don’t think about it.
Wanna save 10%? Or found this review useful? Read on!

Hopefully you found this review useful. At the end of the day, I’m an athlete just like you looking for the most detail possible on a new purchase – so my review is written from the standpoint of how I used the device. The reviews generally take a lot of hours to put together, so it’s a fair bit of work (and labor of love). As you probably noticed by looking below, I also take time to answer all the questions posted in the comments – and there’s quite a bit of detail in there as well.
I’ve partnered with Clever Training to offer all DC Rainmaker readers an exclusive 10% discount across the board on all products (except clearance items). You can pickup the gimbals from Clever Training. Then receive 10% off of everything in your cart by adding code DCR10BTF at checkout. By doing so, you not only support the site (and all the work I do here) – but you also get a sweet discount. And, since this item is more than $75, you get free US shipping as well.
Feiyu FY-WG 3-Axis Wearable Gimbal
Feiyu Tech G4 3-Axis Handheld Gimbal
Feiyu Tech G4S 3-Axis Handheld Gimbal
All Feiyu Tech Products
Additionally, you can also use Amazon to purchase the unit (see sidebar) or accessories (though, no discount on Amazon). Or, anything else you pickup on Amazon helps support the site as well (socks, laundry detergent, cowbells). If you’re outside the US, I’ve got links to all of the major individual country Amazon stores on the sidebar towards the top. Though, Clever Training also ships there too and you get the 10% discount.
Thanks for reading!