Wahoo Fitness KICKR Trainer In-Depth Review

(Updated January 15th, 2016: Overhauled sections include pros/cons, summary, various minor items throughout post).
The Wahoo KICKR is probably the most anticipated trainer to hit the market in quite a while, if not one of the most anticipated sports technology products for endurance athletes to hit the market. But, how does it live up to the promises and fanfare? Well, I’ve spent the last two months using it week in and week out. Every aspect of this trainer I’ve poked at or dove into. Heck, I even took parts of it apart (with wire cutters!).
In doing so, I’ve got a pretty good grasp on how the unit works, as well as all the details inside and out. Because I want to be transparent about my reviews, once my evaluation period with the Wahoo KICKR has elapsed, I send it back to them in the Atlanta. Simple as that. Sorta like hiking in wilderness trails – leave only footprints.
Lastly, at the end of the day keep in mind I’m just like any other regular triathlete out there. I write these reviews because I’m inherently a curious person with a technology background (my day job), and thus I try and be as complete as I can. But, if I’ve missed something or if you spot something that doesn’t quite jive – just let me know and I’ll be happy to get it all sorted out. Also, because the technology world constantly changes, I try and go back and update these reviews as new features and functionality are added – or if bugs are fixed.
Unboxing:
First, let’s get this thing unboxed. Twice.
Here’s the outer shipping box that the KICKR comes in. If you buy your KICKR via the interwebs, it’ll likely come in this box.

Inside the heavy-duty cardboard box, you’ll find the KICKR’s inner box.

Thus, if you buy your KICKR at a local bike shop, you’ll likely find it looking more like this:


From there you’ll crack open the outer shell and find the protective cardboard inside. Mine held up pretty well given the travelling it did. It first flew from Taipei to Las Vegas via UPS. Then, I dragged it across the Vegas CES show floor to my hotel (no easy feat for those familiar with Vegas). After that, I took it from Vegas to Houston to Paris via commercial airliner (checked luggage). And then finally, I dragged it again through the subways of Paris to my apartment. I’d imagine it should hold up pretty well in a mini-van ride home from the bike shop.

Below the cardboard is the KICKR, fully packaged up in plastic.

After removing the KICKR, you’ll find another small box and a manual.

Inside the small box is the power block. It’s 100-240v, with a replaceable US cable on it. As I’ll discuss later, the power block itself works just fine in Europe.


Then we’ve got the quick start guide. Though, I highly doubt you’ll need it after this post.

Below is a plastic clip for disc brakes on mountain bikes, to keep them from potentially becoming engaged while riding the trainer.

Thus, with all the pieces taken out of the box, here’s what you’ve got. The trainer, the power cord, a small manual and warranty statement, and then the little plastic doohickey.

All good?
Good.
Let’s take a quick tour of the unit before we dive into it.
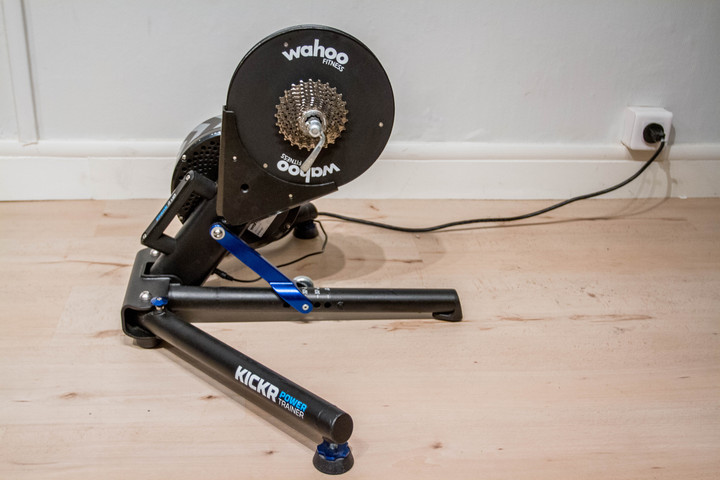
First up to note is that you’ll unfold the legs for riding, allowing you to store it in smaller spaces. There’s a handle on the back to pick it up – it says ‘Crank it up’ on it.


The legs that fold out have these all-metal clips on them. They feel strong and I don’t suspect they’ll break.

As I’ll discuss in more detail in the next section, the trainer includes a cassette, which is pre-mounted onto the flywheel. It also includes the training skewer.

Down below, you’ll see a small round knob, along with a blue metal lever. This allows you to control the height of the KICKR. This is of use for different tire sizes, so the rider isn’t so high off the ground (perfect for The Girl with her 650 wheels).


Finally, note on the backside of the unit, the large flywheel isn’t ‘open’ like some trainers, rather closed. The entire flywheel does rotate though, including where you see those silver arrows (it rotates in that direction).

With the high level overview complete, lets start getting detailed.
Weight/Size Comparisons:

When it comes to size, the unit is definitely the heftiest of the bunch…by far. As in, put that kid on a diet and take away the marshmallows! Yes folks, that’s pounds below:

46 pounds in total (about 21kg)!
To put that in perspective, the CompuTrainer weighed in at 22 pounds, and the Tacx Genius at 25 pounds, and the LeMond Revolution at 34 pounds.
Now, I don’t think the weight is really a bad thing. Yes, beastly, but not bad. It’s stable, and that’s one of my most important trainer aspects. I HATE wobbly trainers. The weight likely comes from the components. The thing is made out of steel for all major components. Which means that it will hopefully last a long time. Where it does pose a slight problem is for those folks that may take trainers with them while travelling. Most airlines have a 50-pound weight limit for checked luggage (without additional fees), and this just sorta barely slides in under that.
When people talk about the CompuTrainer, there’s one thing they always say: “It’s build like a rock”, which is immediately followed by “I’ve had mine for 10 years, and it still keeps on ticking”. I think from a materials standpoint, the KICKR is in the same ballpark. Of course, time will be the true test.
From an electronics standpoint, having Bluetooth 4.0 and ANT+ in there should make it relatively future proof for a while. You can still connect modern smart-phones with legacy Bluetooth headsets from years ago, and thus I don’t see backwards compatibility being an issue anytime in the next 6-10 years.
Lastly…one final thing to touch on.

LeMond Revolution Pro this is not. It’s funny, a lot of folks have made observations that the Wahoo KICKR is simply a rip-off of the LeMond Revolution Pro Trainer. To help understand why that isn’t the case, let’s run through the main differences.
A) The LeMond trainer is wind-based, thus wind provides resistance. The Wahoo KICKR is electronic. No wind is used, nor emitted.
B) The LeMond trainer does not have resistance control. The Wahoo KICKR does. In other words, you can’t control the LeMond, you can control the KICKR.
C) The LeMond trainer uses private-ANT to communicate between itself and the PowerPilot head unit. Thus no connecting your ANT+ head unit (i.e. Garmin Edge 500) to the LeMond. The KICKR uses open-ANT+, and provides speed and power (and thus distance).
D) The LeMond does not have Bluetooth Smart (or any Bluetooth in it). The Wahoo KICKR does.
E) The LeMond trainer has no API or development aspects to it for 3rd parties. The Wahoo KICKR does.
F) The LeMond trainer does not have an adjustable height. The Wahoo KICKR does. Same goes for adjustable legs.
The point here isn’t to just be a bulleted list of things the LeMond trainer doesn’t do. Instead, juts to be clear on differences. And certainly, there are things the Wahoo KICKR doesn’t do. For example:
A) The Wahoo KICKR is relatively normal from a loudness standpoint. The LeMond trainer is 100db. Not so quiet.
B) The Wahoo KICKR weighs 46 pounds and eat kittens for breakfast. The LeMond trainer weighs a fraction of that.
C) The Wahoo KICKR has a sorta-mostly-realistic road feel. The LeMond Revolution has a very realistic road feel.
As you can see, the KICKR is no more compatible to the LeMond Revolution Pro than a mountain bike is comparable to a road bike. Yes, they both vaguely look the same from a distance, but that’s about where it ends. If you wanted to add up the things that are similar, it’d look roughly like this:
A) Both trainers use a cassette to attach your bike to them.
B) Both trainers have three legs
C) Both trainers have a big round thing on them.
D) Uhh..both trainers attach bikes to them? Umm, end of list.
The LeMond Revolution was actually based on a Russian Physicist design that Greg LeMond worked with in the 1980’s. He adapted it as part of the Revolution Pro. Again, both trainers have their markets, but it’s important that if you’re comparing the two on looks alone, then you’re likely missing the forest from the trees.
Hardware Setup:
During the next few sections I’m going to walk through using the trainer on a day to day basis, and then after that I’ll dive into some of the 3rd party apps.
Attaching your bicycle to the trainer:
First up, is getting the unit attached to your bicycle. To do so, you’ll be removing your rear wheel. It has no action in this game. Instead, the KICKR comes with a rear cassette that replaces the cassette on your rear wheel. This has both benefits and annoyances. From a benefits side you remove issues around rolling resistance of the wheel itself, as well as wear and tear on the wheel. Trainers are notorious for chewing up wheels (quite literally, leaving fine black dust everywhere). The downside though is that you have to take off your rear wheel and put it back on. Some bikes are easy, and others are a bit of a pain in the butt (such as my P3C). If it were me, I’d probably have preferred not removing my wheel – but that’s just a personal preference.


Once you’ve got your wheel removed, you’re going to go ahead and place it on the skewer that’s provided with the KICKR. I find it easiest to remove the skewer entirely and then thread the skewer in once your bike is on the cassette.


After that’s complete, ensure you tighten up the skewer.

Done, you’re ready to ride.
Now, if you have a smaller bike (or one with a different wheel size), you can also adjust the height of the trainer down along the bottom:

For example, when The Girl rides her bikes, I’ll sometimes remember to adjust it so that it’s lower to the ground for her.

If you haven’t yet plugged the trainer in, be sure to do that. The cable that comes with it plugs into a standard American outlet. But, it’s 100-240v, which means it works anywhere in the world with a simple $1-2 adapter. That’s how I use it over here in France.


In fact, if you want to get all fancy, you can simply change out the actual cable from the power block to the wall. Again, a couple dollars.


Ok, and the power cable plugs into the trainer at the bottom, under it.

With that, let’s start using it.
Software Setup:
Wahoo Fitness provides the Wahoo Fitness App on the iPhone/iPad platform, which is their fitness application that connects to the trainer and records data. This is the same application that also works outdoors while cycling or running. And, the same application that connects to both ANT+ devices (with the ANT+ adapter), as well as Bluetooth Smart devices (for compatible devices). The applications records your workout, as well as exports the data to any number of formats (i.e. CSV/TCX/etc…) and services (Training Peaks, Nike+, Garmin Connect, Strava, etc…).
After downloading the free app, you’ll be brought here:

Next up is pairing to your KICKR trainer. To do this, we’ll dive into the settings. It’s here we can pair any number of devices – from the KICKR to heart rate straps, to speed and cadence sensors. Note that I created a separate ‘profile’ for the trainer. I do this so that I can disable the GPS on it, and then not mess up my running or outdoor cycling settings with GPS on.
At any rate, within settings we’ll have a list of sensors we can pair with:

We’ll click to add a sensor, and then add a power meter sensor:

Once we do this, it’ll start searching for the Bluetooth Smart power meter device profile. In the event you happen to have a Stages Power Meter nearby, note that it would pick it up as well – so just be aware of which one you pair to.


Once that’s done (and it’ll only take a second), you’ll want to pair any other sensors you have. I recommend picking up the Wahoo Blue SC, since at this time the KICKR doesn’t provide cadence information. The Blue SC does, and will then keep everything Bluetooth Smart.

And finally, pair up a heart rate monitor if you have one:

Next is a REALLY important item, especially if you have the Blue SC. You’ll want to change the speed data to pull the speed data back to the KICKR. Otherwise it’ll pull from the BlueSC, which won’t have any speed data since you won’t have a magnet flying past the magnet since your wheel is off the bike.

And, while you’re at it, ensure that the cadence is coming from the combo sensor, and not from the KICKR.
Finally, you’ll want to scroll down in all the data pages that are offered and ensure the KICKR Training Page is enabled:

There are numerous training pages available to you, below is a quick gallery of them. My only complaint though is that at the end of the day I’d really much rather just customize these myself – like on most devices. Pick and choose them. Sorta like how I can do on the RFLKT. Instead, they are pre-canned and I have to live with whatever I was given, and on the pages they were set. Note when it says ‘Tap to Toggle mode’, it means that you can tap the page to then alternate through variations of that data from Current data (instant), to previous and current laps and averages.


Ok, with all the data pages out of the way, let’s get into controlling the KICKR.
Resistance Control:
The KICKR has four user accessible control modes. Each one of these modes controls the trainer in slightly different ways. All of these modes are found when you enabled the KICKR control page, and are just sub-sections of that page.
Level Mode:
In this mode, the KICKR has a simplified resistance level bands. From 0 to 9. These are somewhat abstract, and simply levels that Wahoo has effectively christened. Just like your stationary bike at the gym has random levels on it, these are sorta random too. But, if you just want an easy option for remembering what setting you had it on last – this is it. I prefer the other options.

Resistance Mode:
This mode simply controls the resistance of the brank unit – on a scale from 0 to 100%, with 100% being ‘full stop’. If you’re thinking of incline, that’s later on in a different mode.

Erg Mode:
Erg mode is without question my favorite, and where I spend the vast majority of my time. It’s simple, and potentially brutal. In this mode you simply specify an exact wattage, and the unit holds it. No messing around here. Input wattage, trainer responds, you hurt. Rinse, repeat. It’s how I do most of my workouts – based on set wattages. You utilize the +/- buttons to increase the digits that make-up the watts. In general, I find the KICKR will adjust it within 1-2 seconds. Enough that it doesn’t stop-you dead if you go from 100w to 400w.

As you’re riding, the unit will show you the target power (what it’s putting out) above, and then the actual recorded power below.

Sim Mode:
Last is ‘Sim Mode’ – short for simulation. In this mode, it allows you to simulate different settings based on not only slope and wind speed, but also rolling resistance. First though, you’d define a slope (i.e. hill), and then you’d define the wind speed (i.e. pain).

Then, you click on the ‘Bike Type’ setting and you can define the exact Coefficient of Rolling Resistance and Drag Coefficient of your setup (primarily your wheels).

I haven’t played with this particular setting too much – but the potential is pretty impressive. There’s plenty of apps and data sources out there today that allows you to pull in and specify this information. Which would primarily serve to better simulate the impact of your tires (and body drag) – given that the KICKR doesn’t otherwise include any of those forces in its equations.
General Wahoo Fitness App Items:
After you’re done riding, you’ll want to save your workout. Note that you can press pause at any time to stop recording. Also note that incoming calls/texts do not impact the KICKR from recording, it’ll continue to do so in the background. At the end of the workout after you’ve pressed stop, you’ll get this screen:

Upon saving you’ll get some workout summary details. This includes overall averages, as well as lap averages. I don’t find the lap averages page terribly useful, primarily due to the lack of power information on there.


From there, if you click the little icon in the upper right corner, it’ll allow you to save it out to various destinations that you’ve pre-configured. In my case, I’ve setup the unit to share to Training Peaks and Garmin Connect. Additionally, I can e-mail the workout files. E-mailing is great because it includes the files in a slew of common formats, that virtually any application on the planet can accept.

If you haven’t setup sharing ahead of time, fear not, the workout is still saved locally and you can share it later. You can pre-configure these sharing options though with a number of services. Below are the current services.


With that, you’re data is transmitted off to the service and you’re good to go.
You can see how I often feel that the best application out there for use on the iPhone and flexibility of the data is actually the default Wahoo App. I’m one who just wants the data in the formats I want it in, and care little about putting it in yet another app’s online site. Thus, this allows me to get it to Training Peaks or Garmin Connect (my two main dumping grounds for files), and not worry about it.
Note that the application supports user profile settings such as setting up heart rate zones, power zones, weight, and audio cues as well. You can see some of the zones information in my various screenshots above.
Trainer Feel:
A lot of people ask about ‘feel’ when talking about trainers. I’m a horrible person to ask about that. Perhaps because with the exception of the LeMond Revolution Pro, most trainers for me fall into two categories: Feels fine, or feels sucky. The Wahoo KICKR falls into the ‘feels fine’ category. Admittedly, at the upper end of that. The LeMond revolution is the only trainer that I say ‘Yes, I FEEL that!’.
I train so much in erg-mode, that ‘feel’ isn’t really part of the equation. Rather, providing consistent resistance is of more importance to me. Which isn’t to say I don’t value feel at all. It’s just that I personally don’t rank it high on my list of important items in a trainer. Rather, I prefer accuracy, durability, interoperability, and anything else ending with the letter ‘y’. Touch-feely does not count.
But, others who have ridden KICKR that do rate feel higher, do like the feel more than most trainers…for what it’s worth.
Noise Levels:

Noise levels across trainers are a funny duck. There are many aspects that impact noise, from cassettes to trainer tires to room flooring (i.e. wood vs carpet), to trainer mats and so on. The most important non-environmental factor across trainers is actually speed. Not wattage. I can keep the wattage at a set amount, and simply vary my speed (via gearing or cadence) to change the volume
I previously had done a sound test back in early January, comparing the KICKR to both the LeMond Revolution as well as the Kinetic Road Machine. In that test I used a few different benchmarks, though keeping the gearing and speed levels the same – resistance was the one variable. I generally went from low speed to high speed and just let it be.
This time, I decided to approach it slightly differently. Instead of focusing as much on a high-end speed, I’d just focus on a very common threshold – 200 watts at 20MPH. I kept my gearing exactly the same across all three units (well, you’ll see I had to gear down one ring on the Kinetic because I was too fast).
I then increased the speed to 30MPH, and then to 50MPH on both the KICKR and the CompuTrainer. The sole purpose of this was merely to make it as loud as possible.
Thus, in effect I’ve given you noise levels at ‘normal’ (20MPH), not-so-normal-but-perhaps-occasional (30MPH), and outright silly (50MPH).
Here’s the new video montage:
And, for those that don’t care about video, here’s the simple table.
Trainer
20MPH (200w)
30MPH (200w)
50MPH (200w)
Wahoo KICKR
68.7db
83.5db
86.1db
RacerMate CompuTrainer
69.7db
82.4db
85.8db
Kinetic Road Machine
70.0db
82.6db
N/A
I didn’t include the LeMond Revolution Pro this time, because honestly it’s like bringing a bull into a china shop. I’ve well established it’s incredibly loud at every level, well beyond these other trainers. Not even in the same city, let alone ballpark. And just repeating how much louder it is than the other ones seems silly. You can watch my previous video here on it.
Calibration:
The KICKR supports a calibration spin down method, which enables you to account for any resistance in the system, and/or environmental or manufacturing variations. In order to initiate the spin down, from within the Wahoo Fitness app you’ll simply select the little wheel icon from the upper right corner. You can trigger this at any time during a workout (before starting, during, paused), though I’d recommend you pause the workout so you don’t have a random data blob in the middle that doesn’t match the rest of your workout.

When you do so, you’ll see the button for ‘Calibrate KICKR’ – which will give you instructions to perform the spin down. In short, you’ll be going up to 23MPH, and then coasting until you see a notification (10MPH).

You can see the system will wait until you’ve reached the correct speed:

Then, as you coast down from 23MPH to 10MPH, it’ll

Finally, spin-down complete!

No specific calibration value is outputted during calibration – just a good to go!
3rd party apps also have access to the calibration API’s. And the API’s for 3rd party apps also provide more detailed feedback on the above calibration method (result feedback). And in fact, they have two options. The first is the roll-down like above. Different apps have implemented that different ways. You’ll see for example in Trainer Road that the upper left corner will say ‘Calib Ready’ when it’s prepared for a calibration:

The second method that apps have available to them is a zero-offset. This test is done with the unit at a stand-still (no pedaling). Today, to my knowledge no 3rd party apps have yet taken advantage of this functionality – though it is there. You can see this available in a non-public toolset that Wahoo has for testing, which will give identical results for 3rd party apps.

I’d expect to see this added in an app like Golden Cheetah, which caters to users that may have more desire to tinker. Wahoo believes that the current roll-down method is very accurate, and is their preferred method. In my testing, I’d agree with that assessment. It’s easy and straight-forward.
January 2016 Update Note: In addition to the spin-down type calibration, Wahoo now also offers a physical calibration tool. This is essentially a weight that’s used to calibrate your KICKR if you believe it’s out of whack. You can either buy this tool from them, or you can contact their support desk and they’ll loan it to you (though I think there is sometimes a waiting list).
Firmware Updates:
The Wahoo KICKR can receive over the air firmware updates via Bluetooth Smart. When a new firmware update is available, the Wahoo App will notify you of the update, and then redirect you over to the Wahoo Utility app, which performs the actual update:

The updater will first download the software package from the internet, and then apply the update.

I find the process usually takes a few minutes to complete. So I often just leave it sitting on the flywheel to update. I figure that gives it the best connectivity to the communications pod a few inches away.

Once complete it’ll ask you to unplug the KICKR trainer and then reset any KICKR apps that you may have had open. Overall a very painless process that I’ve done numerous times over the last two months.
January 2016 Notes: In addition to the main production Wahoo firmware updates, you can also get Wahoo KICKR beta firmware updates (such as FE-C), which can sometimes add new features ahead of release. These beta updates may last months. To access the beta updates, you’ll need the Wahoo Utility app, and then you can follow the steps in this short movie clip to access the beta firmware menu.
Power Accuracy:
I’ve spent a LOT of time riding the KICKR over the past two months. Tons of time. And if there’s nothing else that’s impressive, it’s aspects of the accuracy component. Now, I say ‘aspects’ because there are actually two pieces I look at when I’m talking about resistance controlling trainers. The first is how quickly the unit controls the resistance, and how it responds to your output. Remember, the trainer is designed to hold a given wattage in most circumstances – either directly or indirectly. Meaning it’s holding a specific value such as watts, or it’s holding a grade. You want to ensure that if its holding a wattage, that it can do that even when I dramatically change my output.
Take for example the Tacx Genius. This trainer had a very slow response to my sudden changes in wattage. Sometimes 10-15 seconds if I made a sudden jump, before it would pull the resistance unit back in to what it was set out. The CompuTrainer on the other hand, very quick, it doesn’t let you get out of line.
I found the KICKR more in line with the CompuTrainer. It kept the wattage right on-par, despite any fluctuations on my part. And within 1-2 seconds it would adapt to any major shifts. Significant wattage changes saw roughly the same ramp. I saw slightly more ramp when I was talking major shifts. For example, during a TrainerRoad workout that went from 155w to 465w, it took about 4-5 seconds for it to ramp up. This isn’t really a bad thing per se, as it means you don’t have the brick-wall syndrome (where it feels like you’ve just smacked a brick-wall), and thus it allows your legs to adapt to the change.
The second piece is accuracy against other power meters. Anytime I test against other power meters, there’s an aspect of ‘Who’s right?’. And honestly, I’m not here to answer that. And thankfully, in this case, I don’t really think there’s a reason to try and answer that. To put it into perspective, see below:

The two Edge 800’s are paired to the Quarq and Stages PM, while the iPhone is controlling the KICKR. The big iPhone number (200w) is wattage set-point. The small iPhone number (199w) is my current instant-power. On the Edge 800’s you see my 10-second power as the upper number (200w and 206w respectively), and the number directly below that is the 30s average (199w and 205w respectively). Cadence is also displayed, based on those units internal power-meter provided cadence sensors.
With the latest KICKR firmware late last week, they’ve resolved any outstanding beta bugs I was seeing, and things are very stable now – from low speed to high speed, as well as coasting. Previous beta drops (again now solved) had some issues with coasting where it didn’t account for it, thus skewing some of my numbers from those workouts for any time I was coasting (which was pretty rarely).
Here’s a workout I completed on the latest firmware, and you can see just how solid it tracked against both the Quarq:

From a power meter variability standpoint, here’s how things tracked. First, in raw watts. What you see is that post-calibration (at about the 600 marker), things are right on top of each other. Generally within 10w of variability, but often within just a couple watts.

Now where you see differences is those five spikes – or quick accelerations I did. The reason for the differences isn’t actually dramatic differences in power readings. Instead, it’s just inherent lag between data sets albeit synchronized).
That said, here’s what things look like from a percentage standpoint (I cut it off at 60-80% so you’d get more action on the graph):

Again, you’ll see the big jumps during the accelerations just due to tracking. If you look at the point after the calibration, things get remarkably stable. This was mostly a 10-minute relatively steady-state effort. Post-accelerations you see a bit more variability. This is partially the result of just the way that the Quarq reports power back having more variability in it – like most all power meters out there today. For fun, I picked a completely random 15-20 second snip (I really just scrolled a bunch and just stopped and copied a chunk of data. What you see there is that the KICKR has much less variability between data points, and thus you’ll see that more stable line.

You’ll note that all three are within 2.3% of each other. In the above, I went ahead and included the Stages data that I was capturing as well. Just for perspective on data frequency. I have specifically not included it in the other graphs as I’m still working with them on the a follow-up review, and I don’t want this to become another Stages PM review. As I’ve said elsewhere, I’ll definitely post an update to that in the future. But I don’t have a timeframe for doing so.
On the KICKR front, obviously, because of a lack of rear-wheel, I cannot compare it with a PowerTap output – which would otherwise be on the rear wheel.
January 2016 Note: While my experience with the KICKR has been very solid on the accuracy front (on both my initial KICKR this review is based on, as well as the one I later purchased). However, some folks have seen power accuracy issues. It appears that early models (i.e. those in the first year), were very solid. Then somewhere along the way accuracy slipped. In early 2015, Wahoo added a person dedicated to accuracy testing of KICKR’s, as well as introduced a number of power accuracy improvements. These appear targeted at later-production KICKR’s that were having accuracy issues.
RFLKT Control:
At present, one cannot control the KICKR trainer using RFLKT. It is coming, but it’s just not there yet today. RFLKT today allows you to view information provided by your iPhone over a Bluetooth channel. Think of it as a remote display. 3rd party applications are being developed by various companies to take advantage of this. Effectively replacing a Garmin on your handlebars. Instead, app makes such as Strava would have connectivity to the RFLKT, and be able to display whatever they pleased on it.

You can and will however get data fields from KICKR presented to RFLKT. For example, I can pipe the wattage to the unit, and stop and start the training effort from the RFLKT.

Down the road, I’d like to see everything from being able to control wattage/resistance (basic) to starting a calibration routine. All this is relatively straightforward from a programming standpoint – it’s just a matter of where it stands on Wahoo’s internal development totem pole. And note that this would be controlled by either the Wahoo App, or another application (Wahoo or 3rd party). Meaning that the RFLKT wouldn’t directly control the Wahoo KICKR, but instead would pair to an phone or computer app, which in turn controls both. All of this control is done over Bluetooth Smart, as the current crop of RFLKT units do not have ANT+ within them.
ANT+ & Bluetooth Smart:
The KICKR is unique in that it’s the only trainer on the market today that is fully Bluetooth and ANT+ enabled. The unit contains the necessary hardware for communication to existing ANT+ devices (such as the Garmin Edge 500 or Forerunners), as well as Bluetooth Smart support for phone and tablet based devices.
Bluetooth Smart integration requires the use of a Bluetooth 4.0 device. Which means you have have an iPhone 4s or newer, or a 3rd generation iPad or newer. Additionally, at this stage the only Bluetooth Smart device support for these device profiles is on the Apple platform.
From the ANT+ side, the unit uses the ANT+ Bike Power Meter device profile to broadcast your current power and speed. This means it’s compatible with all current ANT+ power meter head units. For example, the Garmin FR310XT/FR910XT/Edge 500/Edge 510/Edge 705/Edge 800/Edge 810, all CycleOps Joule units and Joule GPS, Timex Global Trainer, Magellan Switch, and countless other apps. It will not at this time broadcast cadence though, so you’ll need to add an ANT+ cadence meter into the mix in order to get that on an ANT+ enabled device.


On the Bluetooth Smart side, it uses the standardized Bluetooth Smart Power Meter device profile to broadcast the same power and speed information. This means that it’s compatible with devices that support that device profile. At present, that’s only software apps, and no physical head units. The unit utilizes the same standard as the Kinetic inRide and Stages Power Meter, which are both based upon the agreed and ratified spec for Bluetooth Smart PM’s.
Finally, at this time (as of March 5th), Bluetooth Smart is currently the only way to control the resistance in the KICKR trainer. Meaning, you have to have a compatible Apple device (either phone/tablet/Mac) to control the unit. The next step is ANT+ control, which the Wahoo team is working away on. They expect it’ll be released to developers in the coming weeks (which I’ll talk about in a second).
At this point, support for Bluetooth Smart control on Windows simply isn’t on their radar. Instead, they’d leverage ANT+ support for that. On the Android side, Bluetooth Smart control will be coming, but it’s really in the hands of the handset manufactures right now, more than Wahoo (Wahoo is waiting on them). Samsung will be first, and HTC following that. The good news there is that the ANT+ support with a couple dollar OTG cable should largely get Android folks up and running quickly once the Wahoo ANT+ support is finalized.
Finally of note, is that CycleOps has committed to adding in the ANT+ Resistance Control spec to their trainers as well, as soon as it’s finalized by Wahoo Fitness. This is actually pretty significant, as in doing so it completely opens up their platform to the same level of 3rd party development that Wahoo will have (minus the Bluetooth Smart side for the moment). Further, I think it’ll hopefully pressure other companies to do the same (looking at you Tacx).
January 2016 Update: In 2015 many companies adopted the ANT+ FE-C standard for control of trainers from apps such as Zwift, TrainerRoad, and Kinomap (among many others). At this time, Wahoo is currently beta testing this for the KICKR & KICKR SNAP, which can be accessed via the beta firmware option (see the end of the Firmware Updates section above to access it.)
3rd Party Apps:
January 2016 Note: It’s really best to just see my trainer app guide (it’s massive), since everything posted below, while generally still correct, is rather outdated. Whereas my guide is huge and covers some 20 apps!
Perhaps the biggest single reason the KICKR is so different than other trainers is the open nature of it. Thus, I really wanted to dive into what some of the 3rd party apps are doing. Now, this section is a bit unique in that I’m not so much doing a deep-dive review on these apps. More just talking about what they do. Some of these apps are still in development, and some are complete (I’ll note which ones). And realistically, there’s a TON more apps in the pipeline by a lot of folks I’ve talked with. As these companies release apps I’ll add them in here. Sort of a gallery. Well, at least until there’s too many. Many of these companies are waiting for the ANT+ Resistance Control. In talking with Wahoo over the weekend, they hope to have this in developers hands in the next 1-2 weeks. After getting the units into your hands today, that’s their next big-ticket item to knock out.
Once that happens, it really opens the door to all of the PC apps, and apps that don’t have Bluetooth Smart in it. That’s because these apps can use the ANT+ USB adapter, as well as the existing Wahoo Fitness iPhone ANT+ adapter (for pre-iPhone 4s units).
But ultimately, I knew folks really wanted to hear what I had to say – so I wanted to go ahead get the review out the door, even if all the apps weren’t quite finished. As such, a huge thanks to all the developers below who I pestered endlessly to get me pre-release builds to be able to put this all together in time.
3rd Party Apps: Trainer Road:

TrainerRoad is one of the apps that is fully KICKR ready today (if you have a Mac, pending ANT+ support for Windows). In fact, it’s actually supported KICKR since all the way back in August at Eurobike. TrainerRoad is a subscription based app that’s available on Windows and PC’s (not on iPads/iPhones) that has a massive workout library and guides you through completing workouts with your data being recorded on the computer and then uploaded upon completion to a central web platform.
The first step that you’ll complete is to pair the computer to the KICKR. To do so you’ll simply click the ‘Pair’ button next to Wahoo KICKR, and it’ll find the trainer via Bluetooth Smart. This only takes a few seconds. Additionally, I’ve also paired in a Bluetooth Smart Heart Rate Strap as well as Bluetooth Smart Speed/Cadence sensor. TrainerRoad also lets you use existing ANT+ sensors you may have too. So if you have an ANT+ HR strap or sensor, you can mix and match with KICKR to get all your data.

TrainerRoad has a massive online workout database, and you can also create your own workouts for it as well. In my case, I just cracked open a quick workout and went to town.
TrainerRoad has the concept of target power – which is the power you should be attaining. In the case of KICKR, the software will automatically control the trainer to be that particular resistance/wattage. So in this case ,you can see that it’s currently set for 403w, and I’m achieving 404w. On the right side, you’ll see my heart rate (156bpm), and my cadence (83RPM). In the middle you’ve got my interval time, and time left in the interval.

Looking at the graphs, it’ll track that information as I go along throughout the workout.
Additionally, as you can see below, as I complete intervals it’ll automatically spit out summary information for each set. In this case my precision is at a bit of a disadvantage due to the slight ramp rate from 124w to 465w (in this case), thus it’s a bit lower than you’d probably have for a longer interval.

TrainerRoad has a pretty huge and loyal following, and is currently in their second season in the market.
About the only thing I’d love to see them integrate into this is support for RFLKT – primarily to control the workout resistance as required (and or pause/stop). Today you need access to a keyboard (or, to place your sweaty hands on your laptop/keyboard). This would seem to be a perfect use case for RFLKT.

The again, most every app I talk about here is a perfect use-case for RFLKT.
Note that TrainerRoad also supports videos like Sufferfest, which are synchronized to both the resistance and the video itself. I demo’d one of these in TrainerRoad as part of my Kinetic inRide Review, so you can check it out there.
3rd Party Apps: Kinomap:

Next up is Kinomap. Kinomap is different from the likes of TrainerRoad in that Kinomap’s focus is primarily on recreation of outdoor rides. They do this by providing a subscription service that includes unlimited use of a video library. That video library has GPS courses which are synchronized to it, which in turn control the KICKR trainer to feel like outdoors.
You’ll pair the Kinomap application to the KICKR, as well as any ANT+ or Bluetooth Smart sensors you have:
")
You can also specify resistance attributes as well as which format to show your speed/distance data in (such as MPH or KPH):
")
First up is picking out a course to ride.

There are courses on road, as well as off-road. Interestingly, because Kinomap can also be used for running and rowing, there are courses on water as well. I’d suggest you use the video filtering options to focus on cycling courses:
")
Once you’ve got the video selected you’ll ensure that your sensors are still paired:

At which point you’ll go ahead and start. Within the main Kinomap screen there are a few different views you can use. The video is pretty much always present, but the bottom half of the screen can be configured differently depending on whether you want to view a map, a dashboard of stats, or an elevation profile.


Once the video has started, you’ll be shown how far ahead or behind the video you are. As you can see in the above screenshot, you can select how the software reacts when you fall behind. It can stop and wait for you, or it can change the video rate.


Also of note is that the video can be seperately split out to an external display. You can see some of these options here.

To do so, you’ll need the little adapter if plugging into an HDMI source (like a TV). But this is ideal if you want to display things on a much bigger screen.

At the completion of your workout, you can upload your session details to a variety of sites, including Training Peaks.
If you’re most familiar with entertainment based suites like that of the CompuTrainer Real Course videos, or the Tacx videos, you’ll probably find yourself drawn to Kinomap. It’s a bit pricier than the other options, but the all-you-can-eat aspect of it is hugely appealing. The video quality is generally lower than the perfectly image-stabilized videos you’ll find by Tacx, but at the same price you’re not paying $30-$100US for each one.
Also note that you can indeed create your own videos with GPS data and upload them to the Kinomap service.
3rd Party Apps: iMobileIntervals
Next up is iMobileIntervals. This somewhat lesser known app joins the fray at a cheaper $5.99 – one-time purchase price. The app has long interfaced with Wahoo Fitness devices, and in fact was pretty much one of the very first apps to talk to the original Wahoo Fitness ANT+ adapter.
This app can be used to quickly and easy create and execute workouts with predefined interval times. Additionally, you can control the KICKR in a standard ERG mode as well (meaning, just control wattage on the fly). The first step is pairing to the KICKR trainer, which takes about one button press:

And just like that, you’re ready to begin.

When you first start out, you can load up previously saved workouts of your own, create a new workout, and pull one from a library of workouts.


The library can be sorted by category of workouts, as well as other attributes such as username. You can then publically save your workouts as well for others to use.


I went ahead and created my own workout. You can simply add warm-up and cool-down chunks, and then repeating intervals very quickly and easily.


As you can see from the timestamps, creating the below workout only took me about 1-2 minutes.

Once you’re done creating the workout, it’ll be time to complete the workout (it’ll save it for you as well). While executing the workout you can skip to different parts by simply using the music-style controls. This is useful (and unique) in the event you’re short on time and need to move into the next section. You can also specify a wattage offset in the event that you’re just not holding on anymore.


Last but not least, two items of note. First is that you can define and display TSS/NP/IF information within the app, and that you can pair to other ANT+ and Bluetooth Smart sensors. The app is interestingly enough the only app today to support the Wahoo RFLKT.


If you aren’t sure which apps you want to use with the KICKR today, the iMobileIntervals certainly is a good way to go – especially if you need an interim solution. Obviously, the graphics on it aren’t exactly the most visually stunning, but the functionality is there and works – which is what most folks are looking for. And for the price, it’s hard to beat.
3rd Party Apps: Golden Cheetah:

Next up is Golden Cheetah. Golden Cheetah is an opensource software suite primarily focused on cycling that has historically had its roots in the analytics side. A while back they added a training mode which enabled you to connect to and control some trainers (as well as get virtual power from other trainers with known power curves).
The latest beta builds of Golden Cheetah will shortly allow you to connect to and control the Wahoo KICKR. I got to play with some early previews of it, and will give you the quick rundown. At present, this will require a Mac, since ANT+ control isn’t there yet. But as soon as Wahoo releases ANT+ control, then the Golden Cheetah folks will add it in so that Windows users are also good to go.
First up is adding the Wahoo KICKR Trainer:

It’ll then go off and search for the trainer using the Bluetooth Smart within most recent Mac models. If you have an older Mac, you can simply pickup a $12 Bluetooth Smart USB adapter.

Once the device is found, you’ll go ahead and give it a name:

With the trainer added, we can start to control it.
Instead though, I’m going to create a workout. Golden Cheetah has two options here. The first is to pull workouts from the large online (and free) workout database ErgDB. The second is to simply create your own. In my case, I just created a quick demo one, that you can see below.
For this workout, I used predefined wattage steps – though I could have used % of FTP Wattage or gradient as well. Each chunk in the workout has a specific number of minutes assigned to it (which I supplied). As I’m building this, it’ll create a small graph of the workout as well.

These workouts can be saved locally, or published as well. If you save them locally, you can see how easy they are to edit:

Finally comes time to load up the workout, or to control the unit in a general resistance mode.
While controlling the unit your data will be displayed up on the top. In my case, my current KICKR power, my current KICKR speed, and distance information as well. Additionally, the app would normally display the assigned power level, and the steps within the workout would be overlaid onto the screen. I was running into a bit of a pre-beta bug, so it wasn’t showing up for me.

In addition to the raw data, I can also add in media files (such as movies) that can be display alongside my data – to make the trainer ride slightly more bearable. Once the workout has completed, it’s automatically saved into your workout history within Golden Cheetah. And from there you can easily export it out to numerous formats, or straight to services such as TrainingPeaks, Strava, RideWithGPS and more.
For many folks, the free Golden Cheetah may be the best bet if your looking for one-stop shopping around training and analysis all for the unbeatable price of…free.
3rd Party Apps: Strava Segments by Wahoo
Ok, this one isn’t exactly third party. It’s made by Wahoo. It’s just not released yet. And, there’s no specific timetable to release it. But, it’s cool enough that I wanted to give you a brief tour. I’ve previously shown off bits of it back at Eurobike and Interbike. But this time I had a bit more hands-on time with it.
The Segments app allows you to search out and load up any Strava Segment uploaded anywhere in the world. I simply enter in a city name and/or location, and then off I go.

By doing so, I’ll see the various segments available within that view. I can then zoom around the map (typical pinch/zoom) to look at a given segment. By doing so I’ll pull open the current Leaderboard for that segment, as well as a course profile. You’ll note it also has my best time listed (if I’ve raced that segment). Note that today even if you complete a segment on the KICKR, it’s not uploaded back into Strava. It’s purely separate on your own device.

I went ahead and I changed focus just down the road a few miles to my old neighborhood.
")
From there I found a suitable course that was short for the purposes of this demo:

The bonus was that it was downhill.  The second bonus was that my next-door neighbor was on the leaderboard. And thus, I planned to beat him.
You can see prior to me riding the course, if I switch the leaderboard stats over to ‘KICKR Trainer’, it’s empty. Also note that ‘Best time’ is empty too.

I should probably note that this is an iPad app, and does require an iPad that supports Bluetooth Smart (3rd generation and above).

The course takes a few seconds to load up, and then it’s ready to go. Once you start pedaling you’ll get 10 seconds. This is fair since in this particular example most riders would be coming from down a hill, versus a dead stop.

Here you can see me about 12 seconds into this effort. My wattage and current stat information is displayed against the current leader, in real-time. Additionally, it has a small dot showing where he and I are.

Obviously, had I not run a half-marathon 90 minutes prior, I probably would have had slightly more success in this venture.
But my goal was ultimately accomplished, and I beat my neighbor by 5 seconds. Good enough for me!

You’ll note that the KICKR Trainer category for this particular segment now has my best time on it. On a day I’m more fresh I’ll come back and take care of this…

For an unreleased app that was thrown together at the last minute before Eurobike, the functionality is incredibly cool and pretty engrossing. Hopefully Wahoo and Strava can work through any of the remaining items and get it published up to the App Store. Awesome stuff.
My DIY iPad Stand:
In case you’re wondering where that iPad and iPhone stand came from I used throughout the review, it’s actually one I built. I posted about it a while back. The whole thing cost $30 and is quick and easy DIY.


It allows me to mount not only the iPad onto it, but also the iPhone and various cycling units as I need to.

The full parts list (only a few parts) is available below as well:
1) Mic Stand – $20
2) Mic Boom – $10
(Note: There are a slew of mic stands out there, I selected this one primarily because it had a heavy round base that wasn’t shaped like a tripod – but was still small. I figured the tripod style ones would be easy to trip over.)
And optional components:
1) iPad mount – $35
2) Generic iPhone mount – $13
3) Wall mount (no mic stand needed) – $4
4) Bar tape – $7
5) Wahoo Fitness iPhone key (review here) – $80
6) Generic/Garmin watch bike mount – $12
7) Cup holder for remote controls that clips on mic stand- $10
(Note: There are a gazillion iPhone bike mounts, the one I selected is kinda bulky, but it gets the job done. You can probably pick something more elegant…but it’ll likely cost ya. Similarly, you can use any bike mount that floats your boat for other phone types.)
Buyer’s Guide:
Each year I release a trainer buyers guide, which outlines all of my recommendations by price category. Rather than re-type that here, I’d recommend you hit up that post for all the details. You’ll find it here, full of more detail than you can shake a stick at!
Pros and Cons:
With that, here’s the pros and cons, updated as of January 2016 (most other sections of this review haven’t been updated since then, though, largely still apply).
Pros:
– Open platform, others can develop against it (now some 20+ apps that work with it).
– Just works factor (never have to futz around with it)
– Supports both Bluetooth Smart and ANT+
– Noise levels are compatible to other trainers, lower in some cases
– Pricing is about $500 cheaper than CompuTrainer or TACX Neo
– Pretty cool apps already coming out and available for it
Cons:
– Must remove rear wheel from bike
– Pretty darn heavy
– Some functionality does require 3rd party apps that is typically included (i.e. workout creator)
– While extremely rare, wireless interference can be an issue
– Some users have seen accuracy issues on units (this seems limited to a range of older units, though not the oldest, nor the newest)
Summary:
There’s no question in my mind that the Wahoo KICKR trainer has completely changed the trainer landscape. Partly because of the hardware, but more importantly because of the ability for 3rd party companies to develop software for it. As you’ve seen above, companies and organizations are already doing so (with more than 20 supporting the KICKR as of January 2016) – and at price points significantly lower than the high-priced multi-hundred dollar software suites that the market is currently locked into.
As a platform without 3rd party software, the KICKR is still reasonably strong. Yes, it does lack the massive software suites like that of the Tacx TTS suite. But it also lacks that software price tag of that suite. I believe the ability for you to ride your trainer with any app you want is far stronger than being locked into a given platform (note that Tacx also now allows 3rd party control too).
While my experience with the KICKR has been generally quite good, there are a handful of users over the past few years that have struggled with power accuracy issues. Wahoo says they’ve doubled down on testing efforts for these, and it appears that newer units aren’t having the issues that some units as of a year or two ago did (early units didn’t have issues either). Which, is pretty much the only complaint you’ll find against the Wahoo KICKR (though, certainly a valid one if you’re struggling with accuracy issues).
Lastly, the KICKR does face competition from the TACX NEO trainer as a high-end unit. The main differences between those two are around sound (the KICKR is far louder), as well as some control pieces using ANT+ FE-C (the KICKR currently has that in beta, NEO is released/production). Check out my larger trainer recommendations guide though, for how to decide which trainer might be right for you.
Found this review useful? Or just wanna save a bundle? Here’s how:

Hopefully you found this review useful. At the end of the day, I’m an athlete just like you looking for the most detail possible on a new purchase – so my review is written from the standpoint of how I used the device. The reviews generally take a lot of hours to put together, so it’s a fair bit of work (and labor of love). As you probably noticed by looking below, I also take time to answer all the questions posted in the comments – and there’s quite a bit of detail in there as well.
I’ve partnered with Clever Training to offer all DC Rainmaker readers exclusive benefits on all products purchased. By joining the Clever Training VIP Program, you will earn 10% points on this item and 10% off (instantly) on thousands of other fitness products and accessories. Points can be used on your very next purchase at Clever Training for anything site-wide. You can read more about the details here. By joining, you not only support the site (and all the work I do here) – but you also get to enjoy the significant partnership benefits that are just for DC Rainmaker readers. And, since this item is more than $75, you get free 3-day (or less) US shipping as well.
Wahoo KICKR Trainer
Wahoo KICKR SNAP Trainer (see this post for more info there)
Additionally, you can also use Amazon to purchase the unit (though, no discount/points). Or, anything else you pickup on Amazon helps support the site as well (socks, laundry detergent, cowbells). If you’re outside the US, I’ve got links to all of the major individual country Amazon stores on the sidebar towards the top.
Thanks for reading!