PowerTap P1 Power Meter Pedals In-Depth Review

Back this spring PowerTap for the first time announced a power meter that wasn’t in the rear wheel hub. Well, they actually announced two new power meters. The first was the PowerTap P1, which is a pedal based power meter, while the second was a chainring based power meter. Neither of these new options were designed to replace their long running PowerTap hub line (i.e. the G3 hubs). Instead, these are just seen as new product lines to complement the hub (in fact, the hub also received new dual-capable caps). Just like a car company having different models of cars based on consumer demand.
In any event, PowerTap sent over both the P1 and C1 units for me to start testing in early June, and since then I’ve gotten in a rather nice sum of riding. Of course, I’m not just riding with one power meter, but usually between 3-4 power meters concurrently, allowing me to collect large data comparison sets.
As the title alludes to, this review is focused on the P1. As of this writing the C1 review process (read: lots of riding) is already underway, and will likely publish in late August, perhaps sooner. Oh, and as usual, I’ll send back both of these units to PowerTap once I wrap-up the C1 review, and likely go out and buy sets of the pedals for myself. But…let’s not get too far ahead of ourselves.
Unboxing:

First up we’ve gotta get these things out of their cigar-like box. Elongated cigar-like boxes have become all the rage for pedal based power meters lately. Probably because they look cool.

Inside after cracking it open you’ll find two pedals and some cleats, protected as if entering one of those egg-drop competitions you did in grade school. Don’t worry, I’ve since dropped the pedals three times onto the hardwood floors (while unscrewing them). No broken egg-shells yet.

Floating on top is a card with the ANT+ ID and serial number information for your pedals. Meanwhile, inside you’ll also find two cleats and some cleat attachment hardware (screws and related stuff).


And that’s it. Nothing more that’s needed. Here’s a couple of pretty shots of the pedals.


And then the cleats:

Now the cleats are actually slightly different than your standard Keo cleats. You can sorta use existing Keo cleats with the PowerTap P1’s, but you’ll find the fit isn’t super snug. Based on my testing, it really depends on the age/wear of your existing Keo Cleats.
See, during my first weekend with the units down in Majorca back in May, I had nearly brand new (regular) Keo cleats on my bike shoes, and had zero issues with the PowerTap P1’s. They stayed in spot-on.
But, by time I got to June my new cleats had some wear on them and they’d hardly stay locked into the PowerTap P1’s during any hard efforts. So I swapped to the cleats included and have had zero issues since.
But, do these PowerTap Keo cleat variants work with existing Keo units? Mostly, in my testing. I’ve used them with both a stock set of Keo pedals, as well as the bePRO power meter XPEDO variants, with no issues. But again, it may also be that my cleats are still new enough that issues might not crop up there. So it’s probably a bit a case of buyer beware (or rather, careful).

With the unboxing completed, let’s move onto some of the weight and size comparisons.
Weight & Size Comparisons:
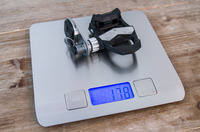
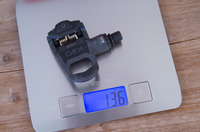
First up is the weight of the pedal itself, first the single pedal (218-219g each), and then the two together (437g):


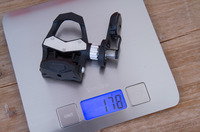
How about weights of other pedal based power meters? No problem, here’s Vector, Vector2, and bePRO, along with a standard Keo pedal (non-power). I’ve included all parts required within the weights.

Of course, comparing size you’ll see slight differences in how each pedal is designed. For example the PowerTap has the battery compartment within the pedal itself, while Vector places it in detachable pods that connect to the pedal. And then bePRO places it in a non-detachable pod that floats off to the side.
(Left side, top-down: Vector 2, Vector1, PowerTap P1. Right side, top-down: bePRO, Keo stock pedal)

All of these pedals have the exact same q-factor though, with none of them being different (despite any optical illusions otherwise). This is important, and something that I’ve seen some discussion on – so I wanted to call it out.
Of course, weight is hardly the only aspect when it comes to power meter selection. In fact, I’d say it actually ranks lowest on my list. Instead, I’d focus on factors such as placement location (and how you might use it), as well as accuracy and cost.
Installation & Configuration:
As you’ll see in a second, the installation of the PowerTap P1 is probably its best feature. If we look at other pedal based power meters on the market, the complexity is either higher – or more prone to being screwed up. To begin, here’s where we start with the PowerTap P1:

We’ve got your normal bike crank arms without pedals, and then we’ve got the pedals. Additionally, we’ve got a standard issue hex wrench set – the kind you already have.
Now – you’ll take the hex wrench and insert it into the crank arm hole and then insert it onwards into the pedal.

Then you’ll tighten until it feels appropriately tight.

And now you’re done. Seriously, done. Just repeat for the other side:

No torque wrenches needed, no specific torque measurement. Neither are there any complex tools or parts needed.

The only thing left to do is to simply calibrate the unit once now that it’s attached. To do that, you’ll grab either a Garmin head unit or the PowerTap Joule GPS (or any other power meter capable head unit) and trigger the ‘calibrate’ button.

Technically this is more of a zero offset, but it is recommended by PowerTap to do prior to each ride.

With that – we’re done and ready to ride.
I really can’t emphasize enough how big a deal it is that there aren’t any additional tools or torque requirements required. This is exactly what everyone wanted Vector to be from a portability standpoint. With Vector I would have needed a bunch of other tools to properly install it for accurate data. Whereas with the PowerTap P1’s I can just toss it in my carry-on bag on the plane with a simple hex wrench and easily install them on any bike I find.
Note that due to the general design of the Keo pedals, you wouldn’t (can’t) use a pedal wrench. Though, I can’t imagine anyone would complain about having to use the universally available hex wrench instead.
Speaking of random notes, lacking another place to put it – I should note that the PowerTap P1 does support oval/non-round chainrings. Here’s PowerTap’s official answer on that:
“Non-round rings are supported perfectly with the P1. We are taking 40 individual angular velocity measurements and subsequently 40 power measurements per pedal stroke. Any acceleration/deceleration within a pedal stroke would be measured. Other systems assume constant angular velocity, which typically reports [higher] power when using non-round rings.”
This is notable because most other crank and pedal region power meters don’t support oval chainrings (including Vector, SRM, and others).
Pedal Impact on Cornering:
Since publishing this review earlier in the week, some of you have asked about the difference in cornering, and if the slightly thicker pedal would have any impact (no pun intended). No doubt I’m not usually racing crits or other situations which require me to corner heavily, but to that end after almost two months with the units I certainly haven’t had a case where they’ve hit. Note that I do know full well that you should have your pedal up when cornering, but still many folks asked to see what happens if not.
Thus I went about putting together a little test to show what difference, if any, there might be. First I grabbed a spare road bike I had and tossed the pedals on it. In this case, the crank length here is 175mm, which may be different than others – so that would have a greater effect than the more common 172.5mm lengths.

Then, I strapped an iPhone with a free level app on the seat tube. I used a small piece of tape to avoid breaking my iPhone for the second time this summer.

Then I simply leaned the bike over until the flat portion of the pedal touched the floor. In this configuration I had the crank arm pointed as straight down as possible, and then I manually rotated the pedal such that the lowest portion (flat portion) would touch. This is because pedals otherwise are rear-heavy and the back portion would touch first. Given you don’t ride with the pedal vertical, I changed the orientation manually.
In the case of the PowerTap P1, this meant that they hit the ground ‘level’ at 31 degrees (31°), as seen below:

Next, I loaded up a standard/stock Keo pedal on one side of the bike (I didn’t bother swapping the other side, since they’re obviously identical).

I then repeated the same procedure:

In this case, the result was a tiny bit more lean – at 33°, sometimes 34° depending on precisely how flat the pedal was – it’s a bit finicky. But we were only really talking about 1mm difference there between those two.

I should point out that 30-33° of lean is actually fairly substantial. A photo doesn’t capture it terribly well, but you have your bike significantly over. The lean would actually be more on the more shorter common crank lengths of 172.5mm (than my 175mm).
Ultimately, I just can’t imagine this making much of a difference in pedal strikes and/or cornering. But that’s just me.
General Use & Battery life:

Now that we’ve got the install out of the way, let’s talk about general usage and daily use. In many ways, it’s set it and forget it. The unit uses active temperature compensation using a temperature sensor internally. This allows them to shift the offset value as required as the temperature changes. Each unit is calibrated prior to shipping at a high temperature and room temperature, which enables them to determine a temperature slope. PowerTap states a temperature range of –40°F to +140°F, in the horribly unlikely event that you find yourself riding at either ends of that extreme.
You can still zero offset prior to any ride, and PowerTap themselves says “it is important to periodically zero the offset manually.” In my case, I just do it prior to every ride and haven’t seen any issues with accuracy by doing it that way. This is similar to most other power meters.
Additionally, you’ll want to ensure that you’ve set the crank length properly on your head unit. This is easy to do (only takes about 3 seconds), and will ‘stick’ permanently within that bike profile/sensor. If you don’t do this, then the unit will likely have incorrect power (I believe the default setting for the P1 is 172.5mm, so anything other than that and you’d have higher or lower power than actual).


It should be noted that the unit has a simple status light on the outside. This automatically illuminates when you first start spinning the crank – letting you confirm all is well.

Next we’ve got the batteries. The unit uses a single AAA battery per pedal, the compartment can be found just below the platform portion of the pedal, and is opened using a hex wrench:

The PowerTap P1 is rated for 60 hours of battery life per AAA battery. I didn’t yet ride for 60 hours in the last 6 weeks (since I mix in swimming and running as well), but during that time I never hit the end of the battery life (meaning, at least it’s not substantially lower).

While some have early-on complained about the AAA battery, I think there’s a fair bit of flawed logic in complaining. PowerTap has made it clear that the power requirements dictated a beefier battery than a standard CR2032. Had they gone with a different coin cell type (i.e. a CR2) it would have made them more difficult to get ahold of. In fact, outside of doing a AA battery, there’s no battery that’s easier to find anywhere in the world than a AAA battery.
Even if you ignore the low-battery warnings you’ll get many hours before it dies, you can stop in any convenience store or gas station on any road on earth and pickup a AAA battery mid-ride. That’s definitely not true of the CR2032. Nor is it true of rechargeable pedals (via USB cable) – which can be a bit of a pain.

Finally, within the constraints of a pedal, the battery housing for the AAA battery is much more structurally sound (and water-resistant) than most CR2032 battery compartments on the market. For example, one only need to look at the water-ingest challenges that Stages has had – or even Quarq. Quarq recently redesigned their compartment yet again to minimize water ingest, but this new beefier design would never fit on the bottom of a pedal (compared to the crank spider). You’d have to find a large and flat spot on the pedal to put the battery in it, while still protecting it from either downwards force onto the ground (walking) or force while clipping in.
Swapping Bikes:

Sometimes, a simple video speaks a thousand words. Words that I don’t have to write. To illustrate the ease in which you can swap the pedals to another bike, I’ve put together this 2-minute video. Of which, significantly less than two minutes is actually used to swap the pedals:
No doubt there are other videos out there showing crank swaps and Vector swaps (including some of my own). I think the key difference though when comparing a crank swap to the PowerTap P1 swap though is that in the case of just moving a crank between bikes – said bikes must have the same bottom bracket configuration. Within my bikes, very few of them share the same configuration. Same goes for rental bikes and the like.
Head Unit Compatibility:
The PowerTap P1 connects to head units via both ANT+ and Bluetooth Smart, concurrently. This means that you can use it with just about any recent power meter capable bike computer/triathlon watch on the market today.
For connecting via ANT+, that’s supported by the Garmin Edge series, Forerunner series, and PowerTap’s own Joule and Joule GPS+. That’s all in addition to a host of ANT+ power-meter capable products over the years by both these companies and others.
When you search for the PowerTap P1’s it’ll find a single ANT+ ID, just like other power meters on the market today. While you may have two pedals, that communication is channeled through one pedal and onwards to the head unit. Note that you can NOT split up the pedals and give one to a friend, and at present PowerTap states they don’t have much interest in selling a one-pedal-only unit (given they already sell the PowerTap C1 for roughly half the price, that would be a more logical direction if you’re budget constrained).

If you dive into the menus of your head unit, you’ll get information such as manufacturer and battery state:

Additionally, this is where you can calibrate (technically a zero offset) for the pedals:

When you do this, you should not have your feet on the pedals and the pedals should be left hanging there by themselves.
As for being out on a ride, you’ll get left/right power balance, total power, as well as cadence. For those interested, here’s an example of ride I did with the PowerTap P1 and the Garmin Epix, to see the data collected.

You won’t however get any Garmin Cycling Dynamics – since Garmin locks that down to just themselves. Additionally, PowerTap has stated that they’re looking to move slowly into more advanced metrics – taking a bit of a ‘wait and see’ approach to what individuals and research entities might find useful.
Now – there is one oddity that I’ve seen, which is that on the Garmin Edge 1000 the crank-arm length option doesn’t show up for the PowerTap P1’s (it does show up for Garmin Vector pedals). This is critical as you must set the crank length correctly to get accurate results. Given this option shows up correctly on other units (including the Edge 810 and Garmin Epix), I’ve gotta suspect this is some sort of bug here on the Edge 1000. Ironically, I also saw this same issue when trying to use the 4iiii Precision power meter (doesn’t allow setting of crank length on the Edge 1000 specifically). Now I’ve also seen an oddity on the Edge 810 where it’ll give a false right pedal lost warning message when you first start pedaling at the beginning of the ride. It appears to be a minor ride start negotiation hiccup and hasn’t impacted any data that I’ve seen. It doesn’t happen on the Joule GPS+, or on the Garmin Epix.
(Update Aug 30th, 2015: Garmin has confirmed they will be issuing a firmware update to add/add back in crank length support for the FR920XT, Edge 1000, and Edge 520 – the only units missing support. They have not confirmed an exact timeframe for doing so. In the meantime, you can post your Settings.FIT file to the Garmin Forums – see link in the comments – and some helpful moderators are responding with updated files for you with corrected crank lengths for people not on 172.5mm.
Update 2: All current Garmin products now support setting the crank length for the P1 – so no problems there anymore!)
Next, on the Bluetooth Smart side, you can pair the pedals with units that support Bluetooth Smart power meters today. Sorta. In my case, my firmware on the units (v1.7) that shipped in early June did not have the Bluetooth Smart stack fully enabled. So while devices could pair to it, they weren’t producing power on my firmware version.
However, devices that started shipping in the past few weeks (v1.9) have had this updated firmware, and readers have generally reported good luck on both Polar (V800) and Suunto devices (Ambit3). Unfortunately, my ability to test that update is limited because of the fact that the firmware updater that will allow over the air updates of the PowerTap P1 is still about 1-2 weeks away from being released.

At the same time that’s released, PowerTap will be changing the way they broadcast the BLE signal. Specifically, they’ll be shifting towards pairing individual pedals versus everything being channeled through the one pod today – per the official spec on dual-capable devices. The benefit of that from their perspective is potentially increased data metrics. However, it’ll also require companies to update their firmware to understand this.
PowerTap tells me that they’ve been working with Polar on this to ensure compliance, and hope to also work with Suunto as well. Once any one of these items are released, I’ll update this section accordingly.
As an addendum – I’ve created the below table to track compatibility status. I’ll update this accordingly based on testing by myself, readers (that’s you), or manufacturers.
PowerTap P1 Compatibility
Garmin Edge 500Aug 8th, 2015DCRFully functional, can set crank length via bike profileGarmin Edge 510Aug 8th, 2015DCRFully functional, can set crank length via bike profileGarmin Edge 520Oct 1st, 2015DCRFully functional, can set crank length via bike profile in FW 3.00 and higherGarmin Edge 800Aug 15th, 2015ReaderFully functional, can set crank length via bike profileGarmin Edge 810Aug 8th, 2015DCRFully functional, can set crank length via bike profileGarmin Edge 820Apr 25th, 2017DCRFully functional, can set crank length via sensor settingsGarmin Edge 1000Sep 8th, 2015DCRFully functional, can set crank length via bike profile in FW 5.10 and higherGarmin FR735XTApr 25th, 2017DCRFully functional, can set crank length via sensor settingsGarmin FR910XTAug 11th, 2015DCRFully functional, can set crank length via bike profileGarmin FR920XTOct 1st, 2015DCRFully functional, can set crank length via bike profile (Beta Firmware 5.28 now available)Garmin FR935Apr 25th, 2017DCRFully functional, can set crank length via sensor settingsGarmin Fenix2TBDTBDTBDGarmin Fenix3/Fenix3 HRMar 26th, 2016DCRFully functional now, was broken in January 2016 timeframe in specific F3 firmware versions, since fixed.Garmin Fenix 5Apr 25th, 2017DCRFully functional, can set crank length via sensor settingsGarmin EpixAug 8th, 2015DCRFully functional, can set crank length via sensor settingsGarmin VIRB XEAug 8th, 2015DCRFully functional, can set crank length via sensor settingsPolar V800Aug 8th, 2015DCRWaiting on P1 BLE enablement – Will Test Upon BLE ReleasePolar M450Aug 8th, 2015DCRWaiting on P1 BLE enablement – Will Test Upon BLE ReleasePolar V650Aug 8th, 2015DCRWaiting on P1 BLE enablement – Will Test Upon BLE ReleasePowerTap Joule 1.0 (non-GPS, small one)Aug 8th, 2015Manuf: PowerTapNot at this time, cannot set crank length.PowerTap Joule 2Aug 8th, 2015Manuf: PowerTapNot compatible.PowerTap Joule 3Aug 8th, 2015Manuf: PowerTapNot compatiblePowerTap Joule GPSAug 8th, 2015Manuf: PowerTapFully functional, can set crank length via sensor settingsPowerTap Joule GPS+Aug 8th, 2015DCRFully functional, can set crank length via sensor settingsSuunto Ambit2TBDTBDTBDSuunto Ambit3Aug 8th, 2015DCRWaiting on P1 BLE enablement – Will Test Upon BLE ReleaseWahoo ELEMNT Apr 25th, 2017DCRFully functional, can set crank length via sensor settingsWahoo ELEMNT BOLTApr 25th, 2017DCRFully functional, can set crank length via sensor settings
Again, please note the date of testing, in case firmware changes have broken functionality. For example, the FR920XT used to work in older firmware versions, but in recent versions (as of Aug 8th) the crank length setting has been removed.
Power Accuracy Analysis:

As is always the case with power meter reviews, I include a section on accuracy. In order to determine validity of the numbers of a given power meter I look at compare it against numerous other power meters concurrently on a multitude of rides. While it’s easy to compare against just one other power meter, the reality is you can never be sure which one is ‘correct’. By introducing three or more power meters, you can start to isolate outliers. In the case of the PowerTap P1, they claim a 1.5% accuracy level.
In general, most power meters on the market today are very good when it comes to accuracy. I don’t subscribe to the ‘gold standard’ theory of certain brands. That’s outdated thinking, and ignores the fact that any and every power meter on the market can eventually have a ‘bad day’ given the right (or wrong) circumstances. Given enough time with so many units, I’ve got bad-day example instances on virtually every power meter (yes, including SRM). The trick is knowing what conditions might lead to this, and minimizing those.
In the case of my testing, all of my examples below are just from standard rides that I’m doing outdoors and inside on a trainer. Most of these rides start in city conditions with aspects like cobblestones, and then head out in the forests surrounding Paris. About half of them are at night, or at sunrise/sunset conditions where the temperature is shifting rapidly. Further yet, many of them occurred where I had brought the bike from the relatively cool DCR Cave temperatures to outdoor temps in the 90°F+ range.
Below are three examples I picked at random from my files to look at. However as is always the case I’ve included the ability for you to download all of the original power meter from my tests, enabling you to do your own analysis as you see fit (I’ve actually got another week or so of data to add in there, just haven’t sorted it out yet, but since it’s on Dropbox the folders will dynamically show up). Data for the majority of these rides was collected with Garmin Edge and Epix devices. Though I do also have some rides using the PowerTap Joule GPS+ as well.
Example 1: Night Ride
This ride started right at dusk, and then went for about 1hr and 45mins into the night, as the temperatures cooled. I figured it’d be a good test to see how temperature compensation handled things.
First up we’ve got the usual raw data comparison, which is of course really hard to discern anything:

Next I’ve smoothed it by 30 seconds, this means I’m showing the rolling average over any 30 second period. This makes it easier to pick out large-scale oddities, but it can in very select situations also illuminate minor differences in how head units record different power meters (such as when coasting). Also, it’ll heavily smooth out sharp sprints in power. Still, it’s an incredibly easy way to spot oddities.

(You may see cases at near-zero power numbers where there are odd disagreements. This is something I’ve long seen across a number of power meters and tends to come from how individual power meters and different head units report the shift from active pedaling – putting out power – to coasting and or stoppage, where the power drops to zero. I wouldn’t fret about anything above.)
Yet even in the 30s smoothed variant it’s tough to pick out minor variances. For that, it’s easier to dig into random sections. In this case, I’m just picking 175-second sections. I usually start at something like 1,000-1,175. These are the seconds into the file (i.e. running time). It’s just the way Excel shows me the data.
In this case, at the 1,000 second marker I was stopped doing a calibration – so that was kinda a loss. So I incremented up until I found a section where I was actually pedaling throughout it.

Well then, that’s pretty self-explanatory. If you have or see an issue with the above graph, you need to exit the room. Immediately.
My next random section I went for 3,000-3,175. But that was stopped somewhere. So I went for 3200-3375, but still sorta stopped:

So I incremented again to 3300-3475, and got a nice comparative set:

I left the highlighter on, just to show you how close these really are. At its widest point, it’s only 6 watts difference (on 216w), or 2.7% between them – well within the margin of error for any single power meter, let alone when you start combining multiple units.
Example 2: Paris Triathlon
Next up we’ve got the Paris Triathlon. Yes, during a race I actually recorded all three data streams. Why not? All you’ve gotta do is press start. Surely if I’m going to weave and dodge a thousand people I can just press the start button. And that I did.
First up, the totally crazy looking 1-second graph:

It was a bit tricky aligning all of these perfectly, because of the fact that the power data on the Epix (multisport watch) meant that it was used in all three legs, so I had to extract just the bike leg down to the exact second. I think I got it sorted out though.
Next, smoothed to 30-second:

And finally, a random snippet. Again, I just went with row 1000 for about three minutes, and shown smoothed at 30 seconds.

You can see that they track quite well against each other. The PowerTap P1 a bit higher than the G3 hub, which again is logical given the placement. This ranged from 2w at 230w, to 21w at 336w. Note however that in those spikes upwards of 350w you’re actually looking at the rolling average over the last 30 seconds. As such, knowing the race – this means that I was liking sprinting or otherwise leading a surge, so if you look at the actual power numbers for those segments were between 400-550w. Thus, it sorta messes a little bit with a rolling average compared to something like a perfectly steady state ride. Typically you’ll see more variance on short sprints between power meters, as they all tend to have their own slight smoothing algorithms.
You notice that as my power decreases the units get closer, well, the PowerTap ones anyway. I’ll talk more about the Pioneer in my last example.
Here’s another random snippet, this one simply at row 2000-2175.

In this random snippet case you see very nice tracking, especially when I’ve got more stable power being applied (versus slight differences when I’m increasing/decreasing power primarily on the Pioneer side).
Example 3: Ride of the TdF final stage
The day of the final Tour de France stage in Paris I went out and rode the route (solo) prior to the race commencing. Here’s what that roughly two hours looked like:

Adding in some 30-second smoothing:

Here’s the first random snippet, from rows 1000-1175. You’ll see the hub drop-out quicker than the others. This is likely a coasting section here following a short sprint (given the wattages in the 450w range). Typically this is one of the few areas you see the PowerTap wheel hubs not ‘catch’ the resulting lower-wattage soft-pedaling that might be going on. This is most easily demonstrated once you add in cadence as well, and about the only edge case on a PowerTap hub to be aware of.

Next, another random snippet, this one from rows 3000-3175 (I would have used 2000-2175 like before, but I was basically was coasting down a hill or a stoplight then by the looks of it). Pretty straightforward. Note, I shrunk the axis a bit, so it’s showing 150w-350w, not 0-350w+ as before (thus it makes them appear further apart). Thus in most cases the two PowerTap products are tracking within 10-12w, while the Pioneer was tracking lower at between 11-30w depending on the spot here.

Again, I didn’t analyze all this data till now – so looking at things I’d probably tweak the Pioneer units calibration unit to get it back in check – something a standard zero offset appears not to have done. In fact, in thinking about it a bit more 6 weeks later, I’m betting that the zero offset on the Pioneer wouldn’t catch the weight differences between whatever pedals I had on prior (Vector I think) and the PowerTap pedals, which would impact things with the slight offset we see above. Said differently, I don’t think there’s anything wrong with the Pioneer unit here aside from me not doing a different calibration on it.
—
Ultimately, I’m just not seeing anything in any of my files that even hints at power or cadence accuracy issues. I’ve used the pedals on three different bikes (Giant TCR, Trek 1.6, and a Cervelo P3C) without issue, and compared it against multiple power meters. Simply put, it works great.
Market Comparisons:

Ultimately, there are many power meters on the market today. As in, an absolute crap-ton. And those are just the ones that are currently shipping. There are yet more that are on the cusp of shipping but haven’t really been proven in the market yet. For example, if we look at this summer alone we’ve got the following newbies:
A) The 4iiii Precision: Starting shipping in spring, working through teething pains
B) bePRO: Started shipping in early July, still to be validated by 3rd parties
C) PowerTap C1: Started shipping as well, first looks seem positive
D) Watteam PowerBeat: Not yet shipping, but things also are trending well as you’ll see here
Of course, I’ve got all of these and have been working through units in iterative bunches. In fact by the end of the week you’ll see or have seen test data from all of these (except the 4iiii Precision, which I’ve long ago noted some issues I’m having with).
Yet there are still many great units on the market at significantly reduced prices, based on the reductions we saw back in the spring:
A) Quarq lineup down to $799
B) PowerTap hub lineup down to $789
C) Power2Max lineup down to $499
D) Pioneer down to $999
All of which is my round-about way of noting there are many options on the market. It’s really best to check out my power meter buyer’s guide from last fall, though admittedly with these new prices and newly shipping options over the past month or two it’s a bit stale. My plan is to publish an update guide in September, just like I have in years past. That gets us past the Eurobike/Interbike new product line rush that starts in just over 3 weeks.

As for pedal based power meters on the market today however, I don’t see much competition – the PowerTap P1’s simply win. But why not Vector/Vector2 you shout?
(Warning: Rosé wine inspired Vector rant about to occur)
Well, frankly – it’s too finicky compared to the P1’s. Which isn’t to say it’s finicky period, but rather just in comparison. It’s virtually impossible to screw-up the install of the P1. Whereas Vector has ample opportunities during installation to screw the pooch. This primarily comes from specified torque ranges and the requirement for a torque wrench. And as much as I’d like to simply say you could bring it to your local shop – I’ve seen clear evidence that local bike shops the world around screw it up more than consumers do. Seriously, nobody reads instructions anymore.
Next, while Vector produces significantly more data and metrics (including the Cycling Dynamics introduced last fall), the reality is that Garmin has dropped the ball in making those tangible. They’ve had two years to do so, and at this point it’s time to call a spade a spade. This was a clear opportunity for Garmin to leverage the power of Garmin Connect to make use of all these metrics being collected. For example:
A) Why doesn’t Garmin show me my average balance over the course of a year on a dashboard item?
B) Why don’t they show me my left/right balance plotted over a wattage mean/max graph?
C) Why don’t they show me my seated/standing time averaged over the course of the last X months in % per ride?
D) Why don’t they show my trends or shifts on any of these metrics over time?
Seriously, this isn’t complex stuff. This is basic stuff – but it’s also core to the entire premise of spending an extra $300 for Vector over the P1 (which is $1,199). Or for that matter, spending nearly an extra $1,000 compared to the PowerTap C1, Power2Max, or Quarq offerings. They’ve marketed all of this data. Data that even the just released WKO4 with all of the magic it has in it…does nothing with. At what point do you draw the line and say: It’s not worth it today, see you in a few years?
Ultimately, if Vector were priced the same as the P1, and didn’t have the fickle pods and torque requirements, then it’d probably be the same. But it’s not. And I’ve yet to find a long-term use for any of the data. And while some folks are finding short-term tweaks in PCO (Platform Center Offset) in bike fitting, I suspect that number is in the sub-1% range of total Vector purchases. But again – why doesn’t Garmin surface that up in the Garmin Connect dashboard?
(End of Rosé inspired rant)
As for other options like the bePRO pedals at a couple hundred dollars cheaper, or the Watteam options? Well, both of them need to be proved a bit more. Watteam won’t be shipping in the next few months, while for bePRO I need to collect more data to determine (and even if the data is spot-on, I’ve got some concerns there about build quality and longevity).
But again, don’t just focus on pedals. Understand what your requirements are and then pick a unit that meets those requirements. There are many great options almost half the price of the PowerTap P1 (including options from PowerTap themselves). To each their own requirements.
Summary:

It’s somewhat rare that I truly get excited about a power meter. Not because I don’t love using them, but rather because for the most part the majority of new units coming onto the market today work quite well and are quite dependable. But they also can be finicky to install for the non-bike mechanics among us. For example, the only reason I’m semi-functional at installing cranksets on bikes is because of power meter installations for reviews. And for the most part, that takes a few goes before you get proficient at it (especially if you have to change bottom brackets).
Whereas standard pedals are within the realm of anyone to install. It takes a hex wrench and less than two minutes, as my video showed. And in that area – the PowerTap P1 rises above the other pedal offerings.
But more importantly that than – they’re simply accurate. And further – accurate every time without dorking with them. For that reason alone, it’s pretty much a given that once I send back these trial units I’ll be going out and getting my own pair of P1’s to use as one of my de facto testing/riding units. The ease in which I can quickly move them from bike to bike, and the durability they appear to have, makes it an easy choice for me. Of course, individual requirements will no doubt differ. For example, if you don’t want to change pedal/cleat types – then obviously this isn’t going to do much for you.
With that – thanks for reading, and as always, feel free to drop any questions in the comments section below.
Found this review useful? Or just wanna save 10%? Read on!

Hopefully you found this review useful. At the end of the day, I’m an athlete just like you looking for the most detail possible on a new purchase – so my review is written from the standpoint of how I used the device. The reviews generally take a lot of hours to put together, so it’s a fair bit of work (and labor of love). As you probably noticed by looking below, I also take time to answer all the questions posted in the comments – and there’s quite a bit of detail in there as well.
I’ve partnered with Clever Training to offer all DC Rainmaker readers an exclusive 10% discount across the board on all products (except clearance items). You can pickup the PowerTap P1 pedals from Clever Training. Then receive 10% off of everything in your cart by adding code DCR10BTF at checkout. By doing so, you not only support the site (and all the work I do here) – but you also get a sweet discount. And, since this item is more than $75, you get free US shipping as well.
PowerTap P1 Pedals
PowerTap P1 Bundle (P1 + extra cleats, see dropdown)
PowerTap P1 Replacement Cleats (0* or 6* float options)
Thanks for reading! And as always, feel free to post comments or questions in the comments section below, I’ll be happy to try and answer them as quickly as possible. And lastly, if you felt this review was useful – I always appreciate feedback in the comments below. Thanks!