DJI Mavic Pro In-Depth Review

While the widely held assumption this year was that the GoPro Karma drone would be the hottest drone to get one’s hands on, it’s quickly become clear over the last 75 days that wouldn’t quite pan out. A mere 7 days after GoPro announced their Karma drone in September, DJI countered with the Mavic Pro.
The Mavic Pro would be DJI’s smallest drone to date, while still maintaining and expanding upon the 4K-capable feature-set of its only 5-month old predecessor, the Phantom 4. Not only was it poised to upset the GoPro apple cart, but also become one of the hottest drones to date.
But I was curious – would the unit be better for solo sports action? Meaning, the ability to take shots and videos of myself without a secondary person controlling the drone. You saw my Airdog drone review earlier this year, and then my GoPro Karma drone review the week GoPro recalled said drone. Would the Mavic Pro be my best bet? I set to find out.
As with all these reviewed drones, I bought the Mavic unit myself. Same goes for the countless Kickstarter and other drones I’ve purchased though never bothered reviewing (mostly because they were so terrible I got bored quickly with them). This review includes a heavy focus on the sports action side, but also goes in-depth on every other component of the Mavic. With that – let’s get started!
In the box:
There are at present two different options available for the DJI Mavic Pro. The first is the base model, and the second is the ‘Fly More’ combo bundle. In my case I bought the Fly More bundle, the main attraction of which is the extra batteries. But I’ll cover the additional differences as well.
First up, the box. Or in my case, three boxes. See, the two side boxes are the Fly More bundle. The big brown one is the man-purse, while the lower left one is the remaining Fly More bundle parts. Meanwhile, the one with the drone on it is the actual base Mavic.

To get things out of the way, here’s that man-purse from the Fly More bundle. This will hold the majority of your drone parts including the drone, controller, extra batteries, and extra props.

Then we’ve got the Fly More accessory box, which focuses mainly on power related things:


Inside that you’ve got all the little boxes with these extra parts. These include: Car Charger, Battery Charging Hub, 2 Extra Batteries (+ 1 more in the regular box), Two sets of extra props, and an adapter to connect car/house charger to charging hub.

Meanwhile, switching gears temporarily we’ve got the main DJI Mavic Pro box. This is the standard offering if you don’t buy the combo dish:


Cracking that open, here’s what it looks like inside:

And here’s those components sitting on a table:

Above you’ll see the props (4 props total), prop bags, controller, drone, phone cable adapters for controller, and A/C adapter.
Next, here’s all the parts from the entire Fly Combo kit on the table. Stuff on the right is the Fly More combo, while stuff on the left is the base:

I dive into the combo a bit later towards the end of the post.
Phew!
Weights & Sizes:
So how does it stand-up when it comes to size and weight?
The Mavic controller comes in at 316g (0.69lbs), the drone itself (with props) at 739g (1.62lbs), and the total weight of Mavic at 1,055g (2.32lbs).


Next we’ve got the weight of the GoPro Karma, with a battery and camera/gimbal attached at 1,941g (4.27lbs). Then we’ve got the controller’s weight at 626g (1.38lbs), or the whole thing at 2,529g (5.57lbs).


Then there’s the DJI Phantom 4, which comes in at 1,395g (3.07lbs) by itself, or 2,235g with the controller.


Heck, if nothing else – just look at the differences in the battery between a Phantom 4 and Mavic battery. It’s basically half the weight – 234g vs 461g!


Finally, we’ve got the Airdog, which floats in at 2,135g (4.70lbs) for everything, or a mere 113g (0.24lbs) for just the controller.


Next to compare sizes, here’s the folded up sizes of the Karma and Mavic:

And here it is compared to the DJI Phantom 4, folded and unfolded:


Obviously, Mavic is smallest, and Airdog and Karma are kinda similar in size, and the DJI Phantom 4 kinda towers above them all. With the DJI Mavic you can leave the props on at all times, as they fold up on themselves. The props can also be left on the GoPro Karma, but they don’t fold, and you have to use their larger backpack. On both the Airdog and DJI Phantom 4 you’ll want to remove the props for travel.
The Basics:

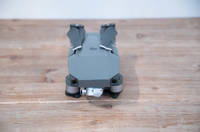
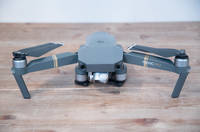
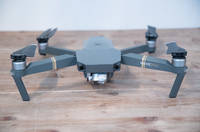
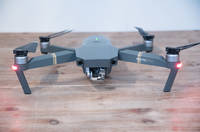
Ok, with all of the unboxing and sizing up out of the way, it’s time to cover the basics of flight as well as using it. Of course, the biggest appeal of the unit is the compact size prior to flight. Its ability to unfold is without question the number one selling point. Thus, you’ll need to start by unfolding the four arms. The two front ones open outwards towards the front, while the rear ones swing down and towards the back.
Next, you’ll want to remove the gimbal cover and gimbal lock. Both are small pieces of plastic that protect the gimbal during transit. The gimbal cover is there to keep the gimbal from getting a toothbrush to the face inside your suitcase, while the gimbal lock is to keep the whole kit from bouncing around a ton.

You may have also noticed a black piece of rubber, that’s the gimbal cover hood. For real.

You’ve got a cover for your gimbal cover. That’s because technically speaking you can fly with the gimbal cover (clear one). And as long as you’ve got no scratches, nor any sun, the footage will be acceptable. However, if the gimbal cover gets either sun or scratches, you’ll notice it gets a bit fuzzy, like below (see the line arching across the screen):

So the purpose of the gimbal cover hood is to protect the gimbal cover in the event you fly with it. Alternatively, you can also use it as a reminder than that the gimbal cover is still on. Thus when you take off the picture would be black, versus clear and not obvious until a bit later in flight.

In any case, with all that taken care of – you’ll insert the battery into the top of the unit. It has two buttons on either side to unlock the battery for removal.

Next, you’ll place the unit on a flat non-metallic surface and prepare to turn it on. You do not need to unfold the props, it’ll do that for you. However, do validate that when the props spin up they won’t hit any objects like rocks or tall grass. The lack of ground clearance is the one downside to the Mavic Pro. Taking off on soft sand for example is tougher, and I’d encourage you to just put down a blanket or even a magazine if that’s the case. Sand (and water) are archenemies of electronics, including drones. Also, never try taking off from atop a car like below because the metal will mess with the compass. Sewer lids also fall into that same camp in many cases.

You’ll quick press then long hold the power button to turn on the aircraft. Then you’ll do the same on the remote control. Speaking of which, you should plop your phone into the controller.

The controller came with different phone connector cables (Lightning for Apple, USB-C for newer phones, and micro-USB for older phones), though it’s not 100% universal. For example I found that while my iPhone 6s fit perfectly fine, my Android-based Nexus did not easily. That’s because the connector is inverted on that phone and the cable was too short.

Swapping out these cables takes only 5-10 seconds though, so if you mix things up phone-wise it’s easy to handle.
With the controller connected and the drone on, you’ll start up the DJI Go app, which is available on Android and iOS. This is the app that controls everything.

Note that you can fly with just the controller, sans-phone. But there are some limitations there today. For example, you can’t actually refocus the image. Even if you re-map controller buttons to set focus, that doesn’t work without the phone in place. Thus, you get an entire video shot of something nice and fuzzy like this:

Still it’s useful that you don’t need your phone in the event your phone battery dies mid-flight. All of the functions like aircraft control and return to home work fine without it. Even taking pictures and video (as fuzzy as they may be).
Anyway, for 99% of the time, you’re just going to use the DJI Go App. When the unit is starting up it’ll validate various sensors and systems including the compass and Gimbal. If anything goes wrong, it’ll let you know you’re up @#$#@-creek and may offer some solution (mostly it won’t though – you’ll need to Google to figure it out). Thankfully, that’s mostly rare.
Once done, you’ll be here and ready to take-off:

You can either press the take-off function on the app, or just manually take-off with the controls. Obviously on your first flight I’d use the take-off swipe/tap option, but personally I just take-off manually as it’s faster than the whole app sliding and take-off process.

Now typically before I start a flight I begin recording. Mostly out of habit so I don’t forget later (like I did on this very flight). You can either press the record icon on the screen, or you can press the physical shutter button on the upper left edge of the controller:

Once done you’ll notice that the app shows your recording state, but actually so does the controller’s display. In fact, while the controller’s display will remind you of that TI-82 calculator from school decades ago, it actually gives you a fair bit of useful information while still keeping a fairly good battery life.

The controller also has a dedicated photo button. Note that you cannot take photos during a video (something you can do in certain modes in GoPro Karma). When you try and use the photo button during videos on current firmware (as of Feb 2017), it simply ignores the press. Next to it is a wheel for changing exposure.

As noted, the unit has a dedicated gimbal wheel. The gimbal allows you to tilt the camera up and down. It will not rotate the camera left/right, as you’ll need to change the aircraft position to do that (whereas the higher-end DJI Inspire series allows complete camera movement).

I’ll cover the gimbal and video/photography stuff more in the next section. Finally, you’ve got two customizable buttons on the back. Those can be setup to various functions of your choosing. For example, you could assign one to be set-focus, while the other is exposure lock.


Now I’ll talk more about performance later on in a dedicated section, but it’s worth noting that by default the Mavic has slightly reduced basic performance characteristics in terms of speed than the DJI Phantom 4 does. However, that’s easily changeable. On the side of the controller is the Sport mode option. This option dramatically increases things like top-speed (upwards of 47MPH), as well as ascent/descent. It also dramatically increases the likelihood you’ll crash your drone. For starters, the avoidance sensors are disabled in that mode. And second, things just happen incredibly quick in comparison to the regular mode.

In sport mode you’re far more likely to get propellers in shots (considered a faux pas in drone cinematography), but you do get more performance. You can balance these two by doing things like flying backwards to get higher speeds without props in the shots. You’ll have to experiment for the shots you need to find the right mixture. Still, what’s most notable here is the slightly reduced speed/handling specs in the basic mode compared to the Phantom 4. However, once in sport modes (on both) most of that difference evaporates.
However, keep in mind that all obstacle avoidance sensors are disabled in sport mode. You can manually disable these in the regular mode as well:

These object avoidance sensors ensure that your Mavic doesn’t fly forward into objects. However, it can still fly sideways, backwards, or upwards into objects – as it lacks sensors on those sides of the aircraft. When you get too close to an object, it’ll show you the distance away to the object and display bars on the screen. Eventually, the aircraft will stop altogether. These sensors can be seen on the front of the unit – the two little dots:

On the below screenshots you can see it displaying ‘7FT’ over my chest, and then as I try and push closer it says ‘Obstacle Avoided. Revise Flight Route.’


Now before we land this thing, it’s worthwhile pointing out that you can technically use the Mavic Pro without the controller, and a phone instead. In this mode the unit will utilize a direct WiFi link between your phone and the drone. To enable it you’ll need to open up the little door on the side of the drone and switch it to WiFi:

Then you’ll need to pair your phone to the drone. You’ll find the WiFi information on both the inside of the battery compartment, as well as one of the arm struts.

It’s somewhat like using a GoPro in that you’d connect to the unit via WiFi and have controls over all the functions. The app largely works the same, though certain features are missing. For example, the Follow-Me function is gone. Also, now you’ll interface slightly differently because you’ll need to use the display for controlling it.
Further, with the WiFi mode you’ve got a very limited range – only about 80 meters (in a best case scenario). I found it even less than that in some cases. Also, it’s just clunky as all get out. It’s fine in an emergency where you managed to run out of battery on the main controller and need to make it work to get that last shot. But I’d never buy the Mavic in this configuration – it’s just far too cumbersome to fly efficiently.
Finally, to wrap up the basics, when it’s time to land you can either do so manually, or you can use the tap-to-land functions on the controller/app. With the controller there’s a dedicated button in the upper left corner, and on the app there’s similar buttons. On the upper left side is a landing button to land where it is, while the middle-left button will trigger ‘Return to home and land’, bringing it back to where it took-off from.

When using automated landing functions the unit will ascend to the specified return-to-home height. I generally set this pretty high so that I know that I’ll clear anything in the way on the return flight (in case of loss of signal). Once it gets to you and gets close to the ground, the downwards optical sensors will engage and make for a smooth landing. Speaking of which, here are those optical sensors:

However, be aware that due to the low ground clearance, you may want to keep an eye on it in case you took off from more variable terrain (like a mountain path) where a meter one way or the other is the difference between a rock garden and a smooth path.
With that – let’s talk in more detail on the cinematography aspect.
Video & Photo Modes:

Of course, the primary reason you’re picking up a DJI drone is for the ability to take photos and videos. And DJI pretty much dominates in this market. It’s been funny watching reviews over the past few months related to the GoPro Karma and DJI Mavic. Many people (who don’t have both units) will try the party line of “The GoPro may have better aerial imaging, but the DJI has more features”.
Except that’s not true.
See, what’s often missed is that the GoPro (even the Hero5 Black) is going to give you a fisheye look in 4K, whereas the Mavic doesn’t have that issue (neither did the Phantom 4). Yes the Hero5 Black has a linear mode, but that’s only usable up to 2.7K, and not 4K. Further, GoPro doesn’t give you anywhere near the flexibility when it comes to in-flight shooting displays like histograms or quick preselects for color/scene settings. However, one advantage of the GoPro system is that it can do 2.7K/60FPS, whereas the Mavic is oddly limited to 30FPS at 2.7K.
But let’s not get too far ahead of ourselves. First, let’s start with the basics. On the right side of your display is where you’re going to be tweaking any and all photo/video settings. You’ll notice a small icon with arrows that have a circle around it (above big red recording button), that’s to quickly switch between photo and video modes/settings.

However, in reality you can always use the dedicated video recording start/stop button and photo shutter button on the back of the remote. Oh – by the way, while the unit will come with a small micro-SD card, you’ll want to get a bigger one. It goes in this little door on the side of the unit:

When you start recording, you’ll see the recording time displayed within the app as well as on the controller display. Up along the top you’ll see the shooting mode shown (in this case 4K/30FPS), along with the recording time left. In my case, I’m using a 128GB card in the Mavic (this exact one), so I’ve got over 99 minutes of recording time remaining (it doesn’t ever show more than that).
To the left of that you’ve got your shooting settings, such as exposure, white balance, ISO and shutter. Meanwhile at the far right you have your exposure lock and focus lock options. These are actually the most important options on the Mavic.
See, for reasons that continue to mystify almost everyone, DJI decided to add a feature called ‘Tap to Focus’ to the Mavic. The idea being that instead of a lens at infinity, the Mavic could actually focus – just like your smartphone camera would. That sounds great in theory, but in practice what happens is everyone forgets to focus upon takeoff. Given the small screen, things look great, but then later on you get home and it looks all out of focus or fuzzy.
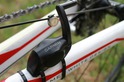
In order to correct this, you’ll need to tap on the screen to focus somewhere. Anything more than a few meters away is good enough to be focused at infinity. The green box indicates the focus. Note on the below two screenshots (click to expand). The bike is about 1 meter away from the drone, when I use the default settings (left), the gravel is in focus and the bike is out of focus. Whereas when I tap the bike, the gravel goes out of focus and the bike in focus:


However, you can also set the exposure using that upper button to the right of the capacity text. This toggles from the focus icon to the exposure icon (the yellow circle below on the image). You can then tap on the portion of the image you want exposed properly. Further, if you want to keep the exposure locked (useful in certain scenes with changing light conditions), you can hit the AE button in the upper right corner, which locks the exposure.

Once locked, it’ll turn the icon blue:

Meanwhile, on the back right of the controller you can use the upper wheel to quickly adjust exposure compensation. Even if you don’t plan to mess with this, it’s somewhat important to know it’s there in case you accidentally bump it.
Next you’ve got various format options. These include video resolution (i.e. 1080p/4K/etc…), as well as the frame rates. In general I shoot everything at 4K/30FPS. However, there are certainly cases where you’d want higher frames per second (if you planned to slow something down). The max FPS Mavic can do at 4K is 30FPS, whereas at 720p it can do 120FPS (the GoPro Hero4/5 Black can do 240fps). There is the one notable differences to the new DJI Phantom 4 Pro, which can do 4K/60FPS.

On this same panel you can adjust white balance and style, as well as color preferences. If you plan to do no post-production work, I’d leave it at the defaults. However, if you plan to do more post-production color grading, then you might consider something like D-Cinelike or D-Log. Be warned though that the footage out of both of those modes will look flatter without additional corrections. Finally, you can also just choose various modes like Art/Black and White/Vivid, etc… Think of these extras as kinda like Instagram filters, but without the side of crazy.

Note that many people consider the Mavic’s image a bit ‘sharp’, so a lot of folks will soften the image slightly in recording. You can do this through the ‘Style’ menu, which allows options including Landscape, Soft, and Custom.

Working my way back to some of the additional in-flight shooting options compared to the GoPro that I mentioned earlier, these can be enabled in the settings menu, as seen below:

(The warning above was unrelated to the menu, and just the case of something I hadn’t dismissed after changing modes.)
Turning our attention to photo modes, we have a lot of the same options here. First is the type of photos you want to take. For example – a single shot, multiple shots, HDR shots, and so on:

Next you can look at the image aspect ratio. DJI mistakenly calls this ‘Image Size’, but really, it’s aspect ratio. On that same panel is the ability to change the image format. This means whether it’ll be shot in JPEG, RAW, or a combo of JPEG+RAW. I always shoot dual.


Above you’ll see the same options for white balance, style, and color that we saw in the video modes. Also of note is that you’ll find back on the main menu the ability to tweak the ISO, Shutter, and EV values just as with the video modes. The only difference (the below screenshot is from video modes), is the range of ISO and Exposure.

This gives you tons of flexibility when it comes to scenes with complex lighting, specifically such as sunset or areas with shadows and mixed sun.
One of the coolest features though of the DJI lineup is that while it’s recording the higher resolution versions of all this stuff to the micro-SD card on the drone itself, it’s also streaming a recorded copy to your phone. That’s at a lower resolution (720p for video), but it’s more than good enough for quick sharing to social media sites. All of this is viewable from within the gallery in the DJI Go App:

This is handy because it allows you to quickly validate you got the shot you wanted, without having to re-check upon landing. It’s also handy in the event you kerplunk your drone into the water…at least you still have something. The only downside? I find it’s sometimes a bit finicky in whether it actually works.

I’ll do some flights and it records it 100% of the time, and other flights where it pretended nothing ever happened. I haven’t figured out much of a pattern there unfortunately. Still, I do appreciate it when it works – and again, another key feature that GoPro and their Karma drone lack.
Finally – with all of this talk of shooting, I figured I’d put together a quick demo reel I did with the Mavic. Everything here was shot at 4K/30FPS in D-Cinelike mode. I edited in Final Cut Pro X (10.3) and applied a color grade to it. Everything here was shot in manual flight modes in the Canary Islands on the island of Gran Canaria (where virtually this entire review was shot). Enjoy!
With that, let’s talk about those automated modes I didn’t use in the above video.
Automated Cinema/Flight Modes:

The Mavic has numerous flight modes that can be used to automate flight paths or specific cinematic shots. The idea behind most of these modes is to simplify otherwise complex piloting and camera skills. For example, the common orbit shot (where you rotate around an object such as a tree) is actually a really tough shot for a beginner to master. It requires understanding how to keep the camera oriented towards an object while you concurrently rotate the aircraft to keep the distance away from the object the same despite travelling at speed.
So DJI and others have implemented automation in these modes. For example, within the Point of Interest mode you simply fly atop the object, set that as the object location, then you’ll fly away from it and start your orbit. You can adjust the height and radius distance at any time.


In total there are the following automated flight modes:
– Active Track (will discuss in later section)
– Follow-me (will discuss in later section)
– TapFly
– Terrain Follow
– Tripod
– Gesture
– Point of Interest
– Waypoints
– Home Lock
– Course Lock
This is of course separate from the automation around the ‘Return to home’ feature. Each of those modes can be used in unique ways to produce pretty cool shots– even for advanced users. For example, Course Lock is super useful when you want to focus on the camera while keeping the drone flying in a given direction at a speed of your choosing. It’s one of the most underrated autonomous flying features. Course Lock allows you to set the flying heading of the drone, and it’ll essentially fly in that direction no matter what you do the controls – enabling you to more easily get the shot you want since those controls become used for rotating the aircraft (thus, camera).
That’s different than Waypoints, which allows you to create a route for the unit to follow. With ‘Waypoints’ you go out and fly the exact route you want to re-fly, specifying the various waypoints along the way. This is useful if you plan to re-do a shot over and over until you get it just right. Now I’ve always thought DJI’s marketing here is a bit askew, since on their site they demonstrate waypoints in a way that’s widely considered illegal in many countries. That’s because the aircraft went out of sight (and even worse, beyond a mountain), as well as likely well beyond many limitations for horizontal distance. Still, it’s a pretty picture that does at least help you understand the function of waypoints.

And all those are different than TapFly, which allows you to simply tap the screen and it’ll fly to wherever you tapped. It’s kinda the most basic way to fly, since the unit is doing all the work for navigation. While it can be useful for beginners, I think it could make someone overly confident in flying well beyond where they should be flying (i.e. out of sight).
So how do these compare to other competitors on the market? I think it’s fair to say that 3DR has the most automated modes, though, they’re exiting the consumer drone business.
We’ve then got GoPro and their (albeit currently recalled) Karmas. Since that only has four modes, it makes it easy:
GoPro Karma has Orbit: That’s the same as Point of Interest.
GoPro Karma has Dronie/Selfie Mode: DJI doesn’t actually have this mode, but you can kinda use Home Lock to fake this. Still, it’s not really the same.
GoPro Karma has Cable Cam: The cable cam is effectively a two-point version of DJI’s much more detailed Waypoints options. So DJI easily wins this, though I’d give GoPro points on simplicity here.
GoPro Karma has Reveal: This simply doesn’t exist as an automated mode within the DJI platform.
Of course, GoPro *only* has those four modes. It lacks the follow-me or active track modes, as does it lack Home Lock or Course Lock. It doesn’t have Tripod, Terrain Follow, or TapFly. Nor does it have the Gesture option.

The other thing that DJI has that GoPro lacks is the app platform integration options. DJI has SDK’s that allow 3rd party app developers to build incredibly impressive apps for the DJI drones, including the Mavic. So if the specific automated camera modes don’t suit you, you can turn to 3rd party apps. One app, Autopilot, is probably the most advanced of them, and allows mind-bogglingly cool scenarios. You can fill in all the gaps in DJI’s active tracking platform using their app and dedicated phone devices, plus you can manage multiple drones for more complex shots.


Seriously, just look at the options for merely the follow option alone:


While the vast majority of users won’t use 3rd party apps, it’s the flexibility that DJI has for users to utilize those should they want to. Still, that doesn’t mean there isn’t room for improvement within DJI’s modes. For example, while there are many things that I don’t like within the Karma drone, one area that is done well is the tutorial and setup pieces of each of the four Auto Shot options that Karma does have. These are clearer for the beginner user to understand and execute than DJI does with their software. Still, that’s mostly nitpicking.
Performance & Stability:

One of the most important things in a drone is for it to be stable, responsive, and predictable. That might sound obvious, but it’s something that even the biggest of companies can stumble with. These areas cover everything from GPS accuracy (so that the unit stays precisely where you put it), to handling in high winds, to dealing with things like light rain.
The first thing I tested was how well it could hold position, both just above the ground (using optical sensors), as well at higher elevations. With optical sensors detecting the ground, it’s going to do so at up to 10 meters in elevation.

I note this test because it’s something that the GoPro Karma failed miserably at in different two ways. First, it was unable to stay close to the ground without floating up or down, as well as side to side, to such a degree that it’d eventually run into the ground or bushes. The second was that it had poor GPS positioning while higher up in the air. In the case of the Karma, there’s no difference between these modes – since it lacks any sort of object avoidance sensors.
However, with the Mavic, there is a difference. Close to the ground it’ll use the downwards optical flow sensors to sense the ground and keep precisely over a given spot. This worked flawlessly, just as it did on the Phantom 4 series.
The second piece was staying put mid-flight at higher elevations. I tested this by placing a drone about 25m in the air and then putting another drone next to it. The first piece I could validate based on my position (did it move away from me), and the second I could validate if either drones position would become close enough for concern (vertically or horizontally). Of course, you need to be below these sorts of tests to validate horizontal position, and you can use the remote to validate vertical position.
Check out the DJI Mavic below (middle of frame), and in particular note the angle of the unit. This is holding position against the wind, while keeping the gimbal level and the picture flawless. This image is shot from the Phantom 4, also battling the same wind.

I did this test both in non-wind conditions, but also in windy conditions (about 30mph winds), and it had no problems in either.
Speaking of wind, I took the unit up to the top of a ridgeline in the mountains, with significant wind. It was about 20-30MPH, and gusting higher. You can see it clearly in the video, though since this mountain range is constantly windy, the trees/grass frankly don’t have as many leaves on them to make it as obvious. I did both low altitude as well as higher altitude hover tests, and of course flying forward/back tests. The unit performed incredibly well.
Here’s a look at that whole test:
What’s most interesting to me is that I’d heard many times in online commentary that the unit didn’t handle well in the wind. But in reality, that simply wasn’t the case. It handled great, just as well as the Phantom 4. What I suspect is the issue is that many people simply aren’t aware that the Mavic has lower performance specs in the non-sport mode than the Phantom 4 does. Whereas once in sport mode it’s very similar.
Note that one area that’s a bit of a downside with the Mavic is that you can’t manually enable the ATTI mode. This mode allows you to fly without GPS signal. Sure, it can be used indoors – but the unit will automatically switch to ATTI mode when it lacks GPS. The issue is the inability to manually enable ATTI mode whenever you want. The use case for ATTI mode is generally in low-GPS quality areas such as dense forests. This being situations where it has GPS signal, but it may be of low-quality. As of today, there isn’t a fix for this – though I’ve gotta believe at some point DJI will re-enable this option.
To be fair, there’s good reason why they made it more difficult than in the past. Essentially new users could get themselves into trouble enabling that mode without knowing what it meant (on the older Phantom series it was a simple switch on the side of the controller). This means that in high-wind scenarios, the unit would drift unless you applied corrections.
Finally, the last area to touch on is the complexity associated with hand-catches. On the Phantom series, it’s trivial to hand-catch the drone out of the air when manually landing (or even taking off). This is most useful in challenging ground environments (i.e. taking off on lava rocks or soft sand), as well as moving platforms (i.e. boats). With the Mavic there is far less catchable area, thus increasing your likelihood of hand to high speed prop contact (a bad thing).
The trick to doing hand-catches with Mavic is to essentially tell it to land on your hand. If you try and manually land on your hand, the unit’s downwards optical sensors will kick in and fly away. But if you hold your hand out a few feet below it, and then tell it to land, it’ll land perfectly on your hand.
Wanna do this in rough seas on a boat? I’d recommend getting a work glove to put on your hand in case things get a bit wobbly. The Mavic props aren’t going to cut off your hand, but they will certainly leave a mark if you get chopped.
Athletic Usefulness:

It’s easy to get distracted by promotional videos from drone companies. They promise the earth and the sky, and in the end, it all comes crashing down. Literally. The ability for a drone to track someone or something without additional control is one of the most challenging things they attempt to do today. It requires not just keeping track of a moving object, but also moving the aircraft itself, keeping the camera focused on the athlete/person, all while theoretically avoiding objects in its path.
Different companies handle this in different manners. For example, Airdog uses a small tracker that you put on your upper arm. This way the drone knows 100% of the time where you are, exactly, as well as your elevation. Whereas DJI has two modes. In one mode, called Active Track, they use the camera on the drone to recognize you as an object and track you accordingly. The downside to that is that if something gets in the way (trees), it’ll lose you. So DJI has a second method called ‘Follow-me’, which instead tracks the controller. That has the advantage of following a known position, but the disadvantage of not being terribly waterproof (or precise).
To briefly cover how Active Track works, you’ll go into the controller menus and enable the Active Track option, which is one of the autonomous flight modes:

Next, you’ll point the camera at the object you want to follow: yourself, a cow, or a car. Once done, you’ll press the OK button.

At this point it’ll start tracking you. There are minor things you can do to improve the tracking reliability, such as doing a slow circle around you/object to let it understand it better, or wearing high-contrast clothing.
You can also use three different modes within that – Trace, Profile, and Spotlight. These are designed to change the orientation relative to you to give a bit more flexibility in the shots you get.
While tracking, you can use the remote control to change the position of the drone relative to you, such as left to right as seen on the screen. This will then orbit around you (again, manually):
![]()
As noted above, Active Track will maintain its same height throughout the flight. You can go up and down small hills and it’ll track you well.

However, if you exceed the height of the unit, it’ll stop in front of the hill (you’ll see that in my demo video below). Thus, you’ll want to set it higher than any point you plan to ascend to. Otherwise you’ll see it stop like below:

If you go too far down, then eventually it might lose you. Though even in my skiing demo last year – it actually held pretty darn well after significant descent.
So what about follow-me? Well in follow-me mode, the drone is simply following the GPS on the controller. You select that mode in the same menus as Active Track:

Then you’ll just set out and let it follow-you.

With Follow-Me it’s far less accurate in terms of tracking since it’s following the controller’s GPS signal and there appears to be a bit of delay/lag in that circuit. It’s effectively a drunk uncle up there roughly following you. Thus you really want wide-open spaces to work with. It’ll still avoid objects that are forward facing, but it’s just not super precise when it comes to following you. Also, you’re limited to a minimum altitude above you of 33ft (10m). Active Track can be much lower.
Now there’s a lot of misinformation and confusion out there on how DJI has implemented these various modes, and how they could be useful in athletics. So instead of explaining it in long written sentences, I’m going to cover some ground rules I’ve put together of how DJI’s tracking modes work today. These could change down the road, but today they are reality.
The 10 Rules of DJI Mavic Autonomous Tracking:
1) Active Track with the Mavic will not increase or decrease altitude autonomously, though it can be done by a human controller. Thus, if you descend or ascend, the drone will stay at the same starting height the entire time.
2) Active Track with the Mavic CANNOT be combined with the ‘Terrain Follow’ mode. When you turn one on, the other turns off. This secondary mode will follow changes in elevation, however it’s designed to be used in manual control.
3) Active Track with the Mavic will lose tracking if you go behind trees/bridges/etc. Generally if it can’t find you in 1-3 seconds, it’ll lose you permanently. When it does so it’ll hover in place.
4) Active Track with the Mavic does not disable the controls. Rather, it changes their usage. Thus, you need to find a way to disable them to prevent Bad Things from occurring.
5) Active Track with the Mavic will avoid obstacles in front of it using the forward cameras. It will not avoid obstacles that it hits from the side. Active Track will always re-orient itself behind you to ‘follow’, if left alone and not put into the secondary mode (i.e. Profile).
6) Follow-me with the Mavic does not know anything about you, it just follows the controller’s location. Period.
7) Follow-me with the Mavic does not ascend or descend either. It stays at a level height. Further, it is more restrictive altitude-wise than Active Track (has to be set higher up).
8) Follow-me with the Mavic CANNOT be used with just the phone via WiFi. However, Active Track can.
9) Follow-me with the Mavic will avoid obstacles in front of it using the forward cameras. It will not avoid obstacles that it hits from the side. In general, Follow-me will always re-orient itself behind you to ‘follow’, if left alone.
10) In either Active Track or Follow-me mode with the Mavic, if you hit the lower of the two battery warnings (default is 20%), it will disengage the autonomous modes and return to home.
So how do those modes differ from something like the newly released DJI Phantom 4 Pro? One key area: Obstacle avoidance.
With the new DJI Phantom 4 Pro, the unit has optical sensors on all sides, versus just forward and downwards sensors on the Mavic Pro/Phantom 4 (non-Pro). This is particularly notable when flying aside you where it would be flying sideways while facing you. With the Mavic Pro, it’ll happily plow through a tree (and probably still keep flying). Whereas with the Phantom 4 Pro, it’ll attempt to navigate around the tree.
Additionally, with the Phantom 4 Pro they’ve introduced slight modifications to the ability to active track and orbit at the same time (autonomously), versus having it only do the orbit manually.
So how does all this come together in real life? Well, I set out to find out. I went up to the middle of nowhere in the mountains to try this out. In general, I have extremely low trust levels of autonomous tracking drones initially until I can understand their nuances better. For example with the Airdog it took a lot of flying to really understand how to best harness the power of it. It’s very predictable, but there’s a lot of nuances to understanding what it’s going to do next.
Whereas with the Mavic, the rules are understood well – but it’s less predictable when it comes to the success ratio (and this is true of the Phantom 4 that I’ve used previously, which uses the exact same logic).
Thus the following video I put together demos all of these modes (in impressively hard weather) as well as demonstrates just how durable the Mavic Pro is when it comes to flying through trees. Seriously, that part alone is worth the watch.
(Note: I had wanted to put together a slightly more concise version of this with better audio this week, but alas, my gimbal has randomly stopped leveling, so the unit is off to support.)
So would I use this for solo/autonomous sports tracking?
Simply put: No.
I don’t see it as predictably reliable enough for day to day usage while cycling, skiing, running, or anything else. Primarily because in Active Track mode you’re dependent on it not getting a tree or other object in the way. And secondarily because it can’t ascend or descend to follow you through mountains. Perhaps if they combined the Active Track with Terrain Follow features, then it might be more interesting. Further, the inability to disable/lock controls while in a tracking mode makes it really tough to use. If I could simply hold two buttons together to unlock/lock controls – that’d be huge (even if not waterproof).
Alternatively, I’d be an insta-buyer of an accessory like the Airdog transmitter pod (waterproof) to follow me without visual limitations. I’ve gotta believe creating such an accessory would be trivial and cheap for the company, given that they already use those same algorithms (sans-elevation) with the follow-me modes. Hopefully, we’ll see that soon.
Finally, I think it should be obvious at this point that the next iteration of the DJI Mavic will likely incorporate the full side/back optical object avoidance sensors of the newly announced DJI Phantom 4 Pro. My money would be that such a new Mavic version would be announced in the spring, like last year, such as the April timeframe. I don’t have any inside information – but DJI is becoming a very predictable company when it comes to release dates and how they roll technology from one platform to the next.
Accessories & Combo Package:

Those who have read here for a while know that I’m generally not a fan of accessory/combo packages. I’m not sure why exactly, but it’s just not my thing. I find you end up purchasing junk you don’t want. However, DJI put one together that makes sense. Actually, more accurately – it’s brilliant. At least if you fly a bunch.
The company has essentially two and a half versions/options of the DJI Mavic Pro:
Option A: DJI Mavic Pro with controller and one battery
Option B: DJI Mavic Pro “Fly More Combo” with extra goodness
Option C But Not Really: This not yet being sold DJI Mavic Pro without controller (use your phone)
The Fly More Combo has a bunch of stuff in it, as seen below, specifically the following:
A) The drone itself (duh)
B) The controller (also duh)
C) Three batteries in total
D) Wall outlet charging cable
E) Car/vehicle charging cable
F) A four-pod battery charging hub
G) Four extra props (thus eight props in total, you need four on the aircraft)
H) A man purse
Now, the man purse is functionally actually pretty good. Meaning it’ll hold the drone, the controller, all three batteries, and your extra props. You can’t quite fit in all the chargers though if you have all the batteries. Though you can do the car charger too with a bit of creativity. On the flip-side, the man purse is fugly looking. Clearly the engineering teams didn’t get to spend time on that.
However, what’s almost more brilliant is this tiny little piece of plastic – the four-pod hub. It allows you to charge up to four batteries at once. Well technically they round robin until charged, but still, you don’t think about it – they just charge. I turned this upside-down to show you how the original charging cable for a single battery simply connects to this small plastic hub, enabling four batteries to charge.

Even more, the little charging pod works with both the car and wall chargers. And it’s just tiny and light, so no big deal to take with you on a trip (unlike charging DJI Phantom series batteries).
In my testing, batteries will charge in about 35-40 minutes, either from car or wall outlet. Flight time runs about 22-25 minutes in the real world. So basically, you can almost maintain continual flying with three batteries and constant car charging (assuming a couple minute break between each one).

I bought the Fly More Combo, and it’s the rarest of times that I’d actually recommend people purchase that over buying individually. I find three batteries is just about the right amount, and that car/hub charger system is brilliantly designed.
Product Comparison:
I’ve added the DJI Mavic Pro into the product comparison tool under the somewhat newly created drones section. Within it you’ll find a comparison to the GoPro Karma and Airdog, two other drones I’ve written reviews on. I’ll likely soon add in the existing DJI Phantom 4 specs into the database (still an awesome drone), and potentially even the new DJI Phantom 4 Pro.
Copyright DC Rainmaker – Updated February 18th, 2017 @ 9:52 amNew Window
Price (non-combo)$799 ($999 with Hero5 Session, $1,099 Hero5 Black)$999$1,599
Announcement DateSept 19th, 2016Sept 26th, 2016Jun 15th, 2014
Shipping DateOct 23rd, 2016Oct 21st, 2016February 2016
IncludedYes (backpack)No (In Fly More Combo Yes)No
Can store props w/o removalYesYesNo
Weight1941g739g2022g
ControllerYesYesYes
Use only phone as controllerNoYesNo
Controller WaterproofRain resistantNoYes
Secondary controller operatorYes, via Passenger app (Android/iOS)Nono
Landing Gear CollapsesYesYesYes
Battery13-16 mins actual25-27 mins actual15 mins actual
Top Speed35mph40mph44MPH
Max DistanceOfficially 3000m, reality far less13,000m/8 MilesVariable, but roughly 400-800m
Indoor ModeNoYesNo
Camera RemovableYES (REQUIRES GOPRO CAMERA)NoYes (requires GoPro camera)
Camera CompatibilityGoPro Hero 4/5 cameras (specific models)N/AGoPro Hero3/Hero4
Gimbal/Type3-Axis3-axis3-axis
Gimbal RemoveableYesNoNo
Max Video Resolution4K/30FPS (with Hero4/Hero5 Black)4K/30FPS4K/30FPS with GoPro Hero4 Black4K/30FPS (with Hero4 Black)
Max Photo Resolution12MP (with Hero4/Hero5 Black)12.3MP12MP (with Hero4 Black)
RAW Photo ModeYes (with Hero5 Black)YEsNo
LOG Video Mode (\’Raw\’)Yes (with Hero4/Hero5 Black/Silver)YesProTune options with GoProYes (with Hero4 Black/Silver)
Obstacle avoidanceNoYesNo
Ground awarenessNoYesYes
Follow-me (software – good)NoYesNo
Follow-me (hardware – better)NoNo (sorta via controller Follow-Me)Yes
Cinematic ModesOrbit, Dronie, Cable Cam, RevealTap to Fly, Terrain Following, Tripod Mode, Active Track, Orbit, Selfie, Waypoints (Multiple), Follow-MeYes
YouTubeNoYesNo
Facebook LiveNoYesNo
Amazon LinkLinkLinkLink
B&H Photo LinkLinkLinkLink
Review LinkLinkLinkLink
If/when specs change (such as flight modes), I’ll update the database accordingly.
Summary:

I said recently that I thought the DJI Mavic is one of the most impressive pieces of consumer tech out there, and that’s 100% true. It’s @#$#@ brilliant. When you hold it in your hand (because, literally, it fits on your hand) you can’t help but marvel at the engineering and design behind it. There’s nothing like it today in the marketplace that combines the tiny size of the unit with the flight power and cinematography specs. Period.
It’s of course commonplace to talk about a Chinese company ‘knocking off’ competitors. But in this case, DJI is truly innovating on their own and pushing boundaries on the hardware level in so many ways. Be it the drone itself, the controller, or the battery charging system. Their single biggest competitor is not just themselves in past products, but actually themselves six months from now on their next refresh cycle. Their rate of innovation is so fast that folks might hold off buying for the next version and their relatively predictable schedule.
All of which still ignores the relatively advanced state of the DJI software platform, including automated flight modes, streaming/recording of your flight videos in real-time to your device (or even Facebook/YouTube), plus integration with 3rd party apps via their SDK. It also ignores the near-brilliant execution of the entire battery charging platform from weight to portability to speed of recharge (half that of the GoPro Karma).
Which isn’t to say that DJI is perfect. Far from it. I’ll happily take GoPro’s support department any day over DJI’s, and the same goes with the entire order status fiasco that DJI still finds itself in over the Mavic (which looks to continue well into early 2017). As anyone knows, interacting with DJI’s support is roughly like talking to Siri when both you and her are drunk. Nothing much makes sense, and you ultimately end up intensely Googling the answers yourself. In my case, my Mavic gimbal has randomly stopped working this week out of the blue, and the repetition process sending the same information four times over with DJI support is painful and slow.
Still, despite that – it’s without question the drone I’d recommend folks buy, especially if they want to travel with it. If you plan to use your drone 100% nearby your house, then you can honestly save some money and pickup a Phantom 4 (or even 3). Or, you can increase specs and go with the Phantom 4 Pro. But for the rest of us that want easy portability and something the size of a running shoe, the Mavic Pro is where it’s at.
Found this review useful? Support the site! Read on!

Hopefully you found this review useful. At the end of the day, I’m an athlete just like you looking for the most detail possible on a new purchase – so my review is written from the standpoint of how I used the device. The reviews generally take a lot of hours to put together, so it’s a fair bit of work (and labor of love). As you probably noticed by looking below, I also take time to answer all the questions posted in the comments – and there’s quite a bit of detail in there as well.
If you’re a fan of Amazon, you can pickup the DJI Mavic Pro that way and it helps support the site! It doesn’t cost you anything extra, yet helps here a bunch. If you’re outside the US, it should automatically find the right Amazon country for you – but you can always use the big Amazon country links on the right sidebar if so! Oh, and in the future if you just click that Amazon logo before buying anything else (like laundry detergent or toilet paper), that supports the site too!
And of course – you can always sign-up to be a DCR Supporter! That gets you an ad-free DCR, and also makes you awesome. And being awesome is what it’s all about!
Thanks for reading! And as always, feel free to post comments or questions in the comments section below, I’ll be happy to try and answer them as quickly as possible. And lastly, if you felt this review was useful – I always appreciate feedback in the comments below. Thanks!