Garmin Vivosmart HR In-Depth Review

Back about two months ago, Garmin announced their first wrist activity tracker (non-watch) with optical HR capabilities, the Vivosmart HR. The Vivosmart HR was designed to build upon the release of the Vivosmart a year earlier. Essentially it’s a daily activity tracker that doubles-down as a workout HR monitor, as well as doing all the now expected functions around smartphone notifications and the like.
I’ve been using the device the last 45 days or so, thus I’ve got a pretty good understanding of how it works (and where it doesn’t). For this review I was sent a Vivosmart HR from Garmin to try out. After this review, I’ll be sending back the demo unit as usual to Garmin in Kansas and getting my own – just the way I roll.
With that intro out of the way, let’s dive into things.
Unboxing:
First up is the unboxing. There are a few different colors, as well as sizes (bands) of Vivosmart HR models. However, the unboxing will be the same for all of them.


Inside you’ll find a mere three things. The Vivosmart HR, the Vivosmart HR USB charger, and the paper stuffs (manual/legal junk).

Starting with the charging, it’s a proprietary charger used only on the Vivosmart HR that’s designed to charge the unit while ensuring the unit remains waterproof (in general we haven’t seen good luck with micro-USB charging ports on deeply waterproofed devices, long-term).

It simply snaps on, and the lock is pretty secure. From there you can charge it in any USB port on the planet:

Next, the manual. This is only notable because it talks to how to wear the unit, which should be away from the wrist bone. As a general rule of thumb for optical HR sensors – the further away from the wrist bone the better.

Lastly, here’s two looks at Vivosmart HR, don’t worry, we’ll get plenty more shots by the end of this thing.


And in case you were wondering, it weights 30g:

And if you compare it to the Polar A360, you’ll find it’s pretty close to identical on size:

With that, let’s get on with the show.
Daily Activity & Sleep:

Now that everything is all unboxed, we’ll start with the basics – which is around the daily activity tracker components. Then after that we’ll dive into the workout and optical HR sensor pieces.
For daily activity tracking the unit will track steps, sleep, and stairs climbed. It does this using its internal accelerometer and various Garmin algorithms to decide what’s a step, and what’s a false-positive (i.e. cleaning the dishes).
When it comes to steps, the unit will display these on a page on the device that you can swipe to, or set as your default page:

Above you see my total steps for the day, against my goal steps. My goal steps is a dynamically changing metric aimed at getting me to step slightly more than the day before. It changes a little bit each day (either up or down), so a single large day (low or high) won’t cause a massive drop. You can always override the goal too, should you like.
Once I hit my goal steps for the day I’ll get a small fireworks show. It’s like 4th of July, only without the hot dogs, cotton candy, and the neighbor’s house burning down:

So what about step-counter accuracy? In general I find it trends pretty similar to other devices I’ve worn at the same time. Part of the challenge with step-counter accuracy is that each vendor (i.e. Garmin, Nike, Fitbit, Polar, etc…) all do slightly different things which they believe makes for the best possible accuracy. However, sometimes that means certain activities end up being more accurate on one device versus another. Or more specifically, even one person compared to another.
For example, I don’t tend to get any (or more than a handful) of steps while in the shower. Yet others will get hundreds (what are you doing?!?). Same goes for driving. Or washing the dishes. In theory these devices won’t track that, but sometimes it happens for others. I guess I’m just less active in those activities than others are.
Ultimately though – these devices should be used for you to look at trends. For example, if you’re at 9,900 steps out of 10,000 for a day, then just go walk around the block once. Meanwhile, if you’re at 2,000 steps for the day – then it was a lazy day. The unit isn’t likely going to be off by 8,000 steps. Make sense?
Oh, in addition to steps you’ll also get your total walked distance for the day:

And right after distance, you’ll get calories. This is using the optical HR sensor as well for some of these calorie calculations. And further, it’s considered a holistic view into your total calories for the day – so it includes your BMR calories for just being alive.

Alongside calories you’ll get intensity minutes. These are based on the recommended number of ‘moderate exercise’ minutes per week being 5x30minutes, so 150 minutes. You can change this goal however.

Next up – stairs (or rather, floors). The unit has a barometric altimeter in it to measure your stair climbs, by floors ascended. I’ve found this function somewhat mixed, mostly in the extra stair category. You can see here my flights of stairs combined with stair goals:

What I’ve found is that most of the time (perhaps 80%) this works out well. But I’ve seen that often times when I’m in cities with high-rise elevators, it can be tricked. For example one day in NYC it thought I climbed 44 floors (2nd and 3rd photos).


What’s ironic about that is that given I was in NYC I actually climbed even LESS steps than normal (at home in Paris we have multiple flights of stairs to our apartment). So basically, it appears to be getting triggered occasionally with the elevator, which I’d see. Sometimes it’d award me steps as I stood there.
Personally, I don’t put a lot of value in the step piece anyway – so this isn’t of huge concern to me. And, if I’m avoiding high-rise elevators, then it seems to be mostly just fine.
Next, in addition to steps and stairs, you’ll get sleep tracking. This will automatically track your sleep metrics, including the time you fell asleep and woke up. There’s no buttons to press.


When it comes to hitting the times I woke up and fell asleep, it generally nails it spot-on, so it does a pretty good job there.
Beyond that, it provides metrics about deep sleep and such, like below:


I don’t at this time have a way to validate whether these metrics are accurate or not, but here’s (below) the same exact night as recorded by the Withings Aura device. As you can see, the deep sleep sections are pretty different. Though, both devices nailed me falling asleep and waking up within a couple of minutes of each other. Pretty impressive.


There ya have it on sleep, steps, and stairs. Note that at this time none of this data is sent to 3rd party platforms (except for MyFitnessPal).
Workout Usage Overview:

Now before I dive into the optical HR sensor and accuracy, let me briefly talk about the methods to use it during a workout. So this part will be thin on optical HR sensor, and more heavy on the other parts. But don’t worry, we’re going to get all optical sensor’d up in a moment.
Unlike the original Vivosmart, the Vivosmart HR only has one workout mode: Running. Or I suppose Running & Walking. Basically, it just has this single little icon of a guy that appears to be running. That’s it. You can see it here:

Once you tap that button (on the touch screen) you’ll be ready to begin your activity:

You’ll then press the physical button to start the activity, which begins recording. Once you do, you can swipe between the various ‘screens’ that you’ve setup ahead of time using the Garmin Connect Mobile app. Within that, you can configure four data pages, each with either one or two metrics on them:


The metrics you can select per data page are: Time, Distance, Calories, Heart Rate (bpm), and Heart Rate Zone. In addition, you can also enable the ‘Time & Date’ data page.
Here’s a few examples of what those look like:


Now, distance is based off of the accelerometer. In my testing I’ve found it’s varied from within 1% to off by 20-30% (all in running). Why the difference? Well it depends a lot on your stride length. For some of my runs where I was running at my natural paces (the paces I normally run at), I was within 1-2%. Yet for other runs when I ran with someone else at a different slower pace than I normally run, it was significantly off. These were all using the automatic stride length, and not overriding it.
However, you can set a custom stride length within the settings, which might help for those outlier cases.


Finally, there’s also the option to enable Auto Lap, which is hard-set to laps every 1-mile or 1-kilometer, depending on whether you’re in metric or statute mode. I often used the Auto Lap and it worked well enough, notifying me each time I completed a mile. Though of course, whether or not that mile was accurate depended on my stride length.
No matter what option you use for stride length, after you complete a run you can select to save the data:

This data is then sync’d to Garmin Connect via the Garmin Connect Mobile app, which in turn allows you to view your run on Garmin Connect (web or mobile), just like this example run:

You can also check out any splits that were taken, such as these with Auto Lap:

You’ll note that there won’t be a GPS track, since the Vivosmart HR doesn’t include GPS, nor does it use GPS from the phone for a GPS track.
Optical HR Sensor:

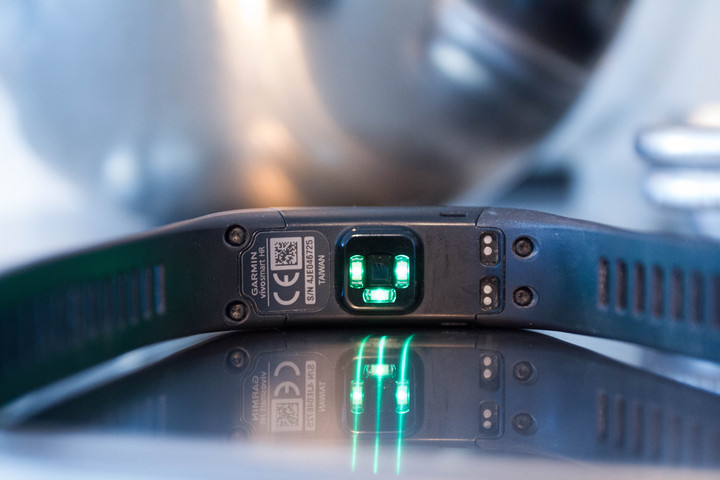
Of course, all roads on the Vivosmart HR lead to the optical HR sensor. After all, it’s likely the main reason someone would purchase the Vivosmart HR over other competing activity trackers. The optical sensor is the green LED thing plunked on the back of your Vivosmart HR, seen below:

In the case of the Vivosmart HR, Garmin is using their own internally developed sensor, which they’ve branded ‘Elevate’. This sensor is the same one that’s seen in the Garmin FR235 and Garmin Fenix3 HR (the FR225 uses a sensor from Mio). As we saw in my FR235 review, the results were generally positive, though, there were some oddities in certain cases. Now unfortunately you can’t assume the sensor will be the same in a different device. That’s especially so with the Vivosmart HR because it’s a totally different form factor than the watch-like FR235.
The Vivosmart’s optical HR sensor serves roughly three purposes:
A) Ability to monitor HR 24×7 (including resting HR)
B) Ability to monitor HR during a workout (running primarily)
C) Ability to re-broadcast your HR over ANT+ to other ANT+ devices
It’s the combination of those three things that set the Vivosmart HR apart from other units in the market. For example, the A360 is currently unable to do A & C above, rather focusing on just B.
But the question isn’t so much whether it does A/B/C, but rather – does it do them well? And for that, it gets messy. Really messy.
First up, the 24×7 HR monitoring. This is where the Vivosmart will periodically take HR measurements throughout the day and record them, attempting to determine your resting HR, but also giving you a picture of your HR throughout the day. It does this at a variable sampling rate, which is a fancy term for ‘we’re doing it as minimally as possibly because the battery life will be horrible otherwise’.
On your device, you can swipe to this screen at any time, which shows you your current HR, as well as the average resting HR during that day:

Next, on the app itself you can look at your HR over the course of the day:


You’ll notice that these are huge blocks of time that the HR values are recorded at. Like, hours’ worth. Basically, Garmin has made this useless by decreasing the recording rate so much. Now there is a difference between resting HR and just current all-day HR. Which is really too bad, because the company put a lot of effort into making these data pages on the app look really clean, and with the FR235, the data looks great. Here, not so much.
Using resting HR values can be extremely useful in determining fatigue. For example I can see mine rise and fall going into and out of the fairly sleepless period of CES towards the end:

You can also use RHR values to often predict when you’re getting sick (if you track the values close enough). For example I know that if my RHR value spikes to about 50-52bpm (lowest value in the course of a day), I’m on the verge of getting sick. It’s definitely a super-interesting leading indicator.
When it comes to RHR values, the unit seems to report a bit higher than I’d expect. Meaning my typical RHR value is about 39bpm-42bpm on a ‘normal’ day. However, the resting value that Garmin Connect determines is about 43-46bpm, a touch bit high. Only one day over the past month did it find an RHR value of 38bpm. I can sit here over the next 3-5 minutes and get you a value of 40bpm without trying.
I suspect that’s because Garmin has reduced their sampling rate, especially while there’s a lack of movement – effectively ignoring the most critical times for RHR sampling. Still, it’s disappointing since the FR235 did a much better job there where I routinely got 39-41bpm, as seen below (as well as higher levels of data capturing):


Next, we’ve got the ability to re-broadcast your HR over ANT+ when not in a workout. Yes, that’s counterintuitive, so just stick with me for a second. With the Vivosmart HR while in a workout it’ll increase the sampling rate and record your HR at a higher rate (which I’ll cover in-depth in the next section). However, when you’re in the running workout mode, it won’t re-broadcast your HR to other ANT+ devices.
Re-broadcasting is when your Vivosmart HR acts like a heart rate strap. That means it allows you to take your Garmin Edge (or other ANT+ device) and pair it to your Vivosmart HR as if it were a HR strap, such as this:

To do this, on the Vivosmart HR you’ll have to dig into a bunch of menus. It’s as if someone is making this complex on purpose. You’ll press the button > Settings> Swipe 5 times to Heart Rate > Swipe to Broadcast Mode > Tap to Start Broadcasting. Then see this:


Once you see this, then be super-careful to not touch the screen, because then it’ll ask you to exit broadcast mode, which then means then it’ll stop sending your HR. In the winter (like now), this is really easy to do with your jacket, thus ending things prematurely. That makes for sad pandas.

In reality, Garmin should have a lock screen option there. Or, just simply use the physical button to end things.
Now the main scenario that you have for broadcast mode is most likely cycling, since that’s the scenario where you’re most likely to be using another ANT+ device to receive that signal. Meaning that it’s unlikely that most of you are just going to wear two watches (such as another Forerunner watch) merely to avoid a HR strap. So, let’s slide into the next section and talk about just how accurate that would be.
Oh, and last but not least – in an odd move, Garmin actually does not permit the Vivosmart HR to connect to an external HR strap (such as an ANT+ chest strap). This is something that every other ‘Vivo’ branded product allows, even ones 1/3rd the price. I’m at a loss for why they’d make it harder to spend money on other Garmin products; especially given all competitive units (such as the Polar A360 or even the Apple Watch, as well as all of Garmin’s own products) allow this.
HR Accuracy Results:
Ahh yes, all roads lead to accuracy. After all, you generally don’t buy a device because it’s inaccurate. The first thing to understand about optical HR sensors though is that they can be both highly accurate, and highly inaccurate. It really comes down to which model of sensor is being used, placement in the device, as well as how and where the wearer is using it. It’s inaccurate to say that all optical HR sensors are inaccurate, since that’s proven not true.
However, do not let major brands trick you into thinking they are better. For example, Apple’s optical HR sensor technology is sub-par to Mio (by Philips) and Valencell, companies many people have never heard of. Thus, I look at every single device individually, as you’ll see here – even an individual sensor that may be ‘proven reasonably good’ can be implemented poorly in a different device (i.e. a band vs a watch).
Finally, before we dive into the results, note that how and where you wear the device is really important. If you’re struggling with accuracy, ensure you’ve tried:
A) Moving it away from the wrist bone. It should be at least 1-2cm away (and never on-top).
B) Try putting it on the inside of your wrist (the soft fleshy part, generally sensors do better there)
C) Try the other wrist, you’d be surprised how often that makes a difference
With that, let’s dive into things. I’ve got tons of sample data, but I’m just going to pick a few examples that I think are fairly representative of the larger set of data I have.
Run #1: Medium intensity steady run
First up we’ve got a nice moderate paced run (the DCR open house morning run, for those interested) with a few brief higher intensity moments (going up a hill, and a short sprint). In this case I’m comparing it to the Garmin HRM-TRI strap, as well as the Scosche Rhythm+ optical HR sensor. The HRM-TRI is being recorded on a FR920XT, whereas the Scosche is being recorded on an Ambit3.
First, the high level overview.

At a high level, the unit actually did fairly well while running. Ironically enough the only places it seems to struggle were waiting at cross-walks. Theoretically the easiest of things to measure. Go figure.
If I zoom in on various sections of the run where the pace and intensity is fluctuating, you’ll see all three track very well:

And even the sharp increases in HR tracked well as seen in the earlier parts. For example, in this section here it does track well until I stopped, gets confused at the stop, and then as soon as I start again it’s all over things:

As you can see, it’s kinda mixed.
Run #2: Central Park Interval Run
Next we’ve got a run I did in NYC’s Central Park. The first portion is largely just keeping a fairly even intensity, after which you see the first big spike in HR being the big hill, which I maintained pace and increased HR.
Following that, I did a set of 60s intervals (each lasting 60s, with 60s rest). I’d repeat this a number of times. The weather this day wasn’t too cold, I wore t-shirt and shorts (though most would have gone long-sleeve).

You can see it starts off ok for the first minute or two, and then the Vivosmart HR struggles for a bit as my HR stabilizes. It’s around the 10-minute marker that it seems to catch up and is happy. it remains happy through the hill climb, and then to the start of the intervals.
It’s the intervals though that prove more challenging. Let me zoom in on them (and I’ve smoothed them to 3s to make it slightly clearer):

What you see here is that the Vivosmart HR kinda gets it for the first one or two, and then seems to just totally lose the plot after that. The HRM-TRI and Scosche track fairly closely. Given these were short 60-second intervals, we see a slight lag of optical compared to chest strap.
Either way, I’d hardly say you could use the Vivosmart HR’s HR detail during this interval for any sort of analysis. But, as seen in some of my other runs, it tends to be better on longer intervals (of increased intensity) rather than these super-short intervals.
Run #3: Cold Weather Run
Last on the run comparisons is a colder weather run. This was just below freezing level, so in the grand scheme of cold, not horribly so. But kinda your average winter run temp-wise for most folks.
Here, the course was rolling, so my HR was equally rolling. Here’s the comparison:

I’m not really sure any further analysis is required, it sucked. Simple as that. However, by about the 30 minute marker, it did seem to improve a bit as I apparently warmed up. The device was at the edge of my sleeve, so that I could occasionally glance at it, while still being kinda protected by my long sleeve and gloves. The Scosche meanwhile mostly nailed it, but did have a few seconds here and there where it seemed to stumble briefly.
I did another run in similar temperatures and found the same with the Vivosmart HR. Which, to be fair, it’s not that surprising for wrist-based optical HR sensors that are exposed to the cold. Or more specifically, trying to measure blood-flow in an area of your body that’s cold, which can be very challenging.
Cycling: Outdoor
Next, I wanted to briefly include outdoor cycling. While the Vivosmart HR doesn’t include a cycling mode at all (unlike the original Vivosmart), it does include the re-broadcasting. So on one hand it’s odd to remove a feature from a previous generation, I kinda understand it. I suspect very few people ever used it, since it required additional cycling ANT+ sensors. And the only people who had those sensors likely already had a Garmin device for cycling.
In any event, here’s a ride I did turning on the ANT+ HR broadcasting option on the Vivosmart HR. On this ride it’s compared to a Garmin HRM-TRI strap, both of which are recorded on the Edge 520. As you can see, it’s nowhere near what I did.

Now I know my efforts for this ride, especially the middle part because I was doing steady-state sections on a local loop, you can see the slight ‘bump’ look to it as I descended the hill (decreasing the HR) each time. Ultimately, these two tracks look nothing like each other. And I’d like to say this is the only time, but basically each time I’ve ridden with it it’s all over the map.
Finally, just to add insult to injury here, there’s currently a bug where the Vivosmart HR will stop broadcasting your ANT+ HR if you receive a smartphone notification.
Smartphone Connected Features:

Of course, before we wrap things up, I wanted to touch briefly on the smartphone related features that are included in the Vivosmart HR. The Garmin Connect Mobile app will be used to setup to your phone, which is available now on iOS, Android, and Windows Phone.
First up is that the unit (obviously) integrates on a near constant basis with your phone, most notably for notifications, which are controlled via your smartphone notification center. That means that you won’t configure different notifications within the Garmin Connect app, but by whatever your phone does. You can turn this on and off though, through the options in the Vivosmart settings.
When a notification comes in, it’ll buzz on your wrist and show the first line or so of the text of the notification. Oddly though, it doesn’t respect the orientation arrangement if vertical, so it ends up being sideways again.

You can tap a notification to read it further, as well as clear it:

Now while you can set Do Not Disturb mode on your phone, and the Vivosmart HR will follow that, you can also set the same thing on the Vivosmart HR itself, which will silence the wearable while leaving your phone free to receive notifications:

Next, you can control music from the Vivosmart HR. Note however that this is just controlling music on your phone, and is NOT capable of storing music on the Vivosmart HR itself. Again, the Vivosmart HR does NOT have any music storage capacity. Just control.

Next, you’ll also have the option to see some of the weather, pulled from the Garmin Connect Mobile app on your phone:

When it comes to data sync (be it for steps or workouts), the unit is syncing behind the scenes throughout the day. However you can always manually sync it by just pressing the button on the Vivosmart HR and swiping to select the ‘Sync’ option:

That instantly sync’s things and gets everything all settled between the two devices.
Market Comparisons:

If you’re looking at this review, you’re likely looking for an activity tracker with optical HR sensing capabilities. As such, there are a handful of players in the market to consider. I’m going to keep things somewhat brief, because I’ve written reviews on all of these already. Thus I’m going to focus on the key differences to get you started in the decision making process:
Polar A360: While one might think the A360 is the most viable competitor to the Vivosmart HR, that’s just not the case today. The unit lacks features such as 24×7 HR recording, ability to re-broadcast one’s HR, and stair capability. Not to mention lack of music control, and HR readings that are far more inaccurate (in my testing) than the Vivosmart HR. In-depth review here.
Basis Peak: The Basis Peak is the best option for those that might not workout a lot, but still want tons of data metrics. It delivers quite a bit more data about your data (such as skin temperature and perspiration), as well as now having smartphone notifications. It does lack music control and weather, however. In-depth review here.
Fitbit Charge HR: The Fitbit Charge HR does a far better job than Garmin for 24×7 HR, but when it comes to workouts it is equally mixed. Further, the Charge HR doesn’t do full smartphone notifications (just phone alerts), let alone music control or weather. So it’s a more ‘basic’ version of what Garmin is delivering. Still, the Fitbit platform is widely popular, so if you already have friends there – it might be worthwhile to stay in that camp. In-depth review here.
Apple Watch: While a fair bit more expensive than the Vivosmart HR (by about $100 right now), this unit definitely does a better job at 24×7 HR, but is equally mixed when it comes to sport. Of course, the main appeal of the Apple Watch is the apps, but it does come at the price of being iOS-only. Further, the battery life is about 24-36hrs, versus 4-5 days for the Vivosmart HR.
Microsoft Band 2: Once you get to this price point (same as Apple Watch in the US anyway), you’re really looking at more competitive options from Garmin and others for a GPS watch. So it’s not a terribly fair comparison since we’re shifting the price up by double. But I wanted to mention it since I’m sure someone would ask. While the GPS accuracy of the Band 2 is pretty good from what I’ve seen, the HR accuracy isn’t all that great for anything more than steady-state. Further, the thing is terribly uncomfortable for me (no matter how I wear it).
There ya have it – the quick run-down of all the major options out there.
Summary:

On one hand, the Vivosmart HR is a relatively well executed smart-band, that cleanly displays your notifications and also tracks your HR. The battery life of about 4-5 days is pretty good, and the activity and sleep tracking aspects work well.
However, the main pitch of the Vivosmart HR is the optical HR sensor. After all, it’s part of the product name. And in that area, they’ve made too many sacrifices with the product. The battery tradeoffs have made the all-day and RHR functionality pretty much useless (which could easily be addressed by Garmin allowing you to increase sampling rates and decrease battery life). And then the optical HR sensor during workouts is very mixed. Some days and portions of the workout it’s great, and other days it’s just lost in space. Meanwhile, use in re-broadcasting during cycling is totally useless (which is pretty much the only time you’d use the broadcasting feature).
Thus, leaving me with a bit of a conflicted product. I’ve found it easy to wear over the past month in that it’s just sorta there and the notifications and step reminders do well. But, when push comes to shove, it’s going to be all over the map for the HR pieces. Some days it wakes up on the right side of the bed, and others it’s all upset about life. And ultimately, nobody wants someone unpredictable.
Found this review useful? Or just want a good deal? Here’s how:

Hopefully you found this review useful. At the end of the day, I’m an athlete just like you looking for the most detail possible on a new purchase – so my review is written from the standpoint of how I used the device. The reviews generally take a lot of hours to put together, so it’s a fair bit of work (and labor of love). As you probably noticed by looking below, I also take time to answer all the questions posted in the comments – and there’s quite a bit of detail in there as well.
I’ve partnered with Clever Training to offer all DC Rainmaker readers exclusive benefits on all products purchased. By joining the Clever Training VIP Program, you will earn 10% points on this item and 10% off (instantly) on thousands of other fitness products and accessories. Points can be used on your very next purchase at Clever Training for anything site-wide. You can read more about the details here. By joining, you not only support the site (and all the work I do here) – but you also get to enjoy the significant partnership benefits that are just for DC Rainmaker readers. And, since this item is more than $75, you get free 3-day (or less) US shipping as well.
Garmin Vivosmart HR (select drop-down for various colors/sizes)
Additionally, you can also use Amazon to purchase the units (though, no discount). Or, anything else you pickup on Amazon helps support the site as well (socks, laundry detergent, cowbells). If you’re outside the US, I’ve got links to all of the major individual country Amazon stores on the sidebar towards the top.
Thanks for reading! And as always, feel free to post comments or questions in the comments section below, I’ll be happy to try and answer them as quickly as possible.