AirDog Action Sports Drone In-Depth Review

Like most Kickstarter projects, it’s been a much longer road than anticipated to get their product off the ground. But unlike most Kickstarter projects, AirDog literally needed to get off the ground and into the air to be successful. It started almost two years ago in the summer of 2014, with the launch of their crowd-funded campaign for a sports-action focused drone that could film you while you did your thing.
And despite their (numerous) delays, the company now has a product that both externally and internally looks like what they initially promised way back when. Like 1,357 others, I bought the AirDog as part of their Kickstarter campaign. During this time I’d watched numerous other Kickstarter drone projects I’ve backed launch (and many of them flounder). So the real question for the AirDog is – does it actually work well?
And that’s what I set to figure out starting a few months ago. I was able to get a near-final production unit back in January, and have been using that until I recently received my production unit. For this review I’m basing my final textual thoughts on the production unit, though including video and lessons learned from three months of flying.
Let’s get going!
(Side note to new folks: If you’re not a huge sports person and are just now arriving to my little island for the first time, welcome! While this depth of review may seem crazy, it’s just the norm around here. Also, since I’m focused on sports, my posts tend to have more of a focus in that area. Enjoy!)
Unboxing:
So you finally got the box in-hand, after…well…a lot of waiting. Here’s what you’ll find:

First up is that it comes in a carrying case complete with a handle. This will be handy for the interim, though I think if you carry it around a lot like this, eventually the case will break. I’ll talk about my regular carrying bag for the AirDog throughout the post.

Next, you’ll go ahead and slide out the box to see everything safely packed inside.

Atop is the manuals and other paper stuff. This would be the rare exception in my reviews that I actually encourage you to read the manual after reading this post. By ‘encourage’, I mean – ‘implore you’ to read it. Seriously. Front to back, back to front. Upside-down. Especially on the modes, it’s semi-critical to not crashing your drone.
Removing those manuals off to the side, you’ll find all the components in their own little pocket.

Let’s put everything on the table:

Ok, walking through each piece. First up are the pieces for the battery charger:

They go together like so:

Next we’ve got the one included battery. It was loaded in the back of the AirDog, for those not keeping track:

The way the battery works is that it won’t enable/engage until the front wings are opened up. So you can store it within the drone for safekeeping. But here’s what it looks like sitting on the side of it:

Next we’ve got the wrist strap and controller/transmitter. There’s also a wrist strap extender if you’re wearing it over a winter jacket. Or if your arms are like Hulk Hogan.


Next we’ve got a spare landing gear. Definitely don’t lose that. You’ll likely need it after a flight or two. In fact, just order a few of them now while you’re ordering props and batteries. I’d go with a ratio of: One set of props to one part landing gear.

Then there’s the props. There are four unique props. Well, actually, technically there are two unique props that can be re-jigged to make four different props. But for the purposes of this discussion you have four different props (versus two different props on most other quad drones). You’ll note the text and tip coloring as the way to tell them apart.

Sidebar: In the event you buy extra boxes of props (as I did), they’ll come in this nifty prop case.


You can more clearly see how only two of the four props have text (near the center) on the ‘top’ of them. Whereas the other two have text on the flip-side. It sounds complex now, but I’ll make it sound easier later.

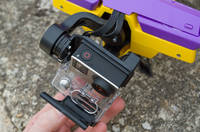
And finally, the AirDog itself from the gimbal side. The front is the part with the gimbal (already attached) that has the GoPro mount on it. You’ll supply your own GoPro and GoPro front case.

Okey doke, with that all set, let’s compare some sizes and then head outside.
Weight & Size Comparisons:
But first, just a quick look at how much it weighs and the size of it, as well as how it compares to the DJI Phantom 4 and HEXO+. Obviously, if I had endless drones I might include those too – but I don’t. I’ve got three Phantoms (2/3/4), a 3DR IRIS+, the HEXO+, and some random Kickstarter junk drones that I’ve never bothered to take out of the box. While the 3DR Solo was somewhat appealing, their very recent announcements make it rather clear the company is changing directions away from consumer drones. Thus I definitely wouldn’t buy into a platform that’s otherwise going to fade into the sunset.
So as it stands today, I think the below comparisons are the most obvious ones. First up, weight. I clock in the Airdog at 4.48 pounds (2.03 kilograms).

The HEXO+ comes in at 4.04lbs (1.83kg):

While the Phantom 4 comes in at 3.08lbs (1.39kg):

Then we’ve got size. This is best seen in two ways. First is just sitting on a table in a ‘transportable’ configuration:


In the above configuration the AirDog is far more transportable, because it’s quite a bit thinner than the P4. Also, the design is a bit more resilient to bangs (i.e. falling while skiing if it’s in a backpack). On the flipside, it takes a few extra seconds to get it unpacked & ready to fly than the P4 does. Here’s how I transport the AirDog – just a simple and cheap backpack:

The above backpack has room for a total of three batteries, plus all sorts of other random crap you might take with you during the day (i.e. food, action cam batteries, water bottle, etc)… So it’s not as if the AirDog is taking up 100% of the space.
And then next, once they are opened up on the pavement or such with all props attached:


You can see that the AirDog definitely expands a bit bigger than the Phantom 4 does, though still is ‘shorter’ (not that shortness matters at all once up in the air).
Ok, with that out of the way, let’s get flying.
Hardware Basics:

The AirDog is super easy to use…once you get the hang of it. I’m going to cover the basics here, but I’d encourage you to check-out my checklist section later on, as I go through the core things you need to know to avoid any snags (you can learn from my mistakes).
First up – the AirDog is incredibly travel friendly. Seriously, it’s built to take a beating – both in-flight and in-travel. Part of that comes from the fold-up design, which allows you to make it rather compact. Each leg folds out, and has a small button that you press to unlock the leg. The legs don’t ‘flop’ around, rather, actually take some effort to swivel out (a good thing). Here’s a little animated GIF of that:

Once everything is out, you’ll have four props to place on it. Now, the props are a bit confusing the first time you try it out, but all you need to know is: Text always faces the sky, then just match the colors up.
See, while the props actually can be inverted using a small tool – each prop has a very specific arm it needs to go on. They don’t label them 1-4 because then it makes it less easy to swap them around. Instead, you have two props that are inverted, and two props that are right-side-up. One of each category is either black, or silver edged. You can see the slight differences below at the base of the propeller cone:

But wait, there’s more! In addition to matching colors, there’s also text on just one side of each propeller. The key is that you simply ensure the text is always facing upwards at the end of the day. As long as you can stand over the drone and see the text on each prop – you’re golden!
Look here at the difference in how these are both facing upwards, but one is under-mounted, and one is over-mounted:


On the bottom you’ve got three pieces of landing gear. One on each of the two rear arms, and then a forward center landing gear.

While these are easy to use, I found that the center landing gear pins break easily. On the bright side, you can still use the drone if you just put some object below that spot in the event you break it while on vacation and don’t have access to another $5 landing gear handy.

Above is the main landing gear folded out, while below is one of the two rear landing gear pieces folded in – and then folded out.


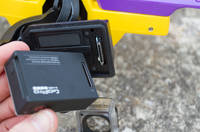
Next, you’ve got the battery. You’ll go ahead and push that in place. It locks in rather securely in the back – pretty straightforward:


On the battery is a small LED battery indicator. While it’s vaguely handy to use to quickly check whether a battery is full or not, I’ve learned not to depend on it. It’s better to just pretend the indicator doesn’t exist and instead just go with ‘empty pile’ or ‘full pile’.

Last but not least, we’ve got the AirDog leash. This is what you use to both control the AirDog, and keep it following you.

It snaps into the small armband that keeps it locked pretty securely in-place. Though, I think if I was doing watersports I’d probably also use a small tether/leash on it, just in case.

Before we get it up into the air, the AirDog does need you to provide a GoPro to capture video. It supports any GoPro Hero4 (Silver/Black) or GoPro Hero3/3+.

Note that it does NOT support the Hero4 Session, nor the GoPro Hero+. It also doesn’t support any other camera. That’s due to the unique gimbal design that basically is formed around the GoPro and creates a waterproof case:
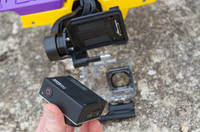
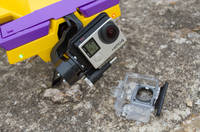
The gimbal is what keeps the GoPro level as well as pointed at you (automatically). Consider that the most fragile part of the drone, so try not to apply any direct significant pressure to it. Note that unlike some other consumer drones, there’s currently no control over the GoPro once in the air. Though the company behind the AirDog (Helico Aerospace Industries), has received official API approval and access from GoPro (very rare, only 3DR has it), they haven’t implemented at this stage. Thus once the GoPro leaves the ground it better be turned on, recording, and with whatever settings you wanted.
Flying with it:

Okey doke – so now you understand how it works and you’re ready to fly it. First up is taking it out of your bag and getting all the props on. There’s also turning it on and letting it find GPS. Once you become good at it, the entire process can take less than 2 minutes. To demonstrate that end to end (bag to airborne), I’ve put together this video below:
Now there are some caveats to the above video. First, and really most importantly is that I’ve flown with the unit that day once before. Second, it’ll have recently acquired GPS signal in that area (or nearby), thus reducing time to find GPS.
While the most recent firmware should minimize (if not entirely remove) the need for calibration pieces before flight, that may not always be the case.
These calibration (or sensor check) pieces can vary, as there are actually a multitude of different things you might need to calibrate. Be it the AirLeash or AirDog, and then within that there are different tests to do.

Some of these calibration tests may take only 30-45 seconds. But sometimes you’ll sit/stand there for dozens of minutes trying to get it all happy (especially after a firmware update). That’s why a key Pro Tip I’d give to folks is before you head out for the day, just get everything all validated and happy on flat and level ground somewhere where nobody is bugging you. Just budget 15 minutes for this. Perhaps you’ll only need 60 seconds.

Ok, so it’s time to go up in the air. At this point the remote should say ‘Ready’, and you’ll press the ‘Play’ button on the upper left corner of the remote. A moment later you’ll confirm that by pressing OK.


The AirDog will beep, the props will spin up, and then (hopefully) fly into the air. Just like this:

At this point it’ll go to the starting height you’ve set and wait for it’s next command. I highly recommend you take-off in a spot that allows you room to take off vertically, but also room for the AirDog to ‘float’ around once in the air (horizontally). That’s for two reasons.
First is that when it takes off it doesn’t immediately start following you (you can change that if you want though). Instead, it’ll just pause there and track you with the camera, but not go anywhere else. To start moving after you, you have to press the play button. But when you do that it may move to a different orientation from you (i.e. to your left or right). Which could whack into a tree/rock/etc if you’re in a tight space. You can also press the play/pause button to immediately pause it though.
The second reason is that I find that the AirDog doesn’t have a great GPS chipset in it, it drifts a bit. But it drifts a bit especially after take-off. In fact, the only two crashes I’ve had with the unit were immediately after take-off (in tight areas) where it just drifted into trees. Ironically, neither time was for sport purposes, but was just taking photos of it for this review. Go figure.
That drift seems to minimize significantly after it’s been in the air a few minutes. We’re only talking a few meters, but again, if you’re in a tight space – that few meters matters.
Ok, now it’s time to follow you. Before you do that (or if you want before it took off), go ahead and stick the AirLeash on it’s holder on your arm. This entire thing is fully waterproofed, so no issues with watersports.

With it already in the air you’ll press the ‘Play’ button and it’ll swing around to the position you’ve specified. You can adjust that position by pressing the left/right buttons on the controller. You can also press the up/down buttons on the controller to increase/decrease altitude. Within the app (or AirLeash) you can specify the reaction speed the buttons will have.

Now the exact method in which it follows you will depend on which sport mode you are using. For example, in Mountain Biking mode, it’ll follow your altitude profile. Meaning if you go up, it’ll go up. And if you go down, it’ll go down. Whereas in other sport modes it may keep the same altitude (i.e. watersports).

There are different modes for how it will track you (i.e. from which side). For example, you can specify that it always stays to your left, but in a different mode you can instead specify that it always stays to your east. While this may sound subtle, there’s a world of difference. I prefer the compass style method because I find most times I can mentally track this better, and the shifts in direction is usually less than if I turn my body.
Still, you will need to be very much aware of what’s going on around you. This is especially true in mountain environments where the road changes direction and what was ‘safe’ territory on your east in one second, is very much a rock wall the next.

It’s one reason why in general I like to fly ‘above’ any such obstructions. Remember that the AirDog doesn’t have any obstacle avoidance system. It’ll happily plow into trees in front of it. I’ve been lucky in that aside from my two photographic tree incidents, no such plowing has occurred while I was actually going anywhere. You really need to have a very good mental awareness of how high the drone is and how high the trees around you are. Same goes for any rocks, like this scene I shot:

While the AirDog has a ground avoidance system, I’d categorize that as ‘mostly useless’. That’s because unless you’re going very slow, it won’t trigger fast enough. Also, if the ground changes rapidly, it won’t trigger fast enough. That said, I did have one mind-bogglingly cool time where I had the unit off to my side off-road in the desert at low-altitude and the terrain under the AirDog quickly shifted up/down (like little speed bumps, but were 1-2 meters high). This caused the AirDog to instantly shoot up into the air when it got close to hitting the ground. I think I might have actually cleared the ground/bumps without this…maybe…hopefully, but it was nice that it did kick in and go upwards.
Lastly, when it comes to batteries, the AirDog isn’t too shabby. You can count on about 12-18 minutes of flight time per battery. I’d recommend having more than one battery.
By default it’ll start beeping at you on the transmitter when it gets below the 30% threshold, but it won’t force a landing yet. Which is a good time to talk about forced landings. See, the AirDog has two modes for what happens if it either loses contact with the transmitter, or runs out of juice:
– Option A: Spot Landing
– Option B: Return to Home Landing
Spot landing means it lands at the last known point of the controller. Whereas ‘Return to Home’, really means ‘Return to takeoff point’. Meaning, wherever you took off is where it’ll go to. I’ve tested both of these methods (both on purpose and on accident).
In something like Windsurfing (i.e. a watersport), you DEFINITELY want it to return to the starting point. But in the case of downhill skiing, you definitely don’t want that. The difference between the two means the difference between having your drone sink like the Titanic into the ocean blue, and having your drone land itself up atop a mountain while you’re thousands of feet below.
That said, I did have the unit impressively land itself back atop that @#$#@ mountain by itself one time – precisely on the edge of a cliff where I took off from. Gotta say, that was impressive!
So for most things that aren’t water related, I recommend spot landing. That means that you press the pause button, and then press the + button on the AirLeash (like ‘X marks the spot’) button, which means it’ll come and fly directly above you. Then you’ll press the “H” button to land the AirDog (looks like a Helicopter landing spot). It’ll land by itself though most times I just like to ‘catch’ it if the ground/terrain is rough or otherwise non-ideal for landing a drop on.

And there ya have it – most of what you want to know about flying it.
For fun, here’s three different videos I’ve shot with the AirDog. First, is my skiing video (shot on a beta unit):
For those curious, here’s the entire unedited video from take-off to landing. Note that since then AirDog (the company) have improved the gimbal a bit, so that should reduce the wobble some (that you saw in the video).
Next, I’ve got a few snippets of video goodness tied together from a cycling trip in Mallorca. You’ll find these here:
And another short clip I did earlier this winter while cycling just out in the countryside:
Finally, for fun, here’s a comparison of two clips between the DJI Phantom 4 Active Track mode, and the AirDog tracking. The key things to note are the gimbal/video quality. But while the Phantom 4 looks better, what’s notable is that when I got to the turnaround point, it lost tracking and stayed there. Whereas the AirDog did not lose tracking. Also note that the AirDog follows my elevation shift (very slight in this case, but there nonetheless), whereas the Phantom 4 stays at a constant altitude (it cannot automatically track/change altitude).
Oh, and lastly – note that the AirDog at this time CANNOT control the GoPro’s recording functions (nor settings). So you really need to remember to press the ‘Record’ button on your GoPro before taking off. AirDog says they’ve been granted access to the GoPro API’s/SDK’s, but I haven’t seen the fruits of that yet. I hope they prioritize that very highly in future firmware updates, because it’s a serious Sad Panda moment when you land 15 minutes later and realize you forgot to press record.
Firmware Updates:
Note that the AirDog does accept firmware updates, which are done via micro-USB cable to both the AirLeash (transmitter) and AirDog (drone) individually. You’ll need a Mac or PC to complete the firmware updates.
To begin you’ll download the AirDog software app. Then from there you’ll connect your computer to the drone or AirLeash (depending on what you want to update first). In this case, I’ve started with the AirLeash:

What’s nice is that drop-down box allows you to revert to older firmware versions easily, in case something is amiss and you need to go back a version (many companies make this rather tricky).
For the AirLeash, the entire update process takes only 1-2 minutes.

Next up, the AirDog itself. Simply connect it via micro-USB cable like the AirLeash was. The AirLeash doesn’t need to be powered on or even nearby. No, I don’t know why it doesn’t think it belongs to me either. Simply tap update like before. It took only takes a minute or two to update (far faster than the Phantom series usually takes).

And like before, a minute or two later and you’re all done. Quick and easy.
(Note: The ‘AirDog doesn’t belong to you’ message has since been resolved, as it wasn’t properly registering my AirDog initially.)
My Simple Checklist:

Having used the AirDog on many flights and trips now, I’ve figured out a simple checklist to ensure you’re capturing what you want, and not holding up either yourself or others:
Day of flight:
If the weather isn’t going to change much until your flight, then before you start the day:
1) Find a flat non-metal surface with GPS signal outside and get the unit turned on
2) Complete the tilt/calibration checks if required.
3) Simply take off.
4) Validate gimbal is level when in air
5) Land (I keep flight time under 30-45 seconds, thus minimal battery drain)
Pack it back up, and head on out!
Time for action:
Here’s the steps I go through each time I take off:
1) Turn on remote, let it find GPS while you do other steps.
2) Unpack AirDog, stick battery in prior to unfolding.
3) Put on props while it’s finding GPS.
4) If in sand/snow/mud, dig hole under optical sensors. Validate no rocks near props to hit.
5) Put aircraft on flat surface, wait for GPS ready.
6) Validate GoPro is recording, and on medium crop (my preference). Also validate things like low-light mode and related aren’t on (assuming it’s sunny out). And GoPro ProTune is on, if you plan to leverage it later for advanced editing.
7) On remote, validate correct sport mode, and correct landing type.
8) Take off, and enjoy!
If you do these short steps, you’ll generally get solid results each time with minimal headaches. Each one of those points is mostly tied back to a given ‘lesson’ I had to learn.
AirDog Quirks:

To say the AirDog is flawless would be untrue. It’s got quirks, no doubt. None are show-stoppers, but it’s simply not as easy to use (yet) as something like a DJI Phantom 3/4 or similar. On the flip-side, the Phantom simply doesn’t have the same level of tracking or autonomy that the AirDog has.
Some of these quirks are based on hardware decisions (and thus not changeable with just software changes), and others are based on software decisions (and likely easily addressable).
– Frequent Re-Calibration & Related Required: As noted earlier, there are a number of calibration checks that can/must be done on both the AirDog and AirLeash. After only a few times of use you’ll get very good at these checks. Unfortunately, they are required all too often, and can really put a damper on just getting out and using the drone when you have to unpredictably sit there and do 5-15 minutes of various checks. They’ve made some progress towards this in the latest firmware (v.21), but even that can still require a gauntlet of checks.
– Unable to change sport modes mid-flight. While you can manually take control from the drone in flight, there’s no way to change sport modes or introduce more ‘interesting’ video movies (i.e. a drone selfie or similar). From a cinematic standpoint, being able to quickly change modes during an activity is the difference between a boring movie and an exciting movie. Different shot types and styles is what keeps viewers interested. The good news is I think this could easily be accomplished in software. Note that you can pause the unit in flight, which is how I get many of the shots you see where I ski/bike/whatever past the drone.
– Batteries are not smart. In fact, they’re rather dumb. Now a ‘smart battery’ means that it knows its charge level at all times (and correctly so). However, with the AirDog batteries you must be actively in the air and flying to get the current battery state. Further, there are cases where the battery will misrepresent it’s LED-fill state on the ground as full, only to be in the air 30 seconds and get a low-battery warning. I’d strongly encourage you to not rely on the battery indicators and just instead keep batteries in separate piles. I don’t see a software fix for this. Update: They are now shipping only ‘Smart’ batteries to backers, and no longer the first generation batteries. Woot!
– The center landing gear breaks easily. Specifically the tiny little plastic pins snap off with little effort. On the bright side, it’s super-cheap to replace. But it’s more of a pain in the butt to have it broken than anything. As noted earlier, if you do break it during a trip – you can just put any object below the front of the unit during take-off (I used a spare battery, a glove, a ski binding, and even a snow-ball once). The box comes with an extra one, but honestly like props, I recommend you’d buy a few more sets.
– There’s no method to start recording your GoPro from the ground. I won’t mention the number of times I forgot this. The reason I’d forget is that sometimes the calibration/tilt process would be so long that by time you get the unit happy, you’ve totally forgot about the GoPro. Now, AirDog has said they’ve received approval to use the GoPro API’s (making it only them and 3DR, for drones). So hopefully that manifests itself soon with a simple start/record button.
– Gimbal quality isn’t of the same level as DJI. This means you’ll get slightly less smooth videos in some cases (depends on weather/movement/etc…).
Now the AirDog is both unforgiving and forgiving of your mistakes. For example, if you forget to change the landing mode from home (RTH) to spot (where you are) and the device loses connectivity while going down a mountain – then it will return to where it took off (and there’s no method to change this setting mid-flight). On the bright side, I found out that it’s thankfully very precise at that (since in my case I was on a cliff edge and it landed exactly where it needed to). Additionally, if there are trees in the way, it’ll happily fly right into them. It’s not going to avoid obstacles like the P4, but the P4 isn’t quite as robust in a tree environment (especially in winter) as marketing would like you to think, as it can’t easily pickup small branches on the obstacle avoidance system. Nor does it have sensors on top or sides/behind, so it’s only going forward (not up/left/right/back).
However, while the AirDog can also be unforgiving of mistakes – it’s also surprisingly resilient. For example, on one take-off from the snow the optical sensors got snow stuck covering them. This blocks the ground-avoidance capability. This meant that while I was skiing down a steep slope doing a bit of a orbit around me, it didn’t avoid the ground but rather hit it straight up. Astoundingly, despite getting all twirled about in the powder, it just bounced its way out and kept on going, catching back up to me moments later. (Tip of the day: dig a small hole for the optical sensors when taking off from snow, since it easily will touch the sensors/get stuck).
I’m optimistic though that most of the software quirks can be addressed in firmware updates – and the company seems eager to take user’s feedback on everything from features to simple wording changes.
Market Comparison:

So many of you are likely trying to decide what unit to get. I’m largely going to focus on three in this section, but I’m keenly aware there are many other quads/drones out there. However, drone hardware is commodity. There are hundreds of drone models that will fly in the air, and many more you can build yourself. What’s special is software (drone itself, control system, and then app functionality).
To that end, there is no better unit today for doing follow-me action sports. Especially sports that require you to travel to remote places and carry a unit with you in a compact form factor. The ease in which I can toss the AirDog in my backpack and just go with it is astounding. Sure, I have a backpack for my DJI Phantom 3/4, but it’s just not as compact or resilient.
The AirDog is built like a tank (for better or worse). It’s designed to be modular and breakable. If you break an arm (not just a prop), it’s simple to swap out and repair by yourself at low-cost. It’s also waterproof (though, they won’t officially claim it). The unit I used for the majority of these tests took two extended ocean swims (salt-water) prior to my use. They’ve done internal waterproofing to protect components.
On the flip-side, when it comes to controlling your unit while in the air for cinematic shots – there simply isn’t anywhere as much capability as the DJI Phantom 3/4 or 3DR Solo. Both have vast (and growing) features there. And looking at the gimbals, the AirDog gimbal simply isn’t as stable/perfect as that of DJI or 3DR.
So – you’ve gotta ask yourself – what are you using it for? It’s honestly as simple as this:
Solo action sports: If you’re going to be in a case where you want a unit to autonomously film you, then the AirDog is the unit you want. In this case, you don’t want to deal with anyone else controlling it. Though, in my experience with any downhill sports I strongly recommend having someone follow you, just in case you lose connectivity they can stay with the unit till it lands.
Cinematic shots: If you’re looking to use a drone to capture shots of other things besides you (landscape, others, etc…), then you’ll get far better shots with a DJI Phantom 3/4 or 3DR Solo (assuming you can or learn how to fly either of those well). Those platforms are designed to allow you to see your camera in real-time and nail the shot on the first try. But those platforms aren’t designed to follow-you.
You may say ‘But DJI has a follow-me mode, and now Active Track!!’. Sure, they do. But it sucks. There’s so many reasons it’s not ideal for action sports. First, it doesn’t deal with altitude changes at all (up or down). So it’ll just stay level as you go down-hill. Second, with the P3 you have to take the physical RC controller (the big white thing), along with the phone attached to it. So that’s fine if you’re in a car and just stick it on the seat. But where do you put that in a backpack? Or surfing?
With the P4, it’ll follow you using object recognition – but quite frankly it’s rough too for action sports. It’ll follow in many cases, but you’ll be left standing there in numerous others without explanation for why it stopped tracking. On the flip side, it does have forward obstacle avoidance (but won’t keep you from flying upwards into a tree, since it has no sensors on top). So the AirDog lacks the forward obstacle avoidance, but does have downwards ground avoidance.
Finally, a few quick thoughts on other competitors in the space:
HEXO+: In my buying spree two summers ago, I also bought the HEXO+. My two main beefs with it are that it’s massive to take with you while in sport (compared to Airdog, or even the P4). And second, the battery is pretty horrible. When I last tried last about a month or two ago, I was in the 6-10 minute range. Also, you use your phone for tracking, which just isn’t as convenient for sports as the dedicated transmitter of the AirLeash/Airdog combo.
GoPro Karma: Quite simply, we don’t know enough about this yet. It’s been touted as being sometime “early 2016”, which all signs are currently sounding like June. But we don’t know if it’s aligned more towards the Phantom series, or aligned more towards sports (i.e. Airdog).
Lily: This could be very tempting, and the team has done a good job of going from what was a fairly well faked marketing/kickoff video to showing off lots of footage weekly on their current prototypes. No doubt they’ve raised tons of money, but right now the quality of footage isn’t anywhere near their initial marketing promises. Still, I’m optimistic they’ll work it out. It’s just a question of when.
So to sum it up – if I’m controlling the shots for non-sports, it’ll be my Phantom 3 & 4 any day of the week. But if it’s me cycling, skiing, or doing some other sport by myself – then it’ll be my AirDog.
Summary:

While the AirDog technically isn’t the first drone to introduce a follow-me feature, it is the first one that truly works with action sports for more than just a few seconds. It easily follows elevation shifts, it can be easily used in wet/watery environments, and can be easily transported in a simple and small backpack. All while capturing quality at the level of your GoPro (currently up to 4K resolution).
For a first generation product it’s pretty impressive, even if the wait was longer than any of us really wanted. Is it flawless? No. There are many little quirks I’d like to see addressed, either in this product via software updates, or perhaps down the road in a different hardware model. But they’ve got a very solid the core platform to work from. The updates and tweaks I want aren’t earth-shattering things. They’re mostly around making it easier to film (more modes), and getting better gimbal quality out of those films (all resulting in more creative videos). The structural design of the AirDog, beefy yet compact and foldable, is one of its best assets.
As for which drone I’ll use? Well, it’ll depend on my purposes that day/trip. If I’m going out to capture video of myself (solo) while cycling/skiing/running/etc, it’s going to be with the AirDog. No doubt. Whereas if I’m trying to capture more cinematic/photographic shots of landscape/etc, then it’s likely to be my DJI Phantom 4. The grey area is when I’ve got someone else with me who is a good enough drone pilot to correctly follow me and get the shots I want. In that case it’ll depend a bit on the environment and the circumstances, but if I’m covering larger distances I’ll likely go with AirDog. Whereas with shorter distances it’d be the Phantom series.
With that – thanks for reading all!
Found this review useful? Support the site! Read on!

Hopefully you found this review useful. At the end of the day, I’m an athlete just like you looking for the most detail possible on a new purchase – so my review is written from the standpoint of how I used the device. The reviews generally take a lot of hours to put together, so it’s a fair bit of work (and labor of love). As you probably noticed by looking below, I also take time to answer all the questions posted in the comments – and there’s quite a bit of detail in there as well.
If you’re a fan of Amazon, you can pickup the AirDog and it helps support the site! It doesn’t cost you anything extra, yet helps here a bunch. If you’re outside the US, it should automatically find the right Amazon country for you – but you can always use the big Amazon country links on the right sidebar if so! Oh, and in the future if you just click that Amazon logo before buying anything else (like laundry detergent or toilet paper), that supports the site too!
And of course – you can always sign-up to be a DCR Supporter! That gets you an ad-free DCR, and also makes you awesome. And being awesome is what it’s all about!
Thanks for reading! And as always, feel free to post comments or questions in the comments section below, I’ll be happy to try and answer them as quickly as possible. And lastly, if you felt this review was useful – I always appreciate feedback in the comments below. Thanks!