Redshift Sports Aero System In-Depth Review

Every once in a while an endurance sports product comes out that piques my interest, even if it’s not directly a sports technology item. A perfect example of that would be the Redshift Aero system. I’ve followed it since they first launched on Kickstarter a year or so ago, and then continued to check in with them at various events like Interbike. That culminated back this past spring when they sent out a final production unit for me to try out, which I’ve been poking at since.
So why the interest here? Well, the Redshift Aero system essentially allows you to convert your road bike into a triathlon bike. That in and of itself isn’t unique – there are tons of products on the market that do that. What is unique though is that you can instantly do so (in a few seconds), and convert it back to a traditional road bike configuration in a few seconds as well. That’s ideal for triathletes that may spend more time as a roadie (or rather, with roadies). Further, it’s perfect for someone like me that still might stumble into the rare draft-legal race (such as in Europe) which don’t typically permit aerobars on bikes.
So with that brief overview, let’s dive into things a bit.
Unboxing:

The unboxing in my case was a bit more of an unbagging. Redshift has just recently shifted to actual boxes now, so there’s a legit piece of cardboard as opposed to plastic bags. But no worries, aside from one further item of note, it’s all the same goods inside.
There’s actually three major components here to unwrap, depending on which components you buy. First up is the dual-position seatpost. This is by far my favorite from an unboxing standpoint.

Why’s it my favorite to unbox? Well…because it has precisely one piece. Thus, unboxing done:

You’ll notice that the seatpost flips forward and back, but I’ll cover that a bit later in more detail.


Next we’ve got the aerobars. This is the biggie from an unboxing standpoint:

First you’ve got a bunch of little bags inside the bigger bag (or rather box these days):

After getting rid of all the plastic, you’ll be here:

Now this is a undoubtedly a bit daunting. But, I’ll give you an insider secret: The vast majority of these are spare parts. Thus it’s confusing. Which is why Redshift has since put in a separate bag all the spare parts and just kept the core essentials in the main kit.
What you’ll notice though is that you’ve basically got: The aerobars themselves, the armrests, armrest pads, and then the mounts that attach it to your bike. Everything else is for adjusting fit and/or spare parts. For example to the right of the screws seen above you have spacers that can increase the height if need be.
Last but not least we have the water bottle and bike computer accessories. Note that these are two separate accessories from a purchasing standpoint.

Below you can see the water bottle in the upper half of the photo. It simply has a single screw that attaches to the aerobar base mount.

Meanwhile, in the lower portion of the photo you’ll see the bike computer mount. It too only has a single screw to worry about installing, though it contains two screws depending on which position you want to install it in. Both of these components I’ll cover within the individual component sections.
Installation:

As I noted earlier – the instructions seem daunting. But in reality, they’re not. Especially once you realize that basically everything is already put together for you and all those random parts aren’t needed (nor are half the instructions). So basically you can skip a good chunk of the instructions unless you need to significantly change something.
We’ll start with the aerobars first. Note that Redshift sells two variants of the aerobars, one is a carbon aerobar and the other is an aluminum aerobar. For the seatpost, it’s just aluminum, though they are looking at carbon offerings down the road.
The core component that keeps the aerobars in place are the mounting brackets that connect to your handlebars. This simply requires hex-wrenching in two bolts on each mounting bracket (forward/rear).

Your width between the two mounting pieces will vary depending on how aggressive you want your position to be. Typically speaking the closer the two brackets the more ‘aggressive’ a position is considered to be. Whereas a wider position is considered to be more open. In my case, I attempted to simulate the width on my triathlon bike, which required me to put these as close as possible.

Note that the brackets can be rotated up or down in angle to achieve a perfectly level set of aerobars. Though, you can certainly adjust them in case you want a slight rise to the aerobars.
Next you’ve got the armrests. These have a ton of flexibility in terms of different mounting positions. You can see below that you’re able to slide the pad base forward/backwards as well as left/right into numerous positions.

This is true of both left/right armrests of course, which each have two mounting screws.

Further, the actual bars themselves can be slid forward/back as well, in case you want them slightly further or closer to you from a bend standpoint. Speaking of which, Redshift actually offers two aerobar bend configurations. One is considered an ‘S-bend’ (the one I have), and the other is more of a single-point angle (called the ‘L-bend’).

With the bars and armrests set, you’ll plop on pads. Like most offerings on the market, these simply Velcro to the plate and can be easily removed. Additionally, you can also get a few pairs of them – which allows you to wash them easier and reduce (or replace) the stank that often develops (well, it does for me anyway). I often replace my aerobar pads once a year.

Next up we’ve got the seatpost. The unit doesn’t come with a seat, rather, you’ll just take that off your existing bike seatpost.

You’ll see that you can adjust the exact position of the seat on the rails forward and backwards, as well as use the two screws to adjust the exact forward pitch of the seat.

Installation of the completed seatpost onto your bike is pretty much silly simple. You take the tube, and stick it in the hole. Most adults should be familiar with such a procedure.


Then simply tighten it up using your bike’s existing tightening nut. Like all other bike parts you’d ideally tighten it with a torque wrench to ensure proper tightening. But in my case I just took a swag from years of seat-post installation.

Note that on the back are measurements – allowing you to easily refer back in the event you travel with the bike and need to remove the seatpost. Kinda handy.

Next up on installation we’ve got the first of two accessories: the water bottle cage.
This installs to the side of either of the two aerobar pads. You can simply flip the water bottle cage baseplate over to switch it from left or right.

Now in my case the armpads overlapped this area a tiny bit, so I had to temporarily remove an armpad plate to affix the water bottle cage, and then I was able to put it back in place.

Once I was done, I simply slid the water bottle in. It’s like every other water bottle cage out there, thus, nothing special there from an operational standpoint.

Last but not least, we’ve got the bike computer mount. This comes with two screws. The bigger of the two screws allows you to mount it forward of your handlebars between the aerobars, while the smaller screw allows you to mount it directly to the water bottle holder behind the bottle.

Here you can see me mounting it ahead of the handlebar – directly replacing one of the two aerobar mounting bracket screws.

Alternatively, I can mount it directly behind the water bottle cage onto the back end of that baseplate.

Ok, with everything installed lets talk about day to day usage.
Usage – The Aerobars:
When it comes to the Redshift system, I personally find the aerobars the coolest component of the set. Mostly because of the engineering that clearly went into designing such a system that’s so easy to use, yet knowingly so complex to get designed right.
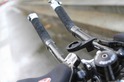
To start though, let’s cover how you actually clip on and off the aerobars. The system works by starting with the always-on your handlebar mounting brackets. These will remain on your bike at all times. You can see them in the photo below on either side of the head tube.

Next, you’ll grab the aerobar (either left or right). When not in use you’ll have those two pieces floating around: The left side, and the right side. The pads and (if purchased) water bottle cage stay attached to the aerobar itself as one solid piece.

You’ll notice how both my left and right hands above are holding onto two metal pieces and pulling them up. I’m actually pulling up a spring that is used to lock a bar down in place and act as a security measure.

Next, I’ll slide the aerobar in from the side and release the spring, which releases the locking mechanism down in a slot preventing the bar from sliding left/right.

Finally, I’ll use a bike-skewer like lever to further lock and tighten the entire component into place.

You then complete the other side, which ultimately gets you here:

Want that in video form? No problem, here’s the whole process from start to finish in less than 30 seconds. It normally takes about 10 seconds per aerobar, and that’s even with stumbling slightly on the second one as I tightened it too much and had to loosen it a bit in order to put the safety clamp down. Plus, I was trying not to block the camera so a bit slower.
So with that overview – how about stability?
Well, that was my single biggest concern. Having once screwed up re-attaching/tightening aerobars after traveling with my bike and then finding myself mid-race with the bars sliding down, it was an area I was skeptical of.
There are actually two separate pieces I was looking at. First was how well the mounting bracket kept attached to the handlebars. Did it move or slide (either forward or side to side)? And did it offer any play at the attachment point to the handlebars? The answer to both was a resounding no. I’m pretty sure I could have actually sat on my aerobars and it would have stayed put. I was very happy there.

The second piece I was looking at was lateral play in the system from the mounting bracket to aerobar attachment point. Did bumps in the road cause any jostling of the aerobars? And was there any play in the armpad area? Again, a clear ‘no’. I took it up and down, and all around through the cobbled streets of Paris, including up and down the famed Champs-Élysées. No vibrations and no unexpected wonkiness. And certainly nothing on more regular roads outside the city as well.
From the standpoint of the aerobars, they’re about as perfect of a clip-on aerobar as I can imagine. Super-easy to remove and put back on, but equally as easy to tweak the configuration if need be.
Usage – The Seatpost:

The next piece of the Redshift system is the changeable seatpost. Like the aerobars, you can purchase this separately or as part of a larger kit. The key benefit to the seatpost is that it allows you to shift forward your seat to replicate a more triathlon-specific fit – thus putting you further over the aerobars. Then, when you’re sans-aerobars it allows you to shift back into a traditional road configuration.
See these two images to understand the difference – focusing specifically on the hinged section directly below the seat:


It does this using a joint that flips up and forward (or back). To prevent unexpected flippage, the system effectively leverages your own body weight as a secondary lock. The primary lock is that you really have to give it a solid tug up first and then in the direction you’re moving. Attempting to move it directly forward or back doesn’t usually net anything. The whole hinge feels almost magnetic in that it wants to lock/pull to one side or the other, there’s no middle ground.
Here it is in action:

In my testing I found it almost perfect. I had a single instance – on a trainer no less – where it flipped somewhat unexpectedly. In that situation I was just standing up on the pedals briefly and the inside of my cycling shorts had managed to catch it in an awkward way that actually completed the up and back movement, thus snapping it into place in the rear position. For most triathletes you tend not to go into a standing position, so it’s less of a concern. And for roadies who are doing standing sprints/etc, the seat being in the rear position is far less prone to accidental flippage because the seat is further back.
In the event accidental flippage does occur though, getting it back into the correct position merely required standing back up and reaching down to the seat and pulling up and forward and I was back in place. I later tried doing so outdoors mid-ride (manually changing positions if I needed to), and found it’s pretty straight forward. If you can grab a water bottle, you can change the seatpost (again, not ideal, but it’s not the end of the world if it does). And remember, as long as you’re sitting on it, it can’t actually go anywhere.
Finally note that the shift in position moves the entire seat forward 50mm, and changes the effective seat tube angle by roughly 3-4° (degrees). However, the saddle height to bottom bracket actually remains the same since you see the slight shift upwards. The Redshift folks point out that the seat tube angle is not quite as steep as a traditional triathlon bike geometry as doing so on a road bike would likely put you too far forward from a steering standpoint – so it’s a small bit of compromise there.
Usage – The Water Bottle Cage:
For most triathletes, proper nutrition and hydration are typically the biggest obstacle to a successful race. Fail to hydrate on a hot day and no matter how much training you’ve put in, your performance will flounder. As has been the popular trend over the past 3-4 years, Redshift offers a water bottle attachment within the aero bars. Many companies have been going this way (horizontal water bottles) as in some cases it’s found to be more aerodynamic than front mounted systems (or nothing at all).
The aero bottle system is essentially three pieces: A water bottle, a water bottle cage, and a platform that holds those and connects to one of your aerobars.

The platform uses a single screw to attach to the side of the left or right aerobar (simply flip it over), where it then holds the cage/bottle.

It’s just a standard cage so you can put just about any bottle you’d like in there.

Otherwise, the cage holder works pretty much just like any other water bottle holder. Note again that it’s attached to the aerobars, so when you remove the aerobars you’re also removing the water bottle cage with it.
Usage – The Bike Computer Mount:
Last up you’ve got about the only sport-technology specific piece of the entire equation: The bike computer mount. This universal mount allows you to mount just about any bike computer…or action camera…onto your aerobars in a centered location that’s more easily viewable than the handlebars.
We left off in the installation section with the unit attached in the forward position, directly to the aerobar mounting bracket on your handlebars.

So this means that the bike computer will be there regardless of whether you have the aerobars in place. For most, this is actually probably ideal – since it acts like an out-front mount that people otherwise pay extra for.
Once attached, it sits there just like a standard road bike out-front mount:


Note that it works well for smaller watch units, but you might need to re-think some of the larger Edge units due to the quarter-turn mount. For example I wasn’t able to fit the Edge 1000 in there. This is because the mount sits slightly below the bars, so it actually blocks me being able to place the unit in sideways to complete the quarter-turn motion. (Update: A reader pointed out that you could actually remove the aerobars quickly, install the Edge 1000, then put back the aerobars – which would indeed work. Thanks!).

Of course this is directly related to how wide the distance is between my aerobars. If I had made it a bit wider, it would have then fit.
Now the only downside to being an out-front mount is that because of that the bike computer sits a bit further back, compared to mounting the unit more forward on the aerobars. For me personally while in aero position I find it slightly behind my desired locale – which would be a bit further up the aerobars. Additionally, you can’t really use it in that same position with the water bottle holder because it would sit below the bottle.
Alternatively, you can always get something like the Barfly mount instead, à la what I’ve done on my regular triathlon bike.
Or, you can also just mount it behind the water bottle on the water bottle holder using the second provided screw:


Last but not least, the front computer mount location actually makes for a bit of an action cam mount in a pinch.

It’s not perfect though because you’ll get a tiny bit of vibration/flux there due to the weight of an action cam and that the mount is only supported on a single side. But if you’re only using it sparingly and on relatively smooth roads then you’ll likely be fine. But if you’re looking at cobblestones you may want to consider a true action cam mount that’s a bit more stable.

For those curious, I tried the K-Edge GoPro mount, but it’s too wide. So you’d need some sort of rubber piece in between to fill the gap (sorta like I have to the left of the mount).

Overall though, in my opinion if you’re getting the bars you should at least get something (from Redshift or otherwise) to mount your bike computer more forward than just on the bike itself.
Brief guidance on road bike versus tri bike:

Many of you have asked about my thoughts on road bikes versus triathlon bikes. I’ve written about it in the past here a bit, both in that post and in my post on getting into triathlons. And largely speaking, those posts still stand as fully relevant.
I should preface I’m not a bike fitter, nor do I play one on TV (though, I do use a cool app to pretend from time to time). And to that end, the decision between a road bike and a tri bike is heavily weighted from the fit perspective. The other pieces that weigh heavily on that decision is which races you’re participating in and how new you are to the sport.
In general I’d suggest that if you’re just getting into the sport then a clip-on system is the best way to go. It allows you to take an existing road bike and make it a suitable triathlon bike for certain race lengths. A system like Redshift is at a premium over cheaper clip-on products. That premium is simply because it’s far more convenient to go back and forth between road and tri.
Overall, I’d suggest that if you’re doing a sprint or Olympic distance triathlon, and aren’t at the pointy end of the pack – then a road bike clip-on bars of some sort is more than sufficient. Especially if you’re new to the sport and aren’t really sure if you even like triathlon yet.
If you’re looking at a full-iron distance, than I’d strongly recommend a triathlon bike. The reason is that those bikes are designed from a fit standpoint for getting into the aero position for 5+ hours.
It’s the half-iron distance where things are tricky. If you’re a regular – then going with a tri bike makes sense. If it’s your first year and a 70.3 race is your ‘A’ race and you aren’t sure if you’ll be doing future tri’s, then going with a clip-on is more logical. After all, you can complete a 70.3 just fine on clip-on bars – as I’ve done in the past. But, if the 70.3 is a pitstop to more 70.3’s or to other longer races, then I’d recommending biting the bullet and getting the tri bike.
Ultimately though there is no perfect answer here, as it just depends a bit on your personal requirements and future race plans.
Summary:

Overall I’m really impressed with the Redshift system. It performs exactly as you’d anticipate and does so without any issues. The fit flexibility of the system is on par with most aerobar systems on the market, yet with the significant added benefit of being able to remove the aerobars on demand. Meanwhile, the seatpost is highly unique in the market and fills the gap for folks wanting to be able to maintain a better fit across both road and triathlon positions.
Of course, these added benefits do come at a cost premium. The Redshift aerobars are about double that of generic clip-on aerobars. Thus I’d focus my recommendation here on people that want the flexibility to go from road to tri and back to road as needed from ride to ride. For example, on group rides that discourage aerobars (or, with roadies that look down on those with aerobars). Additionally, for those in Europe that may come across the stray draft-legal triathlon race that prohibits aerobars, this offers a happy medium.
As always, if you’ve got any questions – feel free to drop them below!
Found this review useful? Or just wanna save a bundle of cash? Here’s how:
Hopefully you found this review useful. At the end of the day, I’m an athlete just like you looking for the most detail possible on a new purchase – so my review is written from the standpoint of how I used the device. The reviews generally take a lot of hours to put together, so it’s a fair bit of work (and labor of love). As you probably noticed by looking below, I also take time to answer all the questions posted in the comments – and there’s quite a bit of detail in there as well. 
I’ve partnered with Clever Training to offer all DC Rainmaker readers an exclusive 10% discount across the board on all products (except clearance items). You can pickup the Redshift system below. Then receive 10% off of everything in your cart by adding code DCR10BTF at checkout. By doing so, you not only support the site (and all the work I do here) – but you also get a sweet discount. And, since this item is more than $75, you get free US shipping as well.
Redshift Sports Dual-Position Seatpost
Redshift Sports Quick-Release Aerobars Aluminum (select dropdown for S or L bend models)
Redshift Sports Complete System Aluminum (Aerobars & Seatpost)
Redshift Sports Quick-Release Aerobars Carbon (select dropdown for S or L bend models)
Redshift Sports Complete System Carbon (Aerobars + Seatpost)
Additionally, you can also use Amazon to purchase the Redshift system and accessories (though, no discount). Or, anything else you pickup on Amazon helps support the site as well (socks, laundry detergent, cowbells). If you’re outside the US, I’ve got links to all of the major individual country Amazon stores on the sidebar towards the top.
As you’ve seen throughout the review there are numerous compatible accessories and variations (models/bundles/etc…) for the system. I’ve consolidated them all into the below chart:
Copyright DC Rainmaker – Updated August 1st, 2016 @ 4:55 pm
Redshift Sports Complete System Aluminum (Aerobars & Seatpost)Redshift Sports$299LinkLinkLink
Redshift Sports Complete System Carbon (Aerobars & Seatpost)Redshift Sports$369LinkLinkLink
Redshift Sports Computer Mount for AerobarsRedshift Sports$19LinkLinkLink
Redshift Sports Dual-Position Seatpost 27.2mm x 350mmRedshift Sports$159LinkLinkLink
Redshift Sports Quick-Release Aerobars AluminumRedshift Sports$169LinkLinkLink
Redshift Sports Quick-Release Aerobars CarbonRedshift Sports$239LinkLinkLink
Redshift Sports Water Bottle Mount for Aerobars Includes Water Bottle CageRedshift Sports$29LinkLinkLink
Thanks for reading! And as always, feel free to post comments or questions in the comments section below, I’ll be happy to try and answer them as quickly as possible.