Checking out the EZ-Trainer iPad ANT+ App
With the introduction of the Wahoo Fitness ANT+ Dongle last year, there’s been a flood of iPhone apps that have supported adding ANT+ data (Heart Rate, Power, Speed, Cadence, Weight Scales, etc…). Everything from small apps you’ve never heard of, to the biggies like MapMyRide/Run and RunKeeper. Pretty much everyone who is someone is now supporting the dongle in their fitness apps. Applications using it have ranged the functional gamut from your typical run tracking apps, to ones that will use it to change diagnostic/calibration values on power meters.
However, despite the fact that the dongle has always been supported on the iPad, there really hadn’t been any specific-made apps for it. So I was pretty jazzed to be able to play with the only purpose made app that I’m aware of for the iPad, over the past few months. What’s even cooler is that the developer of the app is just down the street from me here in DC, I like supporting the little guy (iNtervalSoft) – especially when it’s the local little guy.
So, what is this app? Well, it’s a trainer app that allows you see your ANT+ data overlaid onto media of your choice. This way you can both watch that movie you downloaded and have your training data overlaid directly on the screen. Additionally, you can either download cycling videos (the ones you know and love today), or even create your own. In fact, this weekend on one of my rides I’m going to create my own using the GoPro HD that I bought earlier this week. It’ll be pretty cool…cause…well…I created it.
So – let’s take a look at the app, starting with what it ultimately looks like once you’ve got it all finished up and riding on a trainer:

So with the preview out of the way, let’s start back at the beginning with the normal setup of the app after you install it via the iTunes app store. You’ll be brought to this general setup page:

It’s here that you configure details like wheel size (for distance) and age/weight (for calorie calculations). Additionally, you can setup either power or heart rate zones here, these will be displayed later on within the workout screen:

You probably also noted from the above that you can setup a remote control…but we’ll get to that in a minute. First, let’s finish with the setup and pair our ANT+ sensors. To do this we head on over to the Sensor Setup area and simply tap each sensor type we want to connect to. It’ll automatically go out and find sensors within that ANT+ Device Profile type. It typically takes just 1-3 seconds per sensor. If you have multiple ANT+ enabled bikes nearby, you’ll need to ensure that you’ve got the right stuff paired – though once you do, it’ll stay saved for future use.

Last but not least, before you start we’ll want to add some videos or music to play. While music pulls from your available music, the video requires that you can add videos via iTunes sharing from your ‘personal collection’. Note though that Apple doesn’t allow Apps to playback protected content from within the App itself, so downloaded TV shows and movies from the iTunes Store aren’t viewable here. But if you have ripped movies or TV shows yourself or from the Internet, those are most definitely allowed. You simply tap each item you want to enable it in the queue to watch:

And here’s where you add music if you want:

Finally, with all that set, let’s get on with the show by pressing the big ole “Start Trainer Workout” button:

At this point, you’ll want to start pedaling. As you do so, you’ll see your ANT+ metrics displayed directly on the screen. The metrics are overlaid on any content you like – so it need not be pretty cycling stuff, but rather instead can be something more edgy…you know…like a movie about sharks that I star in:

You can also drag/drop/hide/unhide any of the visual components anywhere you want on the screen – should you prefer a more obstructed view:

Of course, the biggest question you’re gonna ask yourself is where on earth to put the iPad. I’ve tried a slew of locations. First, was up against the wall:

Then there was on-a-box near the wall:

Then there was on-a-box near me:

And finally, the surprisingly effective on-the-aerobars approach. Though, the drawback to the aerobars approach being it makes the aerobars pretty much unusable. And of course, the fact that your bike might not have aerobars.

Nonetheless, the exact placement of the device is something I put in the category of ‘utilize your creativity’.
Some folks on forums have pointed out/asked why you’d want to display all this on such a small screen – versus a larger screen. I think it depends. If your training room is size limited (like a dorm/small apartment), the iPad might fit just perfectly in that arrangement. But more importantly, it’s the only computer-based platform aside from the TACX or CompuTrainer that allows you to display your actual data in real-time (ok, Golden Cheetah has it too these days). It also should be noted that Apple doesn’t yet allow applications to use Airplay to funnel full app display to another screen (such as an Apple TV), and because the dongle blocks the connector port, you can’t connect it to a display that way either. I think eventually this problem will get solved, but it’s baby steps for Apple here.
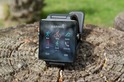
Finally, placement brings up the question of how you control the iPad if you place it out of reach – for example, should you want to create laps by tapping the lap button. For that the developer created a free iPhone Remote Control app that pairs via Bluetooth to the iPad and controls it. Just like a typical remote control:

I do suppose this would mean you’d have to have an iPhone to go along with it if you wanted to control it remotely. Failing that, I’d suggest a bowl full of Jelly Beans to chuck at the iPad buttons from across the room.

Once you’ve finished up the workout, you’re able to go ahead and view a basic graph of it, as well as check out some simplistic stats:

(Above: A relatively sustained effort. Below: Fun with 30×30’s)

The primary goal of the app at this stage is just to record the data and keep you entertained via the media playback – not so much as an analysis powerhouse. For that, you’ll click the little buttons to export the data off to Training Peaks. The data’s all there recorded at 1-second intervals – so any app can take advantage of that.

Now that I’ve given you a bit of a run through, let’s walk through some of my thoughts in a more direct manner:
Pro’s:
– Clean and pretty user interface – well put together
– Allows you to easily overlay your live training ANT+ data onto iPad
– Simple to watch both media content and your training data at the same time
– Integrates with existing dongle that already works with other iPhone apps
– Uploads to Training Peaks, data looks flawless
– Plans in the works to have in-app purchases of cycling videos to ride against
– The app is a heck of a lot cheaper than some trainers that do almost the same thing
Con’s:
– Can’t view iTunes Rights Protected Content (i.e. TV shows) due to Apple Restrictions
– The iPad is a far more expensive option than any ANT+ head unit, but if you already have it…
– Not designed for analysis of workouts, just recording and uploading them to other applications
– Doesn’t actually control the video playback speed like a CompuTrainer would
I think EZ-Trainer by offers a good way to finally find a non-web-surfing use for your iPad (something I honestly struggle with somewhat daily). If you already have the $80 ANT+ iPhone dongle and an iPad it makes for a super easy trainer application. Though I do think that the potential to do more integration with videos and things like racing against friends offers a ton of coolness down the road. I’m also really looking forward to the opportunity to make my own little road cycling videos (this weekend) that I can put on in the background for my 3-4 times weekly trainer rides. Assuming I can find a free way to do it, I’ll make those available to anyone who wants to download them (simple video file).
Finally, for those with the oversized iPhone (iPad), you can hit up this iTunes link and do your magic there ($14). The remote app is free.
Thanks for reading!